
10 Easy DIY Ceiling Tote Sliding Storage Tracks for Garages
Ceiling-mounted storage tracks present an efficient solution for maximizing unused vertical space within residential garages, transforming empty overhead areas into functional organizational systems. Implementing overhead tote sliding tracks allows homeowners to lift bulky, seasonal, or infrequently used items off the garage floor, thereby creating a cleaner and safer physical environment. This long-form guide provides comprehensive Pinterest ideas, practical installation advice, and structural considerations for building custom wooden or metallic channels designed to hold plastic totes securely. Readers will discover how to measure overhead joists, select durable materials, build high-capacity wooden or metal channels, and organize storage containers for optimal weight distribution. Utilizing overhead garage space addresses the common challenge of floor clutter while protecting household goods from potential water damage, dust, and physical impact. By installing an accessible overhead sliding system, garage space transforms into an organized, efficient workspace capable of storing heavy gear cleanly out of sight. The structural principles outlined throughout this tutorial focus on safety, long-term durability, straightforward installation steps, and high spatial utility for homeowners seeking actionable organization solutions.
Overhead sliding tote track systems have become wildly popular on Pinterest boards due to their clever space-saving efficiency, sleek modern design appeal, and low building cost. Traditional shelving often consumes valuable wall or floor area, whereas ceiling tracks capitalize on the underutilized clearance above parked vehicles or garage doors. This trending concept appeals directly to DIY enthusiasts because it utilizes standard lumber and basic hardware available at local home improvement centers, making it a highly accessible beginner friendly creative project. Beyond pure visual aesthetics, ceiling track storage provides a streamlined, minimalist style that instantly reduces visual chaos in residential garages. The design flexibility of wooden or steel tracks allows makers to customize the system length, track spacing, and storage capacity according to their specific tote dimensions. As household organization continues to trend toward clean, functional, and clutter-free environments, these overhead track ideas offer a budget friendly solution for organizing holiday decorations, camping equipment, tools, and seasonal apparel smoothly.
Proper preparation and accurate material selection form the foundation of a safe, structurally sound overhead track installation. Before purchasing supplies, builders must inspect the garage ceiling structure to identify joist directions, spacing, and structural integrity using a reliable stud finder. Materials required for these storage systems typically include hardwood lumber, high-grade plywood, metal angle irons, heavy-duty lag screws, structural washers, and durable plastic storage totes with wide, reinforced lips. Key tools include a miter saw, cordless drill, drill bits, tape measure, bubble level, and safety gear such as protective eyewear. Careful planning involves measuring the exact flange thickness and width of the chosen storage totes to ensure smooth sliding action without excess play or sticking. Additionally, measuring clearance heights ensures that suspended totes will not obstruct garage doors, automatic openers, or tall vehicles. Taking accurate measurements and preparing all materials prior to assembly prevents alignment errors and guarantees a sturdy, long-lasting installation.
Plywood T-Track Ceiling Channel System
Design Overview and Structural Benefits
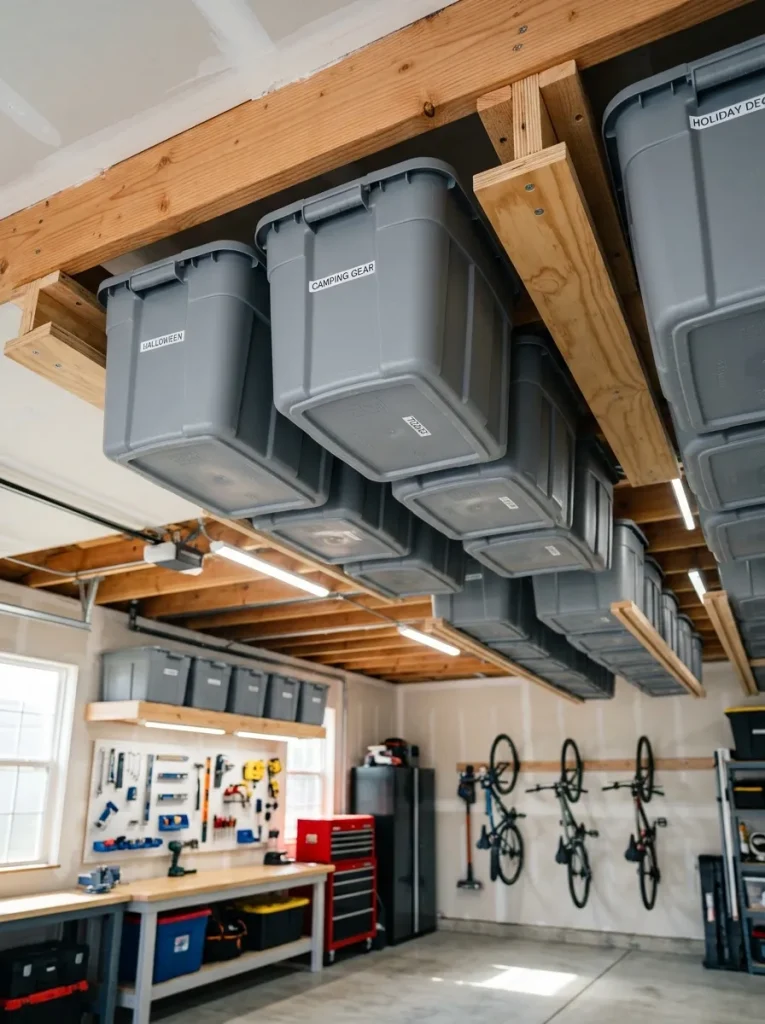
The plywood T-track design relies on layered cross-sections of high-grade plywood to form a supportive horizontal lip that catches the rim of plastic storage totes. Plywood offers high tensile strength and resistance to warping, making it an excellent primary material for overhead structural tracks. The central concept involves mounting a narrow vertical riser block directly to the ceiling joist, followed by a wider horizontal bottom strip that extends past the riser on both sides, creating a T-shaped profile. This protruding edge securely supports the outer lips of two adjacent totes simultaneously, maximizing spatial efficiency along a single joist line. Builders can adjust the width of the bottom strip according to the specific flange dimension of their selected plastic bins. By using exterior-grade or cabinet-grade plywood, the tracks maintain structural rigidity over time without sagging under moderate weight loads. The minimalist aesthetic blends seamlessly into finished or unfinished garage ceilings while keeping overhead storage neatly aligned in straight, continuous rows.
Assembly and Mounting Process
Constructing the plywood T-track system begins by ripping three-quarter-inch plywood into precise strip widths using a table saw or circular saw with a straight guide edge. Cut the vertical riser strips to a width of three inches and the horizontal bottom flange strips to a width of six inches, ensuring perfectly straight edges for smooth sliding performance. Secure the bottom strip to the vertical riser using wood glue and heavy-duty pocket hole screws or countersunk wood screws spaced every eight inches along the track length. Next, locate the garage ceiling joists, mark the track line using a chalk line, and pre-drill clearance holes through the track assembly at every joist intersection point. Fasten the completed T-track securely to the ceiling framing using three-and-a-half-inch structural lag screws accompanied by broad flat washers to prevent wood crushing. Use a level and measuring tape to ensure identical spacing between parallel tracks, carefully matching the width of the plastic totes to guarantee a smooth, jam-free slide during daily use.
Hardwood Cleat Track Build
Design Overview and Structural Benefits
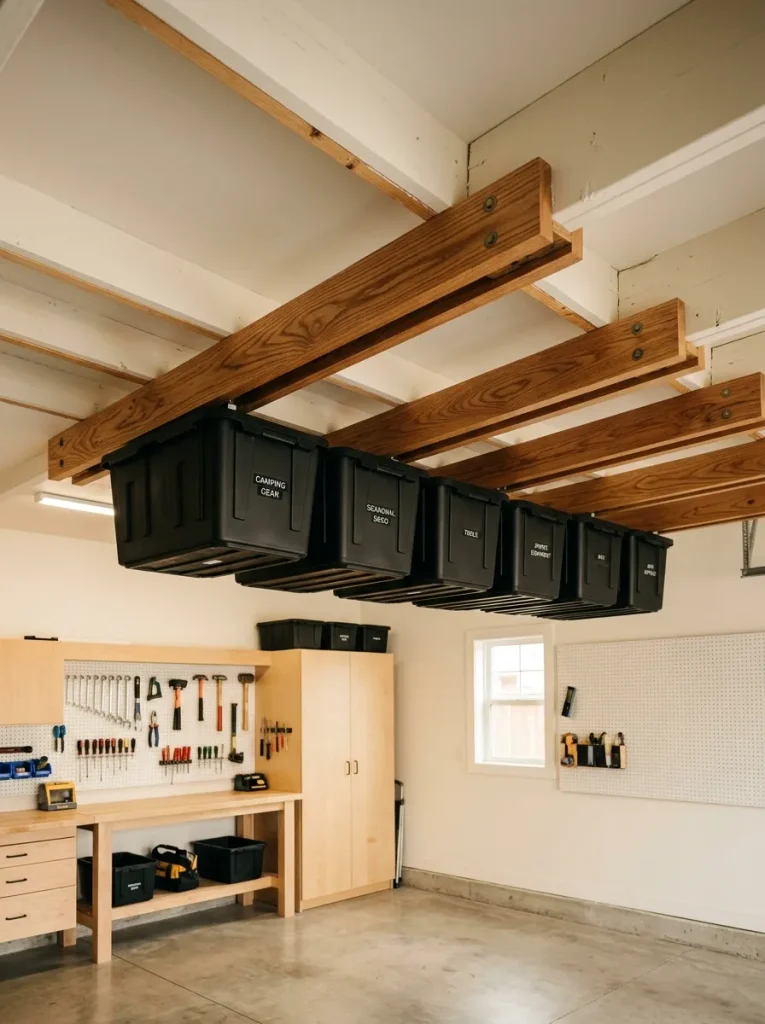
Hardwood cleat tracks offer exceptional weight-bearing performance by utilizing solid, dense timbers such as oak, maple, or poplar instead of engineered wood products. Solid hardwood provides superior thread-holding capability for fasteners and resists indentation from the repeated friction of plastic tote rims sliding back and forth. The design uses solid square-cut hardwood blocks attached to a wide base plate, forming a rigid channel capable of handling heavier storage loads like tools or automotive supplies. Hardwood cleats retain their structural integrity in humid or non-climate-controlled garage environments where lower-grade plywood might suffer from edge delamination over time. The clean lines and tight grain of natural wood give this storage system a premium, custom-built appearance that complements modern design aesthetic preferences. Because solid lumber exhibits minimal flex across long spans, hardwood tracks maintain consistent track clearance, preventing totes from binding or dropping out during insertion or removal.
Assembly and Mounting Process
Begin by selecting straight, knot-free hardwood boards, such as one-by-four and two-by-two lumber, checking each piece for straightness along its entire length. Cut the two-by-two hardwood stock into continuous riser tracks, sanding the bottom and inner edges smooth to reduce friction when sliding totes. Assemble the cleat structure by joining the two-by-two riser to a base board using heavy-duty wood construction adhesive and countersunk timber screws spaced six inches apart. Mark the joist locations on the ceiling, ensuring that lag screws will penetrate at least two inches into solid structural framing members. Lift the hardwood assembly into position, verify alignment with a long spirit level, and secure the track using three-inch heavy lag bolts tightened firmly against structural washers. Before fully tightening adjacent tracks, test fit a tote by sliding it into the channel to verify optimal clearance and smooth operation. Apply a thin coat of clear paste wax along the internal lip of the track to lubricate the contact surface for effortless tote sliding.
Industrial Angle Iron Slide Tracks
Design Overview and Structural Benefits
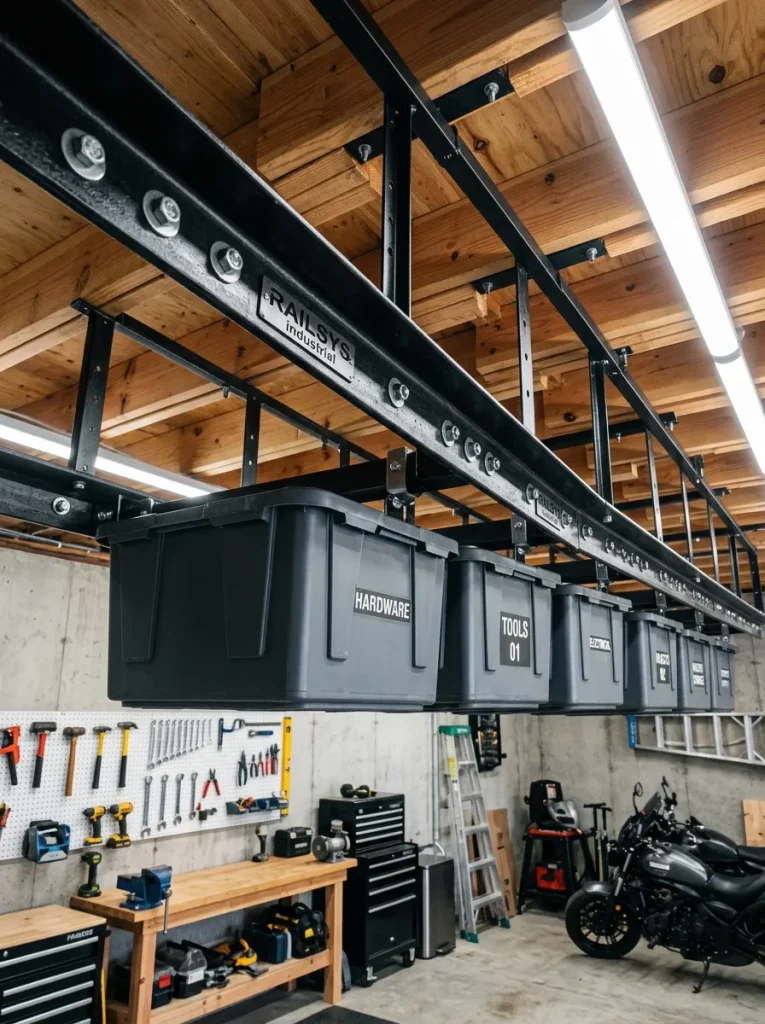
Industrial angle iron track systems provide maximum durability and load capacity by incorporating heavy-gauge steel or aluminum metal angles into the overhead framework. Metal construction eliminates concerns regarding wood split, warp, or wear, delivering a commercial-grade solution suitable for heavy equipment or automotive hardware storage. The L-shaped metal profile offers a thin yet extremely rigid lip that cradles tote edges securely while occupying minimal vertical clearance below the ceiling joists. Metal tracks are naturally fire-resistant, immune to garage humidity, and impervious to insect damage, ensuring decades of reliable performance without structural degradation. The raw metallic finish delivers a sleek modern design vibe, perfectly suited for contemporary workshop setups or industrial aesthetic preferences. By pairing metal angle iron with heavy-duty structural steel bolts, homeowners can create high-capacity overhead storage lanes that easily support max-capacity storage bins while maintaining an exceptionally slim profile overhead.
Assembly and Mounting Process
Select two-inch by two-inch steel or aluminum angle iron with a minimum thickness of one-eighth inch for optimal structural support without excess weight. Measure and cut the metal angles to the desired track length using a cut-off saw, angle grinder, or band saw, ensuring all burrs and sharp edges are removed with a metal file. Drill mounting holes through one leg of the angle iron at intervals corresponding precisely to the ceiling joist spacing, typically sixteen or twenty-four inches on center. Position the metal track against the ceiling joist, checking for squareness and parallelism using a framing square and tape measure set to the exact tote width. Secure the metal angle directly into the center of each joist using three-inch structural hex-head lag screws fitted with thick steel washers. Repeat the process for the parallel metal angle to complete the channel set, ensuring exact spacing along the entire track length. Coat the metal surfaces with rust-inhibiting paint or clear lubricant to ensure smooth sliding action and long-term protection against ambient garage moisture.
Two-by-Four Framed Heavy-Duty Overhead Rack
Design Overview and Structural Benefits
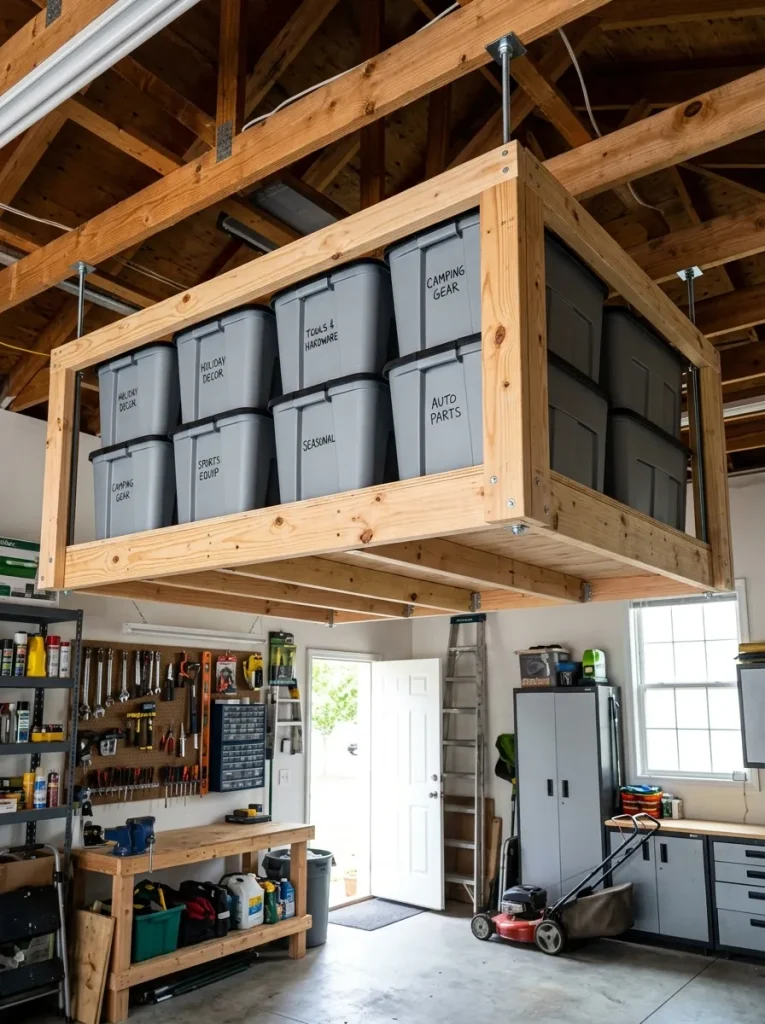
The two-by-four framed overhead track construction provides an ultra-sturdy, deep-drop solution designed for garages with high ceilings or massive weight-handling requirements. Utilizing standard two-by-four dimensional lumber creates a deep, rigid frame capable of bridging wide ceiling gaps or suspending tracks below surface-mounted ceiling obstructions like pipes or conduit. This design features vertical drop posts fastened securely to the ceiling joists, which hold horizontal cross-beams that carry the tote sliding tracks. The robust nature of two-by-four framing distributes weight across multiple ceiling joists simultaneously, minimizing localized strain on any single structural member. This system is ideal for storing heavy winter gear, power tools, or camping equipment that demands high structural safety margins. The wide surface area of standard framing lumber also provides ample space for pocket hole joints, heavy lag screws, and metal corner bracing, making the structure virtually rigid against lateral sway or track deflection under load.
Assembly and Mounting Process
Measure the available vertical clearance between the ceiling and garage door tracks to determine the maximum drop length for the two-by-four support posts. Cut two-by-four lumber into uniform vertical drop legs and horizontal cross-supports, joining them with heavy-duty pocket hole screws and structural corner brackets to form rigid ladder-like frames. Secure these support frames perpendicularly across the ceiling joists using three-and-a-half-inch lag bolts driven into every joist intersection point. Fasten wood or metal sliding flange tracks along the bottom edges of the horizontal two-by-four members using heavy structural screws, maintaining precise spacing for the tote flanges. Check the entire framework with a level and diagonal measurements to ensure the system is completely plumb, square, and parallel along its entire length. Once mounted, test the structure by applying moderate hand pressure to verify lateral stability before sliding fully loaded plastic totes into the tracks.
Aluminum Channel Slide System
Design Overview and Structural Benefits
An aluminum channel slide system utilizes lightweight, extruded aluminum C-channels or U-channels to create smooth, high-precision overhead tracks. Aluminum provides an exceptional strength-to-weight ratio, allowing for simple one-person installation without sacrificing load-bearing ability or structural safety. The factory-milled surface of aluminum extrusions offers an ultra-smooth glide surface, eliminating the drag and friction often experienced with rough wooden tracks. Aluminum is completely impervious to rust and corrosion, making it an ideal choice for unheated or high-humidity coastal garages. The ultra-slim geometry of extruded aluminum channels maximizes available head clearance, allowing totes to sit flush against the ceiling surface. This clean, engineering-focused approach produces a sleek modern aesthetic that satisfies high-end visual standards while offering a reliable, long-lasting DIY organization system.
Assembly and Mounting Process
Purchase heavy-duty extruded aluminum channels with an internal opening wide enough to accept the lip thickness of your chosen plastic storage totes. Cut the aluminum extrusions to length using a miter saw equipped with a non-ferrous metal cutting blade, taking care to wear proper eye and ear protection. Deburr the cut ends using fine sandpaper or a metal deburring tool to prevent snagging on plastic tote rims. Drill pre-countersunk mounting holes along the top flange of the aluminum channel matching the exact center-to-center distance of your garage ceiling joists. Align the first channel along a chalk line drawn on the ceiling and fasten it using stainless steel lag screws and wide flat washers. Align the opposite channel using a spacer block cut to the exact width of the tote body plus one-quarter inch for operational clearance. Fasten the second channel securely, test the slide mechanism with an empty tote, and adjust track tightness before loading heavy items into the storage lane.

Modular Adjustable Tote Track Grid
Design Overview and Structural Benefits
The modular adjustable tote track grid offers a flexible overhead organization framework that accommodates multiple tote sizes within a single ceiling installation. Built using slotted steel strut channels or adjustable metal mounting tracks, this system allows users to reposition track widths easily without re-drilling into ceiling joists. This adaptability is particularly valuable for households that use various tote brands or plan to modify their storage layout as storage needs evolve over time. The structural slotted channels mount permanently across ceiling joists, while hanging track brackets slide laterally within the channels to adjust spacing on demand. The grid design offers exceptional durability, professional-grade weight limits, and seamless integration with other overhead workshop storage accessories. By allowing lateral adjustment, this system eliminates the risk of fixed installation errors and provides a versatile, future-proof organization layout for any modern home garage.
Assembly and Mounting Process
Mount heavy-duty slotted steel strut channels horizontally across the garage ceiling joists, perpendicular to the planned direction of the tote tracks. Fasten the strut channels using three-inch lag screws driven through the pre-punched slots directly into solid ceiling joist centers. Assemble the sliding tote track hangers by attaching metal or heavy plywood flange angles to strut-channel spring nuts or trolley hardware designed to ride within the main channels. Lift the track assemblies into the mounted ceiling struts and loosely tighten the channel nuts, allowing the tracks to slide laterally across the ceiling grid. Insert a sample storage tote between two parallel tracks to establish the perfect width, leaving an extra three-eighths of an inch clearance to prevent binding. Firmly tighten the spring nut bolts using a socket wrench to lock the track spacing securely into place. Test the adjustment mechanism by sliding totes through the system and rearranging the track widths to confirm smooth, reliable re-configurability.
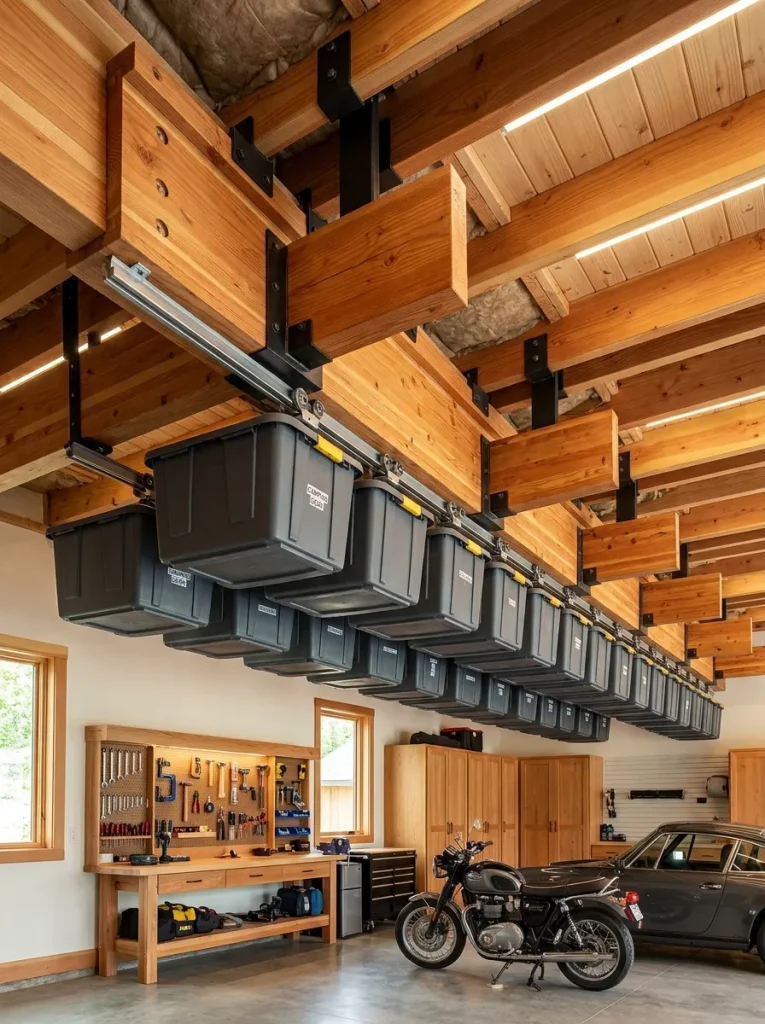
Ceiling-Mounted Wooden I-Beam Tracks
Design Overview and Structural Benefits
Ceiling-mounted wooden I-beam tracks replicate structural engineered I-joists to provide an exceptionally stiff, warp-resistant track structure over long unsupported spans. By sandwiching a central vertical plywood web between top and bottom solid wood flanges, the I-beam profile achieves maximum bending resistance with minimal material weight. The extended bottom flange serves as the double-sided support lip for adjacent totes, while the top flange provides a broad surface for secure ceiling attachment. This structural design is ideal for long garage spaces where tracks must span long distances between joist tie-ins without sagging under heavy loads. The I-beam geometry distributes weight uniformly along the entire length of the assembly, reducing stress points and ensuring consistent track alignment over time. Beyond its mechanical advantages, the crafted wood construction provides a satisfying architectural appearance that elevates the overall look of a custom workshop or garage storage setup.
Assembly and Mounting Process
Construct custom wooden I-beams by cutting one-by-three solid lumber for the top and bottom flanges and half-inch exterior plywood for the central vertical web. Cut a quarter-inch deep groove along the center line of each solid lumber flange using a table saw dado blade matching the exact thickness of the plywood web. Apply high-strength wood construction glue into the grooves and press the plywood web firmly into the top and bottom flanges to assemble the I-beam profile. Secure the joint with brad nails or wood screws driven through the flanges into the web edge, ensuring the entire assembly remains straight and true while curing. Once fully dry, align the top flange of the I-beam flush against the garage ceiling joists along pre-marked chalk lines. Fasten the I-beams to the ceiling joists using three-inch countersunk lag screws driven vertically through the top flange into solid wood framing. Mount matching parallel I-beams at precise spacing intervals, verifying that the extended bottom flange securely catches both sides of your plastic storage bins.
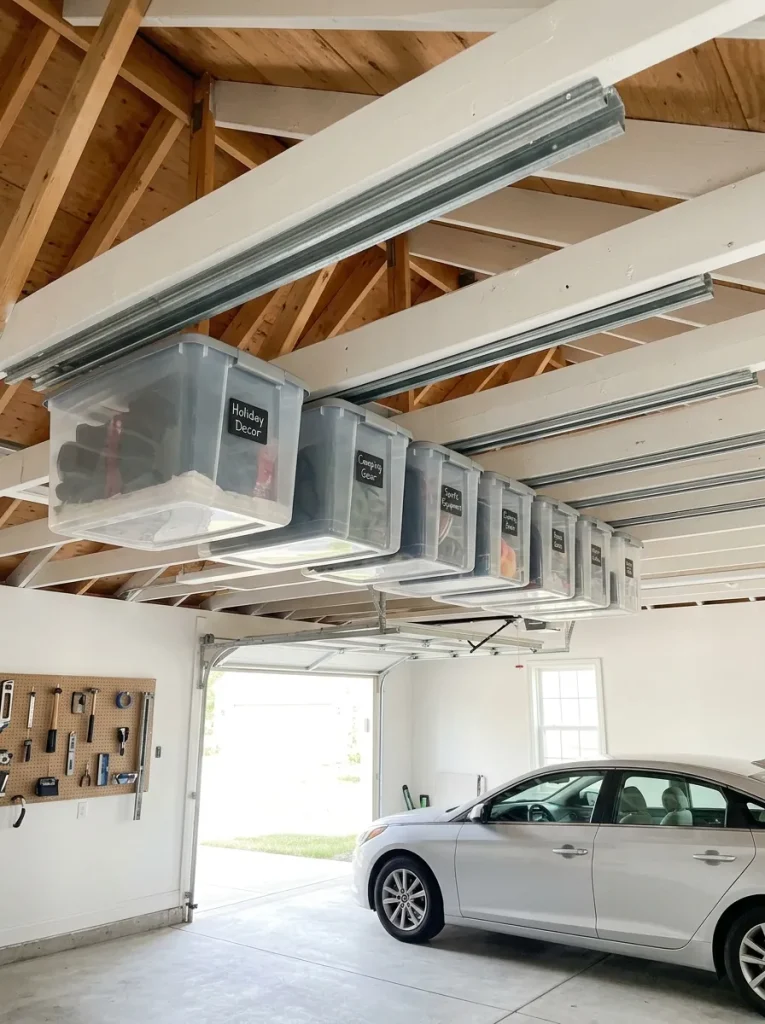
Integrated Ceiling Joist Track Recess
Design Overview and Structural Benefits
The integrated ceiling joist track system mounts flange tracks directly flush to exposed ceiling rafters or joists in unfinished garages, preserving maximum headroom. By utilizing the existing structural framing of the building, this method eliminates the need for tall hanging drop frameworks, keeping storage containers elevated as high as possible. Flange strips are attached directly to the sides or bottom edges of exposed two-by-eight or two-by-ten joists, creating a recessed track channel within the joist cavity itself. This design is exceptionally strong because loads are transferred immediately into the main house or garage framing without intermediary connections. Preserving overhead vertical space is critical in garages with low ceiling heights or where high-clearance vehicles like trucks or SUVs are parked below. The finished look is neat and built-in, seamlessly turning empty rafter bays into hidden, high-capacity storage lanes.
Assembly and Mounting Process
Inspect the exposed ceiling joists to ensure they run parallel to the intended direction of tote movement and are free from electrical cables, plumbing, or HVAC obstructions. Measure the distance between adjacent joists; if joist spacing matches your tote width, flange strips can be mounted directly to the lower joist faces. If spacing differs, install horizontal bridging blocks between joists to create custom-sized track bays matching your tote dimensions precisely. Fasten heavy-duty wooden ledger strips or aluminum angle irons directly into the lower inner faces of the joists using three-inch wood screws spaced twelve inches apart. Ensure all ledger strips are mounted perfectly level across adjacent joist bays using a spirit level or laser level line. Sand or smooth all exposed wooden tracking edges to minimize friction against plastic storage bin lips. Slide test totes into the exposed ceiling bays to verify that the containers clear cross-bridging and sit securely suspended within the joist framework.
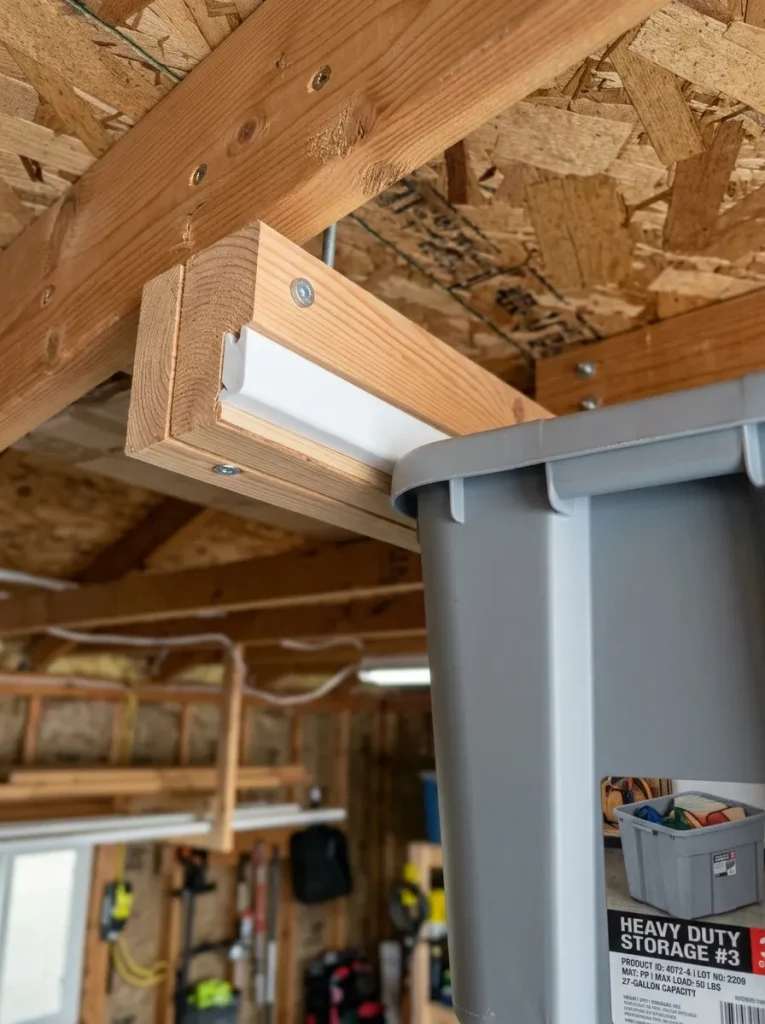
PVC-Coated Smooth Glide Track System
Design Overview and Structural Benefits
The PVC-coated smooth glide track system introduces low-friction plastic polymers onto the bearing surfaces of wooden or metal overhead track frames. Plastic storage totes often stick or generate static friction when sliding against bare wood or painted steel surfaces, making loading and unloading cumbersome. By covering the load-bearing track lip with smooth PVC strips, plastic channel extrusions, or ultra-high-molecular-weight polyethylene tape, friction is dramatically reduced. This modification allows heavy totes to slide back and forth with minimal effort, preventing jerky movements that could cause items inside the bins to shift. The synthetic PVC layer also protects both the track and the tote flanges from mechanical wear, scoring, and plastic fatigue over years of operation. This hybrid concept combines the high load capacity of structural wood or metal backings with the smooth operational feel of high-performance polymer glides.
Assembly and Mounting Process
Build a foundational T-track or L-track support structure out of sturdy plywood or dimensional lumber following standard framing techniques previously outlined. Prior to ceiling mounting, cut rigid PVC channel strips or smooth plastic angle extrusions to match the exact length of your load-bearing track flanges. Secure the PVC strips over the wood flange edges using countersunk flat-head screws, fluid adhesives, or high-tack mounting tape, ensuring screw heads sit completely flush. Alternatively, apply thick self-adhesive plastic wear tape directly along the top sliding face of the track lip where the tote rim makes direct contact. Mount the PVC-enhanced track assemblies to the ceiling joists using heavy-duty lag bolts, checking carefully for parallel alignment and proper leveling. Insert plastic storage totes into the completed lanes to experience the reduced effort required to slide loaded containers. The smooth polymer interface ensures quiet, effortless operation even when storage bins are loaded near their maximum weight capacity.
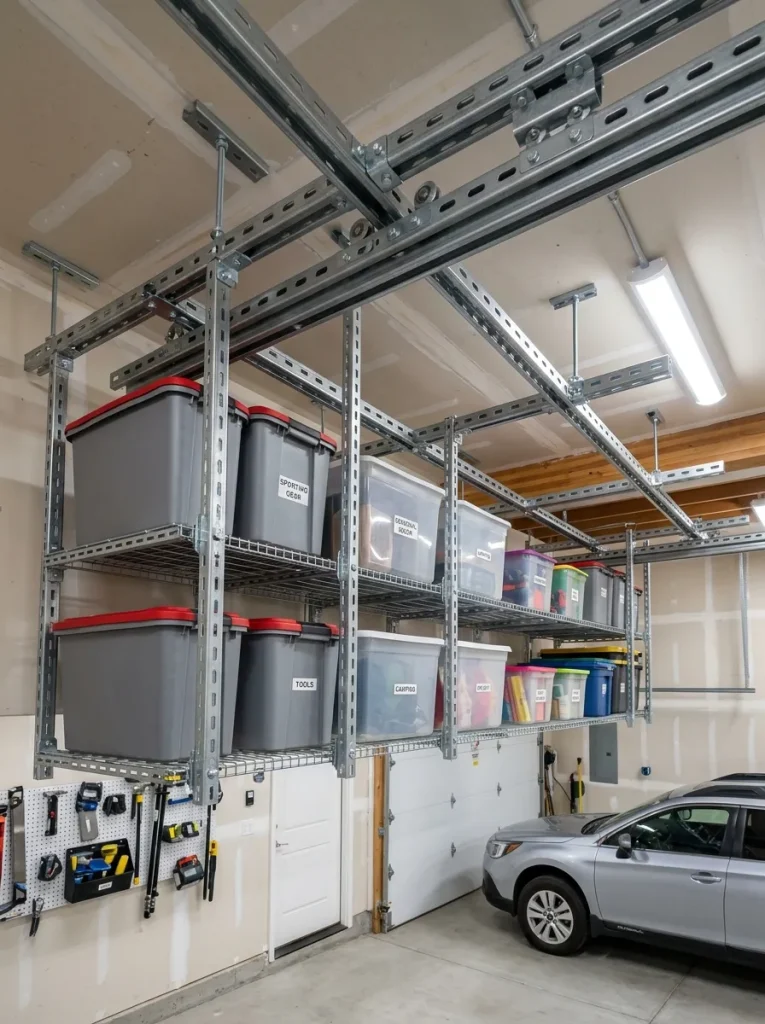
Heavy-Duty Steel Strut Channel Overhead Track
Design Overview and Structural Benefits
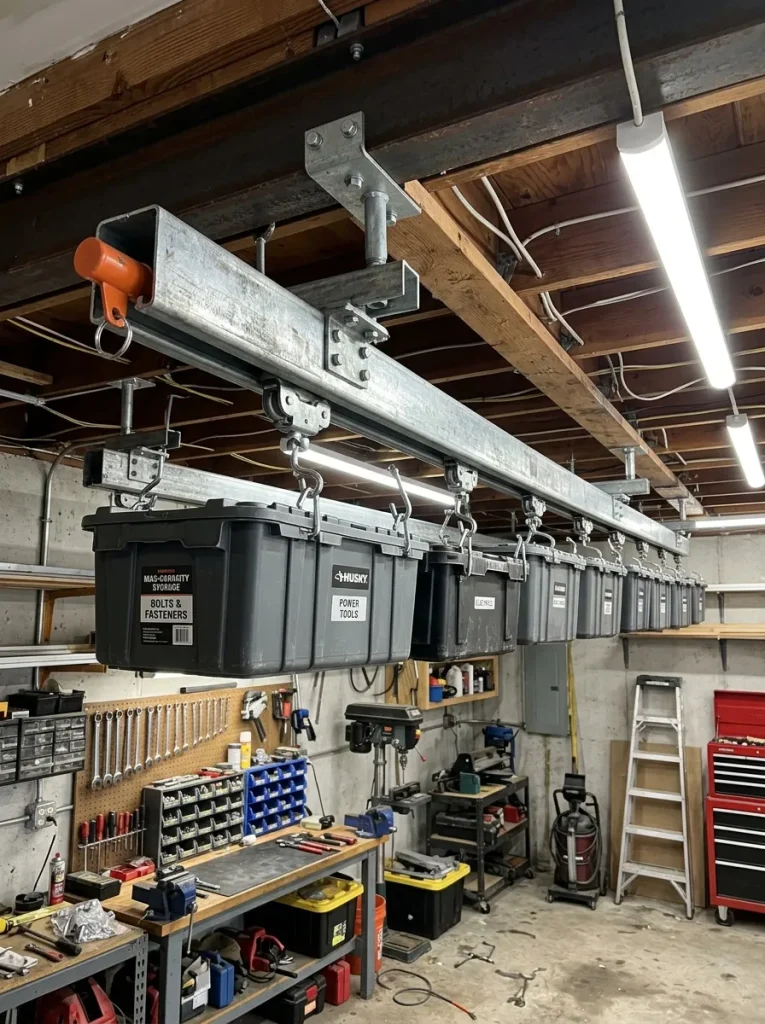
The heavy-duty steel strut channel overhead track utilizes cold-formed structural steel framing channels, commonly known as Unistrut, for ultimate load bearing and industrial utility. Steel strut channels possess exceptional resistance to bending, twisting, and physical damage, providing a commercial-grade platform capable of carrying exceptionally heavy storage loads. Continuous slots along the channel length allow flexible attachment options, precise track adjustments, and easy installation of safety stop pins or end caps. This system is virtually indestructible and performs flawlessly in harsh garage environments subject to extreme temperature swings and humidity. The industrial aesthetic gives workshop spaces a rugged, professional appearance while offering unmatched peace of mind regarding structural safety. By mounting heavy steel strut channels directly across or parallel to ceiling framing, homeowners create a high-capacity, heavy-duty storage solution built to last a lifetime.
Assembly and Mounting Process
Select standard one-and-five-eighths-inch galvanized steel strut channel stock and cut it to length using a metal-cutting chop saw or band saw. Clean and deburr all cut steel ends using a file, applying zinc-rich cold-galvanizing spray to exposed metal edges to prevent rust. Mark ceiling joist centers and anchor the strut channels perpendicular or parallel to joists using three-eighths-inch by three-inch steel lag bolts fitted with thick fender washers. Attach custom metal flange plates or steel angle irons to the main strut channel using standard channel nuts and high-tensile hex bolts. Carefully calibrate the track width spacing using a spacer jig matching your storage bin dimensions, then torque all structural bolts to manufacturer specifications. Install removable steel stop pins or bolt stops at both ends of each track lane to prevent totes from accidentally sliding off the tracks during retrieval. Test the system with fully loaded storage totes, verifying that all steel connections remain rigid, square, and completely secure under load.
Common Beginner Mistakes and How to Avoid Them
Installing overhead ceiling tote tracks requires careful attention to detail to avoid structural failures and operational frustration. A frequent error among beginner builders is fastening tracks solely into garage drywall or ceiling plaster rather than anchoring directly into solid wood ceiling joists. Drywall anchors will fail under dynamic overhead loads, posing severe safety hazards to vehicles and people below. Always use a reliable stud finder or deep-scan sensor to locate the exact center of solid structural framing members before driving fasteners. Another common mistake is failing to allow adequate clearance for tote manufacturing tolerances, lid bulging, or thermal expansion. Building tracks too tightly against tote rims results in stuck containers that are nearly impossible to remove without damaging the tracks. Prevent this issue by adding a quarter-inch to three-eighths-inch buffer space to your track width measurements during layout. Additionally, neglecting to check for level across long ceiling runs can result in totes sliding unintentionally toward one end due to gravity. Always verify track level and install safety stop pins at track terminations to prevent storage bins from falling out unexpectedly.
Practical Tips for Better Results
Achieving professional results with overhead storage tracks involves incorporating subtle construction enhancements that improve ease of use and long-term durability. Sanding all wooden sliding surfaces thoroughly with progressively finer sandpaper removing all burrs prevents plastic tote lips from catching during insertion. Applying a generous coat of paste wax, silicone spray, or paraffin wax along the load-bearing lips of wooden or metal tracks dramatically reduces friction, enabling effortless sliding. When planning track layouts, group totes by contents and weight, keeping heavier items like automotive tools near main support walls where ceiling structures exhibit minimal flex. Label the front and bottom faces of every storage container with large, clear lettering so contents can be identified instantly from floor level without pulling bins down. Utilizing uniform tote brands and models across your entire storage grid guarantees consistent flange dimensions and seamless interchangeable sliding performance. Finally, drill small pilot holes for all lag screws to prevent splitting ceiling joists or hardwood tracks during installation, ensuring maximum thread engagement and structural holding power.
Styling, Presentation, or Organization Ideas
A well-designed overhead ceiling tote track system can elevate the visual organization and overall design aesthetic of any modern residential garage. Selecting matching storage totes in neutral solid colors like charcoal gray, matte black, or crisp white creates a cohesive minimalist style overhead, eliminating visual clutter. Color-coding totes by category—such as green bins for holiday decor, blue bins for camping gear, and clear bins for seasonal clothing—combines visual order with functional organization. Aligning track lanes in clean parallel rows creates structured sightlines that complement organized wall-slat systems and polished epoxy garage floors. For finished garages, painting wooden track assemblies to match the ceiling color allows the framing to blend smoothly into the architecture, making the totes appear to float overhead. Installing low-profile LED strip lighting along the edges of the storage tracks improves visibility when reading tote labels while adding a modern accent light feature to the workspace. These simple styling choices turn a basic DIY project into a high-end garage transformation.
Budget or Time Planning
Careful planning of project costs and time investment ensures a smooth, stress-free DIY experience from start to finish. A basic two-lane overhead track system constructed from standard plywood or two-by-four lumber generally costs between fifty and one hundred dollars in raw building materials, making it a budget friendly organization solution. Upgrading to metal angle iron or aluminum channels increases material costs slightly, typically ranging from one hundred to two hundred dollars depending on track length and steel gauge. Time commitment for a basic installation is approximately four to six hours for a single builder, while larger multi-track grids may require a full weekend. To optimize build time, prepare a cutting list and batch-cut all wooden or metal components before beginning ceiling installation. Purchasing totes in multipacks before measuring tracks prevents dimensional mismatches and saves money compared to buying individual containers. Allocating adequate time for careful layout marking, pre-drilling, and test fitting ensures the project stays on budget while achieving safe, durable results.
Creative Expansion and Advanced Inspiration
Once the primary overhead tote tracks are successfully installed, the framework can be expanded to create a comprehensive overhead garage management system. Builders can integrate sliding hooks, wire baskets, or suspended ladder racks between tote lanes to utilize remaining ceiling space efficiently. Incorporating motorized pulley lifts or mechanical winch assists allows heavy tote tracks to lower down to waist height for individuals unable to reach overhead comfortably. Adding hinged drop-down safety gates or spring-loaded detent pins at the track ends provides extra security in earthquake-prone regions or high-vibration garage environments. Advanced makers can incorporate RFID tags or QR-code labeling on the underside of totes, linked to a smartphone inventory app for instantaneous digital tracking of stored items. Unused ceiling spaces above automated garage door tracks can also be retrofitted with custom shallow-depth tote tracks to reclaim every square inch of overhead clearance. These creative enhancements transform simple sliding tracks into a fully integrated, high-capacity home storage system.