
10 Cheap DIY Overhead Garage Storage Racks Using PVC Pipes
Overhead storage solutions offer an exceptional way to maximize underutilized vertical space in residential garages. Polyvinyl chloride, commonly known as PVC, serves as a versatile, affordable, and durable building material suitable for constructing sturdy hanging rack systems. Converting unused ceiling space into structured storage keeps floor areas clear, improves vehicle parking clearance, and enhances overall home organization. This detailed guide covers ten budget-friendly overhead rack designs that leverage lightweight plastic piping, fittings, and basic hardware. Readers will learn how to measure ceiling joists, evaluate structural load limits, select correct pipe schedules, and execute step-by-step construction methods for various storage needs. Whether storing holiday decorations, seasonal sports equipment, lightweight plastic bins, or bulky garden supplies, these step by step projects deliver high practical value. By utilizing simple assembly techniques and widely available hardware, homeowners can implement high-density organizational systems without investing in expensive pre-manufactured metal units. The following sections detail essential preparation steps, robust construction plans, safety considerations, aesthetic finishing methods, and cost management strategies to ensure a successful DIY installation project.
The popularity of ceiling-mounted storage constructed from plastic piping stems directly from its accessibility, low cost, and adaptability. Modern home organization trends emphasize clean visual lines and efficient spatial management, making vertical storage a focal point for garage optimization. High-density plastic pipes provide outstanding resistance to moisture, rust, and chemical exposure, making them superior to wood or steel in humid garage environments. From an economic perspective, plastic plumbing components cost a fraction of commercial ceiling racks while offering customizable dimensions tailored to specific room layouts. Beginners appreciate working with lightweight plastic because it requires standard handheld tools rather than specialized metalworking machinery or welding equipment. The modular nature of pipe fittings allows users to create expandable structural frameworks that adapt as storage needs evolve over time. Visual inspiration platforms frequently showcase these aesthetic installations due to their neat, uniform grids and clean industrial minimalist style. Building custom racks allows homeowners to route around overhead door tracks, lighting fixtures, and structural beams without compromising structural integrity or access.
Proper preparation ensures structural stability, user safety, and long-term durability when constructing overhead storage systems. Before purchasing materials, measure the target ceiling area meticulously, noting the location and direction of structural wooden ceiling joists. Locate joists using an electronic stud finder, marking the centerlines clearly with a pencil to guarantee secure fastener anchor points. Calculate total planned storage weight to select the appropriate pipe diameter and schedule rating; Schedule 40 PVC is recommended for general utility storage due to its thick walls and load-bearing capabilities. Essential tools include a fine-tooth hacksaw or ratcheting pipe cutter, a power drill with driver bits, a tape measure, a bubble level, and heavy-duty structural wood screws. Clean all pipe exteriors with a degreasing cleaner before assembly to ensure proper adhesion of primers and solvent cements. Purchase appropriate heavy-duty ceiling flanges, steel strap hangers, or eye bolts depending on the chosen suspension method. Lay out all plastic fittings, straight pipe lengths, and hardware on a clean floor space to verify dimensions before executing permanent glue joints.
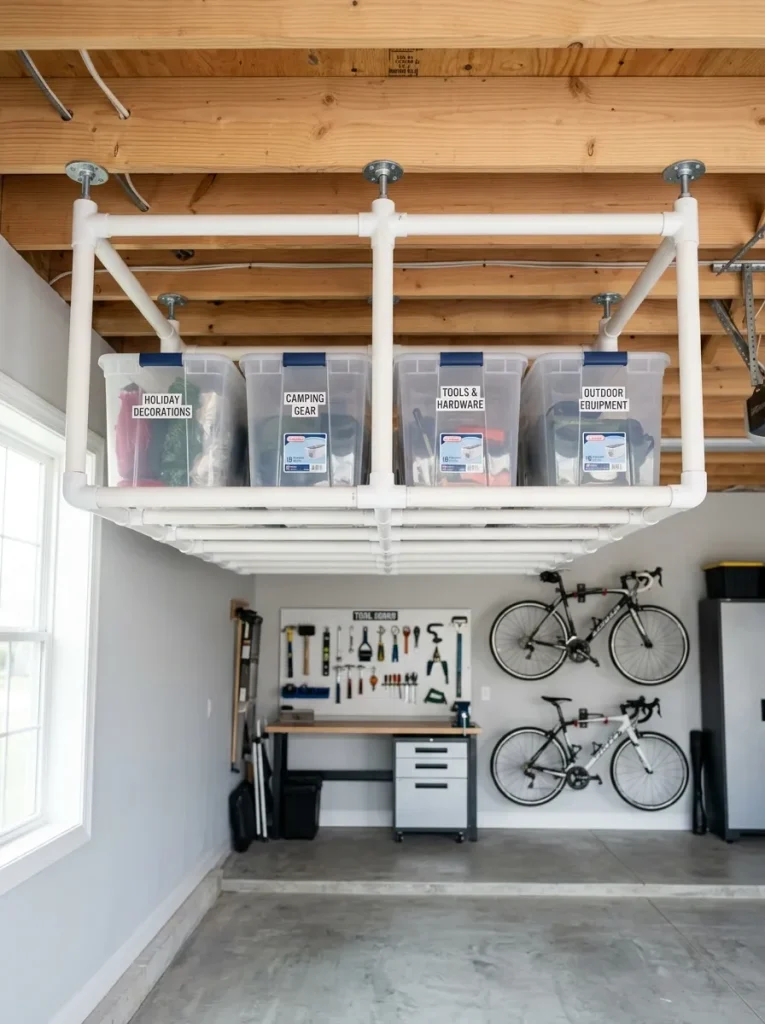
Rigid Hanging Grid Framework for Plastic Storage Bins
Concept and Structural Design
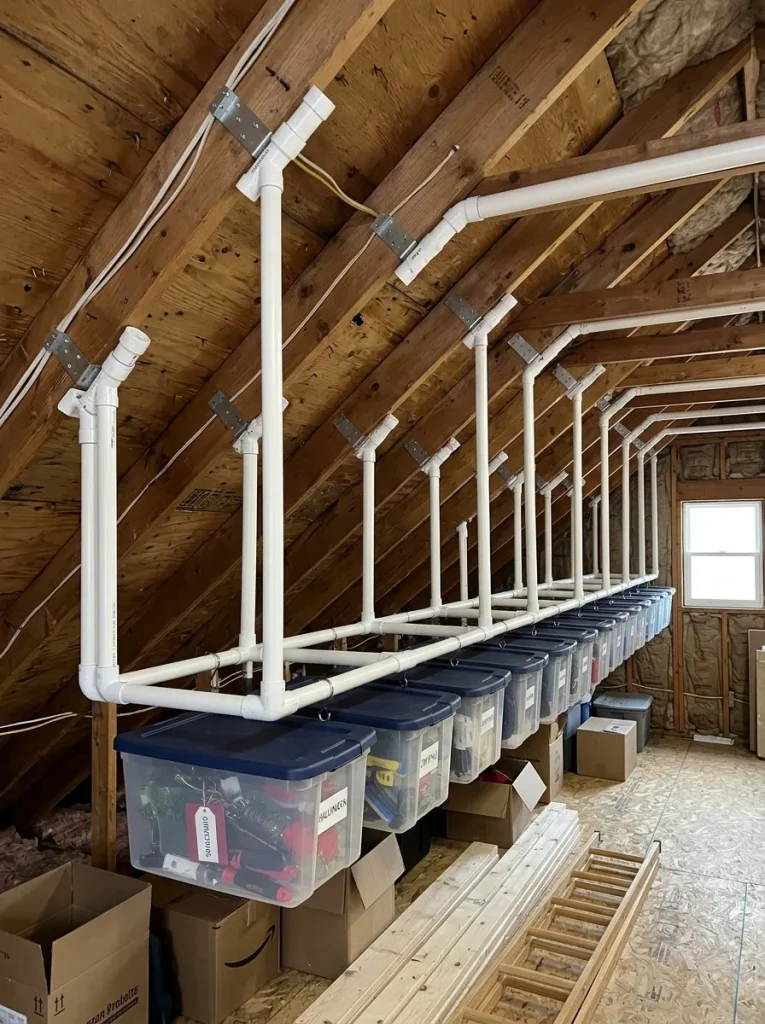
The suspended grid framework utilizes a series of parallel plastic tubes supported by cross-members to create a stable drop-down shelf system. This design specifically targets the secure placement of standardized medium-weight plastic tote bins. By aligning the horizontal supports at precise intervals, the top lips of plastic totes slide smoothly along the tracks, suspended safely above garage floor spaces. The aesthetic appearance remains clean and organized, aligning well with minimalist home decor principles. Using two-inch Schedule 40 piping guarantees high structural rigidity, preventing sag across moderate spans. The grid structure distributes weight evenly across multiple ceiling joists, minimizing point loads on individual home framing members. This setup works exceptionally well in garages with standard nine-foot ceilings, utilizing dead space above parked vehicles or workbenches. The modular layout allows homeowners to expand the grid length by adding extra T-fittings and pipe lengths as storage requirements increase over time. Proper alignment during the initial planning phase ensures totes slide without binding or tipping during everyday operation.
Execution Process
To build this hanging grid framework, measure the width of your plastic storage bins just beneath their top rim to determine track spacing. Locate the ceiling joists above the installation area using a stud finder, marking anchor points directly into solid wood framing. Cut two-inch Schedule 40 pipes into equal support lengths using a ratcheting pipe cutter to ensure square edges. Assemble the outer frame using side T-fittings and corner elbows, connecting the parallel run tracks with perpendicular cross-pipes. Secure heavy-duty steel mounting flanges to the ceiling joists using three-inch structural lag screws for maximum holding power. Drop vertical support pipes down from the ceiling flanges, connecting them directly into the T-fittings of the horizontal storage grid below. Apply PVC primer and solvent cement to all non-adjustable joints, pressing pipes firmly into fittings with a quarter-turn twist to weld the plastic permanently. Check all horizontal members with a spirit level before the cement sets fully to guarantee level tracking. Once cured, test the sliding action with an empty bin before loading heavy items onto the completed overhead structure.
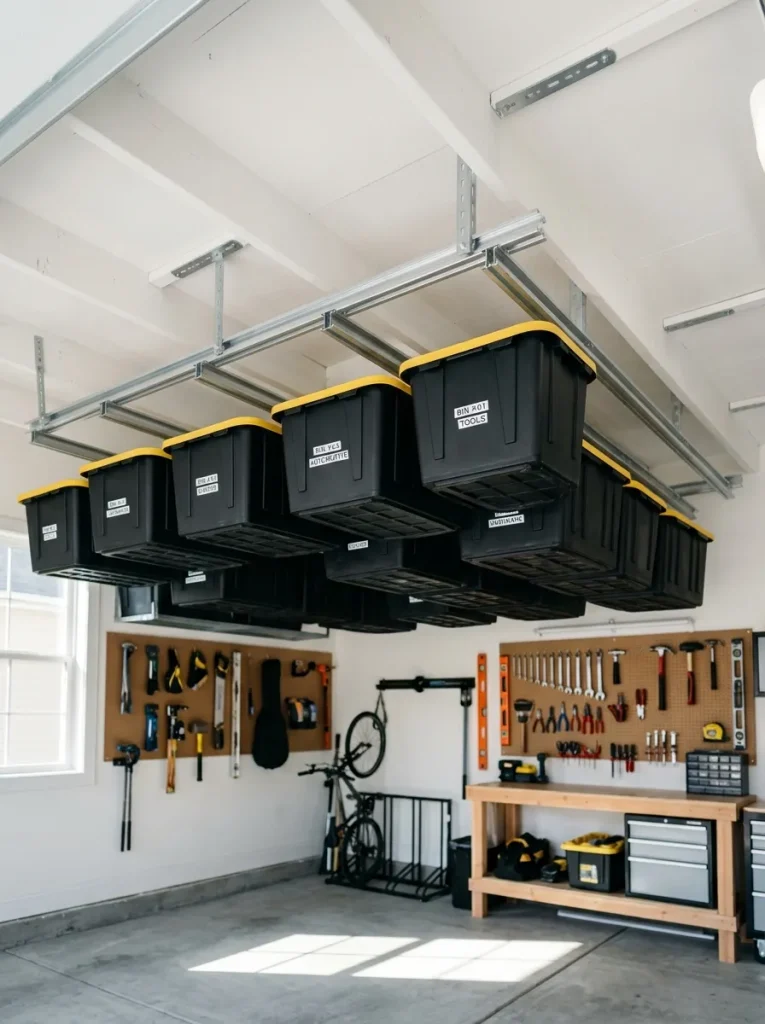
T-Track Sliding Tote Suspension Assembly
Concept and Structural Design
The T-track sliding tote suspension assembly relies on inverted channel tracks designed to support totes by their molded upper flanges. Instead of supporting bins from underneath, this method holds totes suspended entirely from their top edges, maximizing open clearance beneath the storage unit. This streamlined approach represents a highly efficient storage design suitable for sorting seasonal items, hardware, and household excess. The system uses parallel runs of PVC pipes spaced to match the lip overhang of standard commercial totes. Because the design requires minimal material compared to full-platform shelves, total construction costs remain extremely low while delivering high utility. The resulting layout presents an ultra-clean visual profile, fitting neatly into modern minimalist garage aesthetics. The structural strength relies on short, direct vertical anchor drops attached directly to overhead ceiling joists. The system enables users to pull individual totes out like drawers, making item retrieval fast and convenient without disturbing adjacent containers.
Step-by-Step Guide
Begin by gathering four-foot lengths of one-and-a-half-inch Schedule 40 PVC pipe, matching T-fittings, caps, and four-inch steel corner braces. Measure the exact lip width of your plastic totes, subtracting half an inch to establish the ideal track channel gap. Secure heavy-duty ceiling attachment brackets perpendicular to the garage ceiling joists using structural wood fasteners. Install vertical pipe drops from the ceiling brackets down to the desired hanging height, ensuring at least twelve inches of clearance above garage doors. Attach horizontal pipe runs along the bottom of the vertical drops using side-outlet T-fittings, creating parallel guide channels. Insert cross-bracing pipes every three feet to prevent horizontal bowing or spreading under heavy loads. Sand all pipe surfaces smooth along the sliding channels to reduce friction when pushing or pulling plastic totes along the tracks. Install end caps or removable stop pins at the front of each track to prevent bins from sliding off accidentally. Test the weight capacity by sliding a weighted tote along the completed track system to confirm overall structural rigidity.
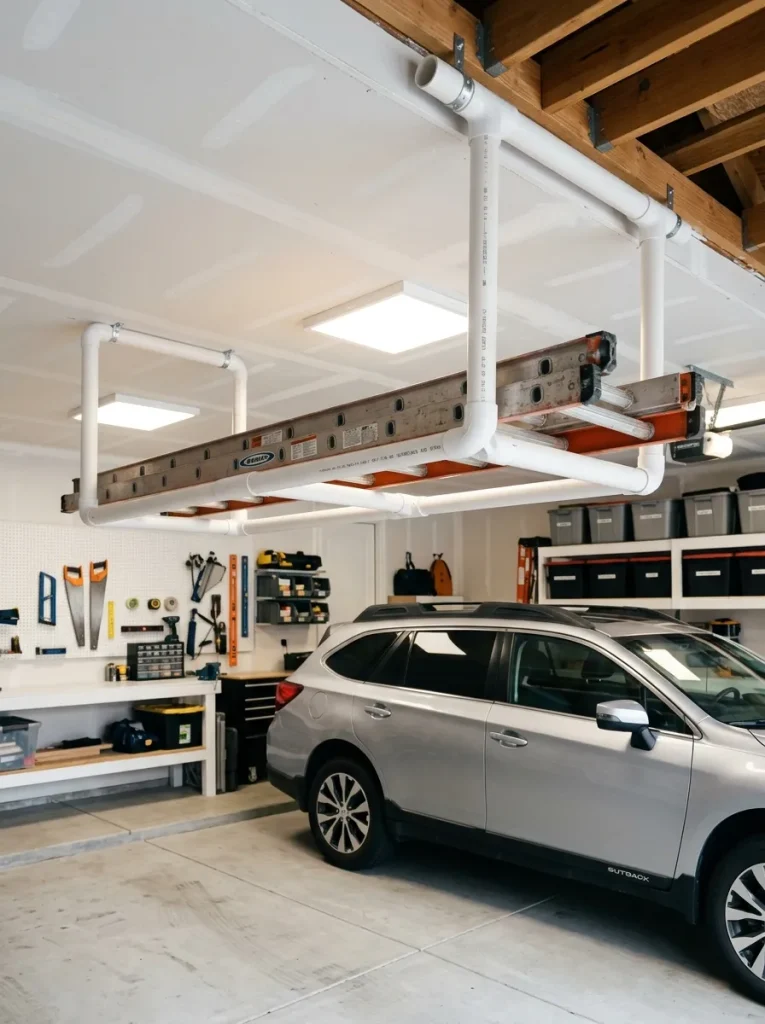
Continuous Dual-Pipe Utility Ladder Rack
Concept and Structural Design
The continuous dual-pipe utility ladder rack provides dedicated long-span storage designed specifically for extension ladders, step ladders, and long materials. Long ladders take up valuable floor area or wall space when stored traditionally; hanging them overhead restores floor access completely. This design consists of parallel hanging loops constructed from thick-walled PVC pipes anchored firmly to double ceiling joists. The open-loop structural design allows users to slide heavy aluminum or fiberglass ladders smoothly into place from one end. The plastic surface acts as a naturally smooth gliding material, preventing scratch damage to metal ladder frames during loading. The aesthetic profile is clean and non-obtrusive, integrating seamlessly into utilitarian garage spaces. By adjusting the vertical drop length, this rack system can accommodate stacked step ladders or combine ladder storage with long PVC pipes and trim boards. The balanced weight distribution across multiple joist anchors prevents localized ceiling stress.
Setup Method
Select two ceiling joist locations separated by roughly five to six feet to balance the weight of your longest ladder properly. Drill pilot holes directly into the center of the wooden joists and mount three-quarter-inch heavy-duty floor flanges using lag bolts. Thread short lengths of threaded steel nipples or heavy PVC adapters into the floor flanges to begin the vertical hanging assemblies. Attach two-inch Schedule 40 vertical pipes extending downward to a height that allows clear clearance above vehicle roofs. Connect the vertical pipes at the bottom using 90-degree elbow fittings joined to a straight horizontal bridge pipe, forming a rigid U-shaped cradle. Repeat this entire mounting procedure at the second joist location to create the matching rear support cradle. Reinforce the lower elbow connections using PVC cement and secure metal strap clamps around the upper ceiling mounts for redundant safety. Coat the bottom horizontal support pipes with foam pipe insulation to provide extra cushion and slip resistance for stored ladders. Test the installation by sliding the ladder onto both cradles, verifying that the assembly remains rigid and level.
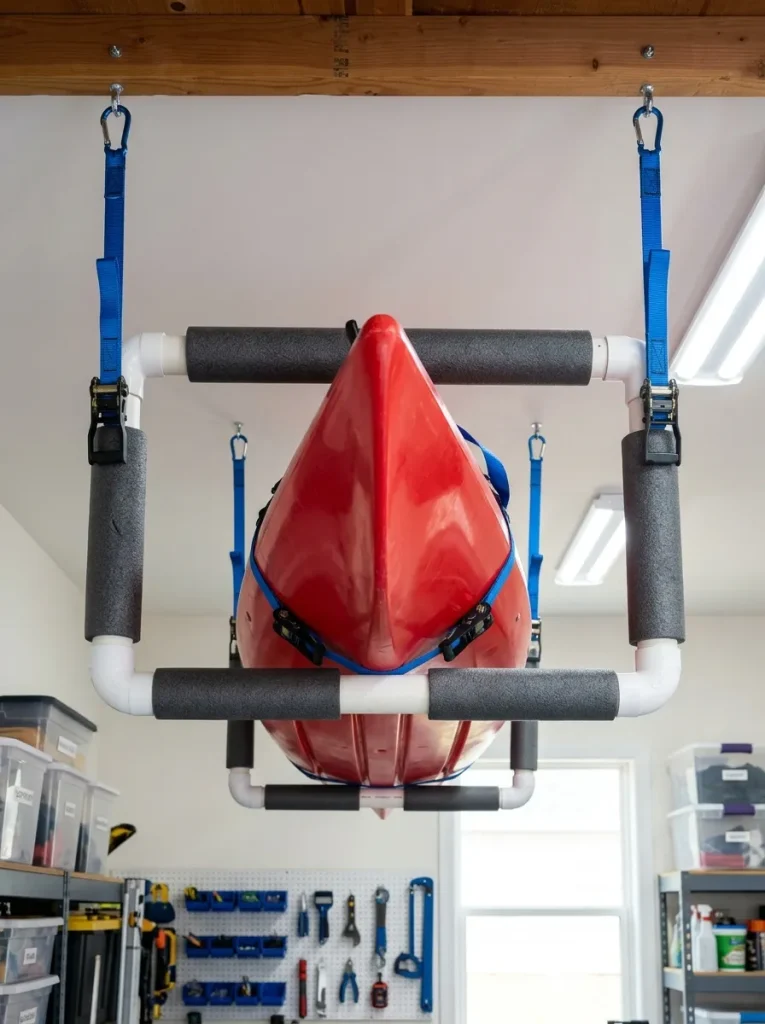
Parallel Beam Overhead Kayak Cradle
Concept and Structural Design
Storing watercraft like kayaks, canoes, or stand-up paddleboards requires specialized racks that support hull shapes without causing surface deformation. The parallel beam overhead kayak cradle provides a contoured, high-strength suspension system constructed from wide-diameter PVC piping and flexible webbing straps. Hanging kayaks near the garage ceiling protects delicate fiberglass and plastic hulls from accidental impact damage while keeping floor space completely open. The design features angled lower cross-arms lined with protective padding to distribute the watercraft’s weight evenly across its hull. The structural integrity relies on robust three-way corner fittings and heavy-duty ceiling anchors attached directly to double ceiling joists. This aesthetic design looks clean and organized, turning bulky sporting goods into neat visual features within the home. The custom dimensions ensure the board or boat sits as close to the ceiling as possible to maximize head clearance. The assembly can easily be adapted for multi-boat storage by extending the vertical drop bars downward.
How to Create
Locate two main ceiling joists positioned above the intended storage area, spacing them approximately four to six feet apart based on boat length. Secure heavy-duty eye bolts directly into the ceiling joists, ensuring full thread engagement into solid wood framing. Construct two identical U-shaped support cradles using two-inch Schedule 40 PVC pipes, 90-degree elbows, and T-fittings for structural rigidity. Glue all pipe joints using primer and solvent cement, applying firm pressure for thirty seconds to form permanent chemical welds. Thread heavy-duty poly-pro webbing straps through the vertical PVC side tubes to act as a secondary safety harness around the hull. Mount high-density foam insulation sleeves over the bottom horizontal support pipes to prevent hull indentation and friction scuffs. Attach the top of the cradle assemblies to the ceiling eye bolts using heavy-duty carabiners or steel quick links. Lift the kayak into the padded cradles, cinching the safety web straps securely to hold the craft firmly against the upper frame.
Cantilevered Pipe Shelf for Long Materials
Concept and Structural Design
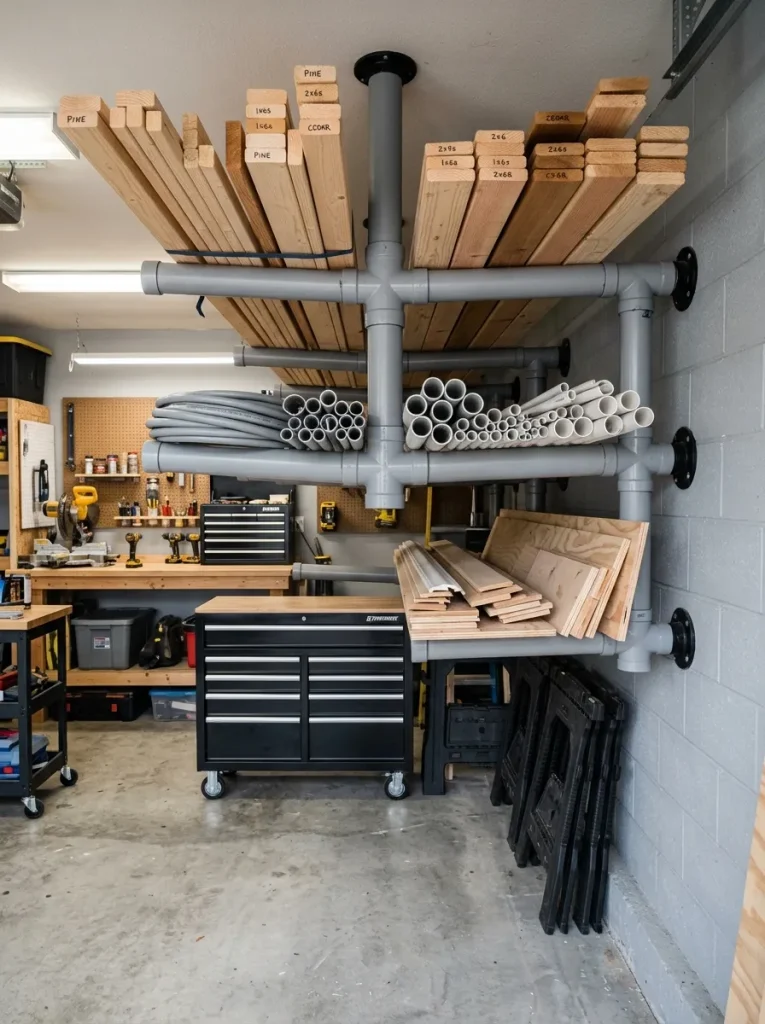
The cantilevered pipe shelf provides specialized overhead storage for lumber, metal tubing, copper pipes, and PVC conduits. Storing long materials overhead prevents warping, clutter, and accidental damage while keeping raw materials accessible for DIY projects. The cantilever design features central vertical support columns anchored to ceiling framing with horizontal extension arms projecting outward on both sides. This arrangement offers dual-sided loading capability without requiring front support posts that block access. Utilizing thick-walled two-inch Schedule 40 PVC with interior steel rod reinforcement creates high load capacities despite the lightweight appearance. The clean geometric lines offer a modern aesthetic that enhances garage organization while utilizing high wall and ceiling junctions efficiently. The design accommodates varying material lengths, keeping short and long boards neatly categorized in separate tiers. Proper anchoring into overhead ceiling joists ensures the cantilevered arms remain rigid under uneven weight distribution.
Step-by-Step Guide
Identify structural ceiling joists running perpendicular to the intended material storage direction to ensure balanced load distribution. Secure heavy-duty steel mounting channels across three adjacent ceiling joists using three-eighths-inch lag screws to create a load-spreading foundation. Attach vertical two-inch Schedule 40 PVC support pipes down from the ceiling channel using heavy-duty flange fittings. Install cross-shaped four-way PVC fittings along the vertical pipes at twelve-inch vertical increments to create multiple storage tiers. Insert horizontal PVC extension arms into both sides of the four-way fittings, extending outward twelve to sixteen inches. Insert solid wooden dowels or threaded steel rods inside the horizontal PVC arms to reinforce bending resistance under heavy loads. Cap the open ends of all horizontal arms with 45-degree street elbows pointing upward to act as end stops. Glue all joints thoroughly with PVC cement and allow twenty-four hours of full cure time before loading lumbers or pipes onto the shelves.
Double-Tiered Modular Utility Platform
Concept and Structural Design
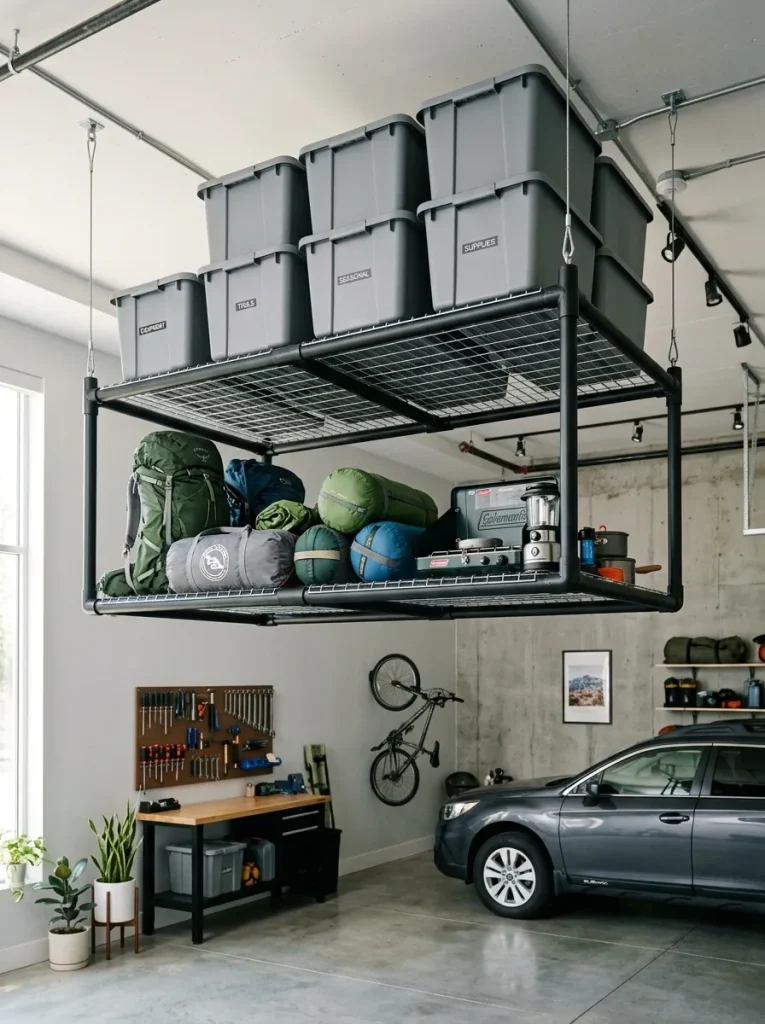
The double-tiered modular utility platform provides maximum storage volume by stacking two distinct horizontal shelf surfaces vertically beneath the ceiling. This project is ideal for homes with tall garage ceilings where vertical space is underutilized. The lower platform accommodates lightweight, high-volume items like sleeping bags and camping gear, while the upper tier holds heavy plastic bins. The structural framework uses a combination of one-and-a-half-inch PVC pipe framing and lightweight wire mesh or plywood decking panels. The open grid design promotes air circulation, preventing dust collection and moisture buildup on stored goods. The modular layout allows users to adjust tier heights during construction to match specific box dimensions. The aesthetic presentation remains tidy and structured, converting chaotic overhead space into an organized utility zone. The weight is distributed across multiple vertical drop posts, ensuring safety and long-term durability.
Setup Method
Measure ceiling height to ensure the lower tier allows safe head clearance for walking and vehicle parking underneath the assembly. Mark a four-by-four-foot grid on the ceiling joists, drilling pilot holes at four corner anchor locations. Mount steel floor flanges to the joists using three-inch structural screws, attaching vertical two-inch PVC pipes to form main support legs. Install four-way cross fittings along the vertical legs at the midpoint to support the middle platform frame. Attach outer horizontal PVC perimeter pipes into the fittings, creating two rectangular support frames stacked vertically. Cut lightweight wire mesh panels or thin exterior plywood to fit inside the horizontal pipe perimeter frames. Secure the decking material to the pipe frames using heavy-duty outdoor UV-resistant cable ties wrapped tight every six inches. Cement all structural pipe fittings using PVC primer and glue, making sure every vertical leg remains plumb. Test the multi-tiered platform with light items on the lower deck and heavier standard totes on the middle level.
Heavy-Duty Perimeter Box Frame Hanging Rack
Concept and Structural Design
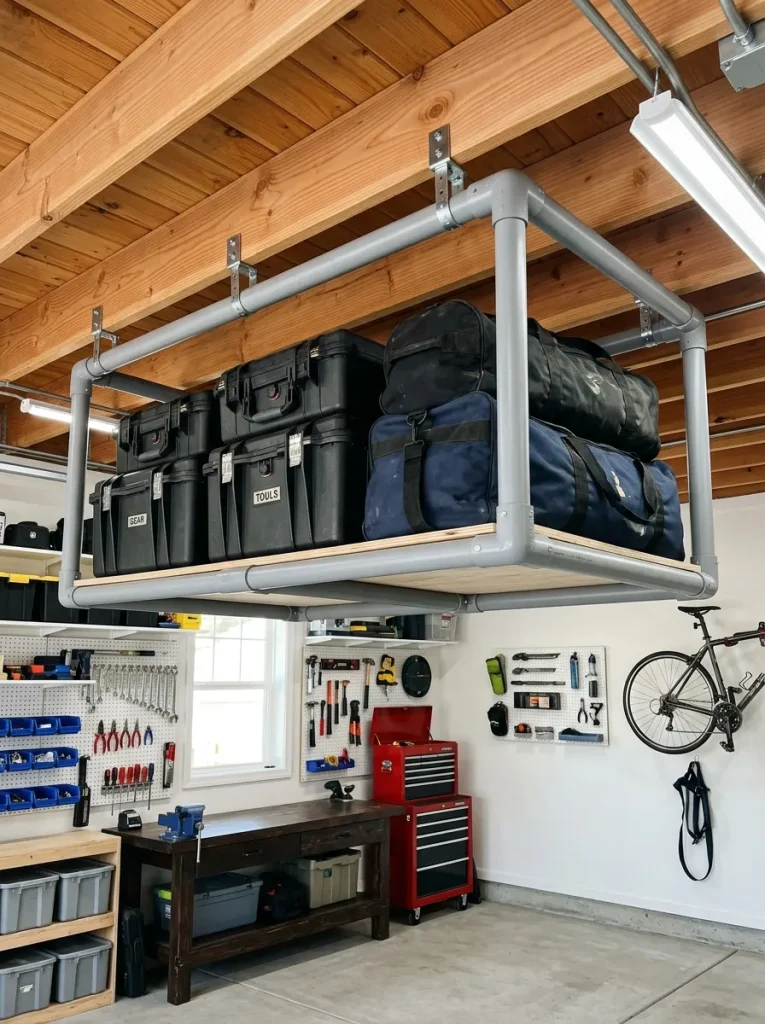
The heavy-duty perimeter box frame hanging rack offers maximum structural strength by creating a fully enclosed rectangular cage beneath the ceiling joists. This design connects all vertical drops and horizontal cross-members into a single unified box structure, minimizing sway and frame flexing. It is tailored for storing bulky gear like seasonal tires, heavy sports bags, and large plastic trunks. The frame utilizes two-inch Schedule 40 PVC pipe coupled with heavy-duty structural fittings that incorporate internal metal reinforcement inserts. The perimeter box format allows for wire shelving or solid wood panels to lay directly inside the frame, creating a continuous flat shelf surface. Visually, the solid box frame provides a clean, professional finish that integrates well into modern high-tech garage spaces. By anchoring all four corners directly into independent ceiling joists, the total load capacity increases significantly compared to single-pipe hanging designs.
How to Create
Map out a four-by-eight-foot rectangle on the garage ceiling, ensuring all four corners align directly over solid ceiling joists. Install four heavy-duty steel ceiling plates into the joists using half-inch lag bolts, verifying that each plate is anchored firmly. Drop two-inch Schedule 40 vertical PVC pipes down from each ceiling plate to the designated shelf height level. Connect the bottoms of the four vertical pipes using heavy three-way corner elbow fittings to form a complete lower perimeter frame. Install intermediate horizontal support pipes across the frame width every two feet using side-outlet T-fittings to prevent deck sagging. Place pre-cut sections of half-inch exterior plywood or heavy steel wire shelving onto the interior lip of the frame. Drill small clearance holes through the PVC fittings and insert safety clevis pins through the pipe walls for mechanical backup strength. Paint the entire assembled plastic frame with plastic-bonding spray paint to achieve a uniform aesthetic appearance before loading storage boxes.
Lightweight Drop-Down Mesh Hammock System
Concept and Structural Design
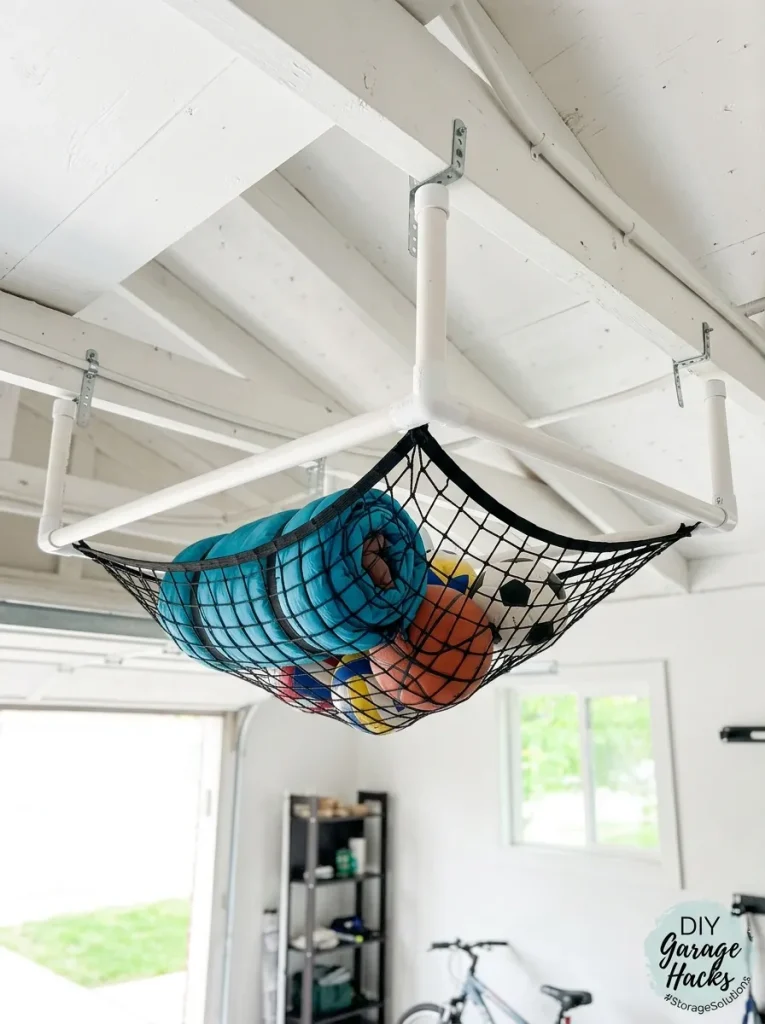
The lightweight drop-down mesh hammock system offers a flexible, low-cost solution for storing soft, bulky goods like sleeping bags, sports balls, and pool toys. Instead of using rigid wood or metal platforms, this design suspends high-strength nylon netting within a rectangular frame constructed from one-inch PVC pipe. The flexibility of the netting allows the hammock to expand downward when loaded while remaining high and out of the way when empty. This soft-sided design eliminates sharp corners, making it safe for installations near overhead garage doors or pedestrian pathways. The aesthetic profile feels light and airy, avoiding the visually dense look of heavy timber or metal shelving. The lightweight nature of the materials makes installation simple for a single individual without assistance. The design encourages continuous ventilation, which is ideal for drying out damp recreational gear or athletic equipment after use.
Step-by-Step Guide
Determine the desired length and width of the storage hammock based on available ceiling space near the garage perimeter walls. Assemble a simple rectangular frame using one-inch Schedule 40 PVC pipes connected at the corners with standard 90-degree elbows. Apply PVC solvent cement to all corner joints, ensuring the frame lies completely flat on the floor while curing. Drill three-eighths-inch holes through the pipe walls spaced every four inches along all four sides of the rectangular frame. Weave heavy-duty nylon cord or elastic shock cord through the perimeter holes to secure a durable mesh cargo net inside the frame. Attach four suspension ropes or light-duty steel cables to the corners of the frame using locking carabiners. Secure four heavy-duty ceiling hooks into the garage ceiling joists directly above the frame corners. Lift the mesh assembly and clip the suspension ropes onto the ceiling hooks, adjusting rope lengths to level the hammock surface.
Slanted Ceiling Attic-Style PVC Hanging Rack
Concept and Structural Design
Garages with pitched ceilings, vaulted roofs, or under-stair alcoves often feature angled surfaces that make standard horizontal storage installation challenging. The slanted ceiling attic-style PVC hanging rack solves this issue by incorporating adjustable-angle elbows and variable-length vertical drops. This design creates a level horizontal storage platform regardless of the roof line angle above it. Using one-and-a-half-inch Schedule 40 PVC pipe, the system adapts to varying ceiling heights while providing a continuous level surface for tote storage. The aesthetic benefit is significant, turning awkward, unusable architectural angles into functional, organized storage bays. The structural layout uses articulated fittings anchored securely to angled rafters, ensuring vertical load vectors remain straight down. This setup is particularly effective for maximizing small home garages where floor space is extremely limited. The modular nature of plastic pipe allows precise custom tailoring to fit unique architectural contours exactly.
Execution Process
Measure the angle of your ceiling pitch using a digital angle finder or pitch gauge to determine required fitting angles. Locate the roof rafters behind the drywall ceiling using a deep-scanning stud finder, marking anchor points along the slope. Install adjustable steel hinge mounts or angled pipe flanges into the rafters using heavy-duty structural screws. Cut custom vertical drop pipes of varying lengths so their lower ends align horizontally across the room. Attach 45-degree or adjustable angle elbows to the tops of the drop pipes, connecting them securely to the angled ceiling flanges. Connect the lower ends of the vertical drop pipes using standard T-fittings and horizontal support pipes to form a level grid frame. Insert horizontal cross-pipes between the main supports to create a stable resting platform for plastic totes or wooden shelving panels. Apply PVC cement to all fixed joints and verify that the bottom frame is perfectly level using a spirit level before loading items.
Quad-Pillar Suspended Corner Storage Crate
Concept and Structural Design
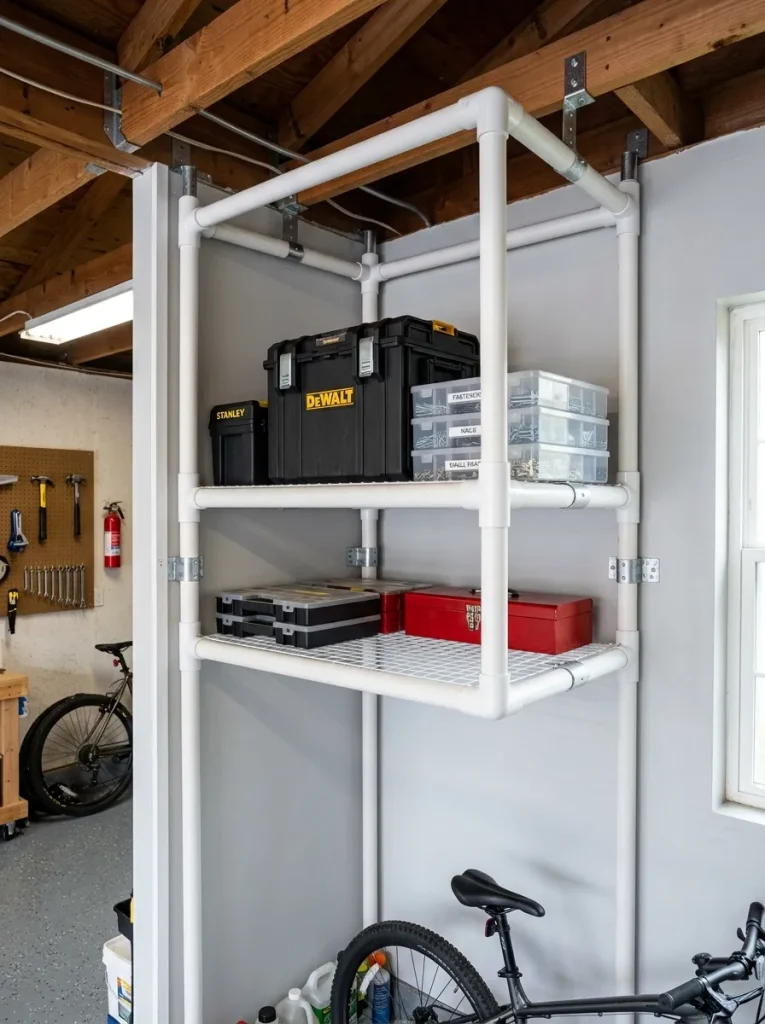
Garage corners are frequently underutilized areas that can host high-density storage without interfering with vehicle doors or pedestrian foot traffic. The quad-pillar suspended corner storage crate uses a four-point suspension framework built from one-and-a-half-inch PVC pipe tailored for tight corner spaces. This compact rack holds heavy toolboxes, hardware cases, or chemical storage bins securely overhead. By utilizing the intersection of two perimeter walls, the structure can anchor into both ceiling joists and wall studs for ultimate stability. The square or rectangular design fits neatly into ninety-degree room corners, presenting a professional, clean visual profile. The open framework allows easy visibility of stored items from below, simplifying inventory checks. The four-pillar vertical design creates a rigid frame that resists sway and rotation, ensuring safe performance even during minor earth tremors or accidental bumps.
How to Create
Locate the corner studs along both garage walls and the ceiling joists directly above the intended corner storage zone. Mount two heavy-duty wall flanges into the wall studs and two ceiling flanges into the overhead joists using structural lag bolts. Connect horizontal support arms to the wall flanges using one-and-a-half-inch Schedule 40 PVC pipe lengths. Drop vertical support pipes down from the ceiling flanges, joining them to the horizontal wall arms using three-way corner fittings. Build a square or rectangular lower base frame using PVC pipes and elbows, attaching it securely to the vertical drop pillars. Place a custom-cut sheet of three-quarter-inch exterior plywood into the bottom frame to serve as a solid shelf floor. Apply primer and solvent cement to all plastic connections, ensuring full socket depth for maximum joint strength. Reinforce the wall-to-frame junctions with metal L-brackets for added load capacity before placing toolboxes onto the finished corner shelf.
Common Beginner Mistakes and How to Avoid Them
Constructing DIY overhead storage using plastic pipes requires attention to detail to avoid structural failures and safety hazards. A frequent error is failing to anchor mounting hardware directly into solid wood ceiling joists. Relying on drywall anchors or hollow ceiling plaster will result in immediate system failure under load. Always use a reliable electronic stud finder and drill pilot holes to confirm solid wood engagement before driving lag screws. Another common mistake is using thin-walled Class 200 or Schedule 20 pipe instead of heavy-duty Schedule 40 PVC. Thin-walled pipes flex excessively under load and lack structural wall thickness for deep socket connections. Always verify pipe markings to ensure Schedule 40 or Schedule 80 specification. Additionally, beginners often forget to use PVC primer before applying solvent cement. Primer softens the plastic surface, allowing the cement to create a chemical weld; skipping this step leads to fragile joints that pull apart under tension. Overloading the storage system beyond reasonable structural limits also poses severe risks. Calculate the total weight of stored items and limit loads to safe thresholds spread across multiple joists. Lastly, installing racks too close to automatic garage door tracks can cause jams or equipment damage. Always measure clearance with the garage door in motion before finalizing rack placement.
Practical Tips for Better Results
Achieving professional results with PVC construction involves proper technique, clean execution, and smart hardware selection. When cutting plastic pipes, use a dedicated ratcheting pipe cutter or a miter saw with a fine-toothed blade to ensure perfectly square edges. Deburr the inside and outside edges of cut pipe ends using a utility knife or sandpaper to allow full socket insertion into fittings. For high-load areas, insert wooden dowels or steel rebar inside the plastic pipes to dramatically increase bending resistance without increasing outer dimensions. When securing fittings with solvent cement, work quickly and hold the joint firmly for thirty seconds to prevent the pipe from pushing out of the socket as the glue cures. Mark alignment guidelines on both pipe and fitting with a marker before applying glue to ensure complex frames stay square during assembly. If the storage rack will be exposed to direct sunlight through garage windows, paint the exterior with a high-quality acrylic exterior paint to protect the plastic from UV degradation. Label hanging storage totes clearly on their undersides using bold markers so contents are easily identifiable from the garage floor without lowering the bins.
Styling, Presentation, or Organization Ideas
A well-designed overhead storage system should enhance the visual appeal of your garage while providing utility. Paint all exposed PVC pipes and fittings using textured plastic-bonding spray paint in matte black, dark gray, or bright white to match modern interior home decor trends. Using uniform color schemes removes the industrial look of plain white plumbing pipe, transforming the rack into a custom-built architectural feature. Pair the custom piping structure with matching color-coded storage totes to organize items systematically by category. For example, use red totes for holiday decorations, blue totes for camping gear, and clear totes for frequently accessed hand tools. Affix stick-on LED puck lights beneath the horizontal support frames to illuminate floor work zones and lower shelving areas. Group smaller loose hardware items into labeled modular organizer trays that slide directly into custom-spaced pipe tracks. Maintain visual symmetry by grouping identical bin sizes together along continuous ceiling runs. Keeping storage geometry aligned with wall lines and overhead joists creates a tidy aesthetic that transforms a chaotic utility space into a high-end garage workshop.
Budget or Time Planning
Executing a DIY PVC overhead storage project requires minimal financial investment compared to commercial metal rack installations. A standard four-by-four-foot plastic pipe storage grid typically costs between forty and eighty dollars in total materials, including pipes, fittings, glue, and structural fasteners. In contrast, pre-fabricated commercial overhead units often cost several hundred dollars while offering less dimensional flexibility. Schedule 40 PVC pipe is sold in economical ten-foot lengths at local home improvement centers, making bulk material acquisition simple and inexpensive. Basic structural hardware, such as steel floor flanges and lag bolts, adds only a small fraction to the overall project budget. In terms of time commitment, a simple single-bin sliding track assembly can be completed in approximately two hours by a beginner. A complex multi-tiered or full-perimeter box frame project generally requires four to six hours from initial layout to final load testing. Planning the layout carefully on paper before purchasing materials prevents over-buying and eliminates wasted pipe cuts. Completing the assembly in systematic stages—measuring, cutting, pre-assembling, and final gluing—ensures efficient progress and professional results within a single weekend.
Creative Expansion and Advanced Inspiration
Once the foundational PVC overhead storage system is installed, homeowners can expand the assembly with custom modular add-ons. Integrate small S-hooks or heavy-duty carabiners into drilled holes along the lower pipe runs to create hanging points for extension cords, garden hoses, and power tools. Attach flexible wire baskets beneath the primary pipe frame to store lightweight items such as sports balls, bike helmets, and work gloves. Advanced builders can incorporate pulley system lifts using steel cables and hand winches, allowing entire storage platforms to lower to workbench height for effortless loading before hoisting them back to the ceiling. Combining PVC frameworks with custom wooden shelving inserts allows for flat, continuous platforms suitable for small cardboard boxes and loose supplies. For outdoor enthusiasts, specialized side-mounted holding arms can be added to store fishing rods, ski gear, or kayak paddles along the outer edges of the main tote frame. The modular nature of plastic pipe systems ensures that as home organization needs change, structural sections can be unclipped, expanded, or reconfigured with minimal effort and expense.