
10 Lofted and Raised Bed Layout Ideas for Small Spaces
Optimizing square footage in compact apartments or small bedrooms requires utilizing vertical space that traditional furniture layouts often ignore. Elevating a bed frame creates usable area underneath, effectively doubling the functional footprint of a room. This comprehensive guide explores ten innovative lofted and raised bed design layouts tailored for micro-living, studio apartments, and shared bedrooms. Readers will learn how to evaluate ceiling heights, select appropriate structural designs, and integrate multi-functional elements such as built-in desks, wardrobe storage, and cozy seating zones. Implementing an elevated sleeping area transforms unused overhead space into an organized, highly practical living environment without compromising comfort or style. Modern small-space planning relies heavily on these vertical solutions to separate sleeping quarters from daytime activities. By carefully balancing proportions, structural support, and aesthetic details, homeowners and renters alike can achieve a custom built-in feel even within restricted footprints. Whether constructing a full high-loft framework or a moderately raised platform bed, understanding structural requirements and layout possibilities allows for a tailored approach to spatial efficiency. The following sections break down step-by-step layout strategies, material requirements, and practical planning insights to turn high-level inspiration into a safe, durable, and visual success.
Why Elevated Bed Structures Are Essential for Small Space Design
The growing popularity of elevated sleeping structures across modern home decor platforms stems from their unmatched functional versatility and aesthetic appeal. In contemporary residential design, particularly urban micro-housing, floor space remains a premium commodity that must serve multiple daily functions. Raising the mattress off the floor unlocks critical real estate for storage, productivity, or relaxation, addressing the common challenge of overcrowded rooms. Beyond pure practicality, lofted bed layouts offer significant DIY potential, allowing builders to customize dimensions, integrated storage, and finishes to fit exact room contours. Beginner-friendly construction techniques, modular lumber components, and readily available hardware make custom bed builds highly accessible without requiring master carpentry skills. From an interior design perspective, elevated beds establish clear visual zoning in open-concept studio apartments by physically separating the sleeping sanctuary from working and living quarters. This vertical division enhances room organization, reduces visual clutter, and promotes a clean, modern aesthetic. Additionally, raised structures encourage creative architectural expressions, turning a simple bed into an eye-catching focal point that highlights room height rather than floor limitations. Adapting vertical floor planning remains one of the most cost-effective and impact-driven approaches to optimizing small spaces.
Essential Materials, Structural Preparation, and Planning
Executing a safe and visually appealing lofted or raised bed project requires thorough structural preparation, precise spatial measurement, and the right combination of materials and tools. Before purchasing materials, accurately measure the room dimensions, paying critical attention to total ceiling height, window placement, door swings, and wall stud locations. A standard rule of thumb requires maintaining at least thirty-six inches of clearance between the top of the mattress and the ceiling to ensure comfortable headroom while sitting up. Essential construction materials typically include structural dimensional lumber such as two-by-fours, two-by-sixes, and high-grade Baltic birch plywood for platform decking. Heavy-duty fasteners, including timber lock screws, lag bolts, pocket hole screws, and heavy steel corner brackets, are mandatory to guarantee structural integrity and user safety. Basic power tools required for assembly include a compound miter saw, a cordless drill and driver set, a digital level, a stud finder, and a sander. Safety considerations dictate anchoring the framework directly into structural wall studs whenever possible to prevent swaying or tipping. Proper surface preparation involves thoroughly sanding all timber surfaces to eliminate splinters and applying low-VOC paint or stain finishes prior to final room installation. Advanced planning ensures a smooth building process and a secure long-term installation.
Main Ideas Section
Idea 1: Integrated Under-Bed Workstation and Study Nook
How to Create
A lofted bed with an integrated under-bed workstation offers an ideal spatial solution for remote workers, students, or creatives operating within tiny room footprints. Elevating the bed frame to a height of approximately five to six feet creates ample headroom beneath to install a expansive, dedicated desktop without encroaching on the room’s central floor area. This setup creates a distinct, semi-private office nook detached from the rest of the bedroom, fostering improved focus and work-life boundary separation. The design maintains a minimalist style by incorporating clean geometric lines, concealed cable management channels, and floating wall shelves above the desk surface for books and office supplies. Integrating task lighting, such as under-cabinet LED strip lights or adjustable wall-mounted sconces, ensures the workspace receives bright, focused illumination without taking up precious desk surface area. Paint choices play an important role in this configuration; using lighter neutral tones on the framing keeps the structure visually lightweight, preventing the room from feeling cramped or top-heavy. This functional layout effectively combines two major furniture requirements into a single compact vertical unit, maximizing floor utility while maintaining an elegant aesthetic.
Execution Process
Building an under-bed workstation loft begins with assembling a rigid structural box frame constructed from select two-by-six lumber, secured tightly to corner support posts made of solid four-by-four posts. Secure the frame directly into the room’s structural wall studs using five-inch lag screws to eliminate lateral rack and sway during use. Once the main bed platform is securely anchored, lay a three-quarter-inch sheet of Baltic birch plywood across the bed joists, securing it with countersunk wood screws to form the mattress support base. Construct the lower desk assembly by mounting heavy-duty metal brackets or a matching lumber apron directly between the vertical support legs at a comfortable ergonomic height of twenty-nine inches from the floor. Attach a pre-sanded hardwood or plywood desktop across the lower supports, ensuring all edges are routed smoothly to prevent sharp contact points. Drill circular desk grommet holes near the back edge of the desktop surface to route power cables seamlessly toward nearby wall outlets. Install a continuous wooden guardrail around the upper bed platform that extends at least five inches above the top surface of the mattress to satisfy safety standards before attaching a sturdy access ladder.
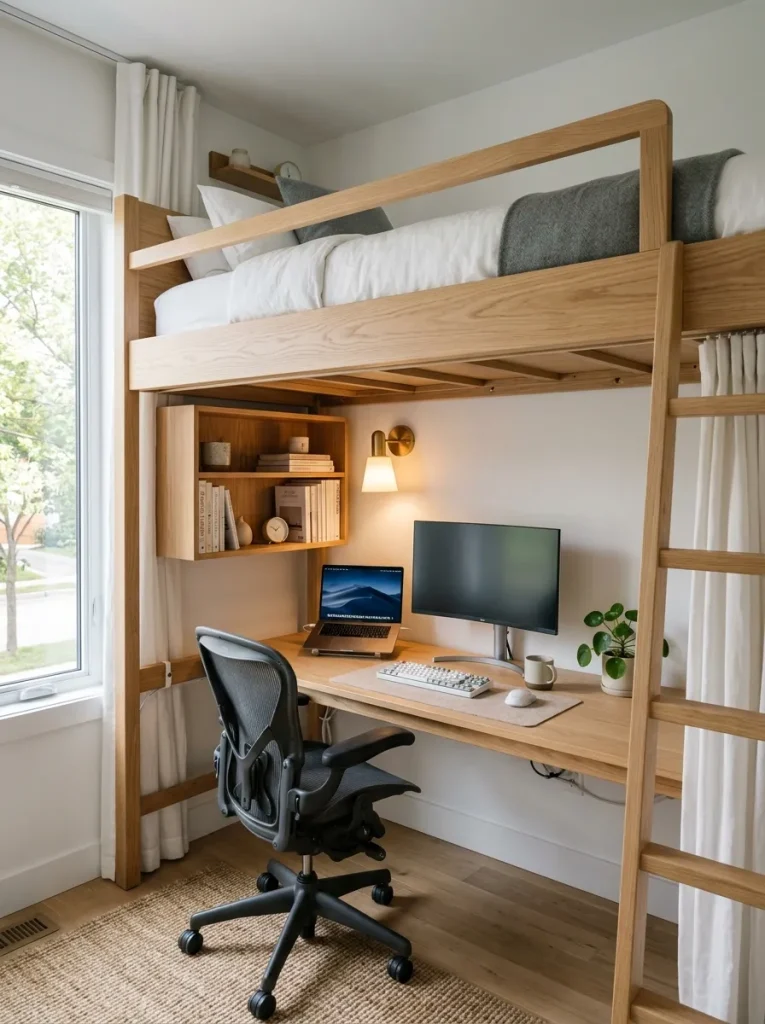
Idea 2: Platform Storage Bed with Pull-Out Drawer Matrix
How to Create
A moderately raised platform bed elevated between two to three feet off the ground provides an outstanding balance between accessible overhead headroom and substantial under-bed storage capacity. This layout design is particularly effective in rooms with standard or lower ceiling heights where high loft beds are impractical. The lower perimeter of the bed frame features a customized matrix of deep, full-extension drawers and open cubbies designed to replace traditional, space-consuming bedroom dressers. By consolidating clothing, extra bedding, and seasonal items directly beneath the mattress platform, the surrounding floor area remains completely clear for easy foot traffic and minimalist decor elements. The aesthetic appeal of a platform storage bed relies on seamless cabinetry finishes, flush-mount drawer fronts, and subtle cut-out handles that emphasize clean, modern lines. The top platform provides a sturdy, flat foundation that eliminates the need for a bulky box spring, keeping the total height comfortable for daily mounting and dismounting. This layout serves as an ultra-practical home decor solution for micro-apartments requiring maximum storage efficiency without compromising on architectural spatial volume.
Execution Process
Constructing a platform storage bed involves building two parallel box cabinets from three-quarter-inch cabinet-grade plywood that will serve as the left and right structural bases for the bed. Subdivide each cabinet interior into individual compartments using dado joints or pocket hole screws to house heavy-duty, full-extension ball-bearing drawer slides rated for at least one hundred pounds. Assemble custom drawer boxes from half-inch Baltic birch plywood, ensuring dimensions match the internal opening depth of thirty to thirty-six inches for deep storage potential. Mount the drawer boxes onto the installed slide rails, ensuring smooth, aligned operation before securing pre-finished drawer face panels flush with the outer cabinet frame. Position the two base cabinets parallel to each other at the desired bed width and connect them structurally using heavy center support beams spanning the internal gap. Lay three-quarter-inch plywood sheets or a series of solid wood slats across the top of the entire cabinet framework to support the mattress evenly across its surface. Finish the exterior wood surfaces with a durable, washable polyurethane coating or satin paint to protect against scuffs and everyday wear.
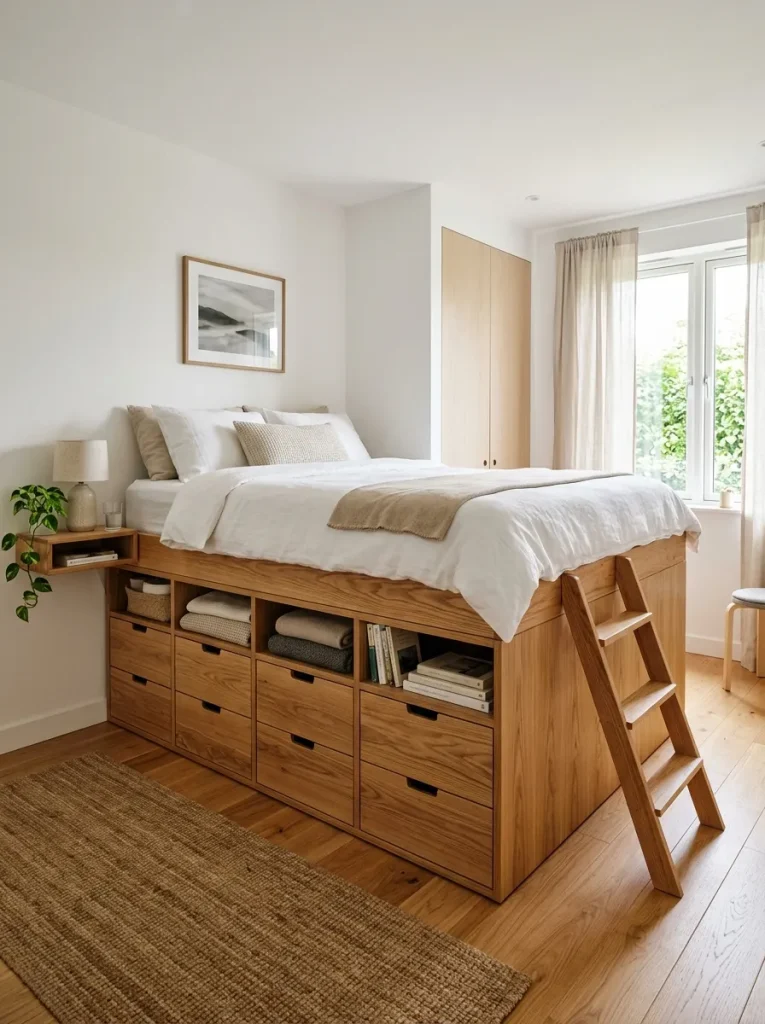
Idea 3: Lofted Lounge and Seating Sanctuary
Setup Method
Transforming the area beneath a high loft bed into an inviting lounge sanctuary creates a multi-zone living environment within a single small bedroom or studio apartment. By raising the bed platform approximately six feet high, the lower space becomes an intimate floor-level living room suitable for reading, entertaining guests, or watching media. Incorporating low-profile modular seating, a compact floor sofa, or a collection of oversized floor cushions maximizes vertical headroom while providing comfortable seating options. The design benefits from soft ambient lighting, such as dimmable warm LED strips recessed along the underside of the bed beams or hanging woven pendant lights that add texture and atmosphere. Wall-mounted floating shelving and a sleek media screen can be integrated into the back wall, converting the under-bed zone into a private home theater nook. Using plush area rugs and tactile textile throw pillows softens the structural lines of the timber framing, resulting in a cozy, relaxed atmosphere. This dual-purpose layout effectively separates sleeping functions from daytime leisure activities, significantly enhancing the perceived value and comfort of compact living spaces.
Setup Method
Begin the lounge loft build by framing an upper platform using high-grade structural timber, reinforcing all four corner junctions with heavy-duty steel angle plates and structural screws. Fasten the rear and side ledger boards directly into wall studs using three-eighths-inch lag bolts, establishing a completely rigid support framework anchor. Erect structural upright corner posts made of four-by-four timber to transfer the downward vertical load cleanly to the floor, inserting rubber isolation pads beneath the posts to protect flooring surfaces. For the lower seating area, build a simple L-shaped wooden bench base using three-quarter-inch plywood, leaving the interior hollow to function as hidden lift-top storage for extra blankets. Cut high-density foam slabs to match the bench dimensions, covering them in durable, removable upholstery fabric to create custom fitted seat cushions and backrests. Mount a low-profile wall bracket to the rear wall for mounting a television monitor or tablet station, routing power cords behind flat cable conduits painted to match the wall tone. Complete the assembly by attaching an angled wooden step ladder securely to the front rail of the loft bed frame using steel mounting hooks.
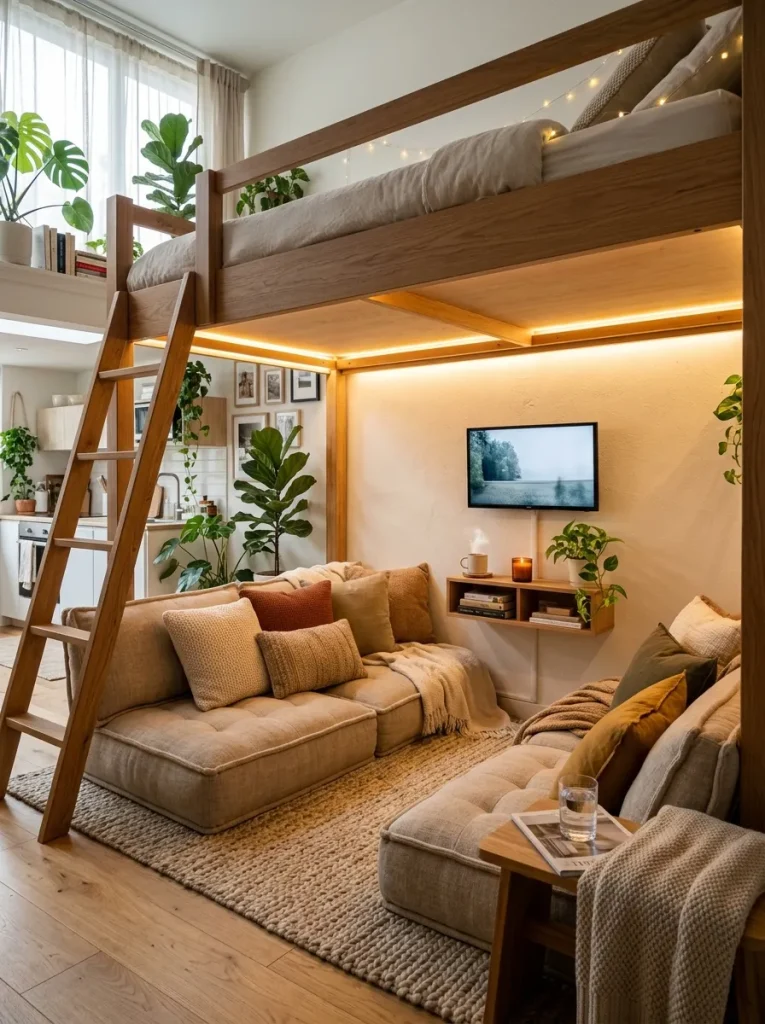
Idea 4: Mezzanine Wardrobe and Closet Loft
Step-by-Step Guide
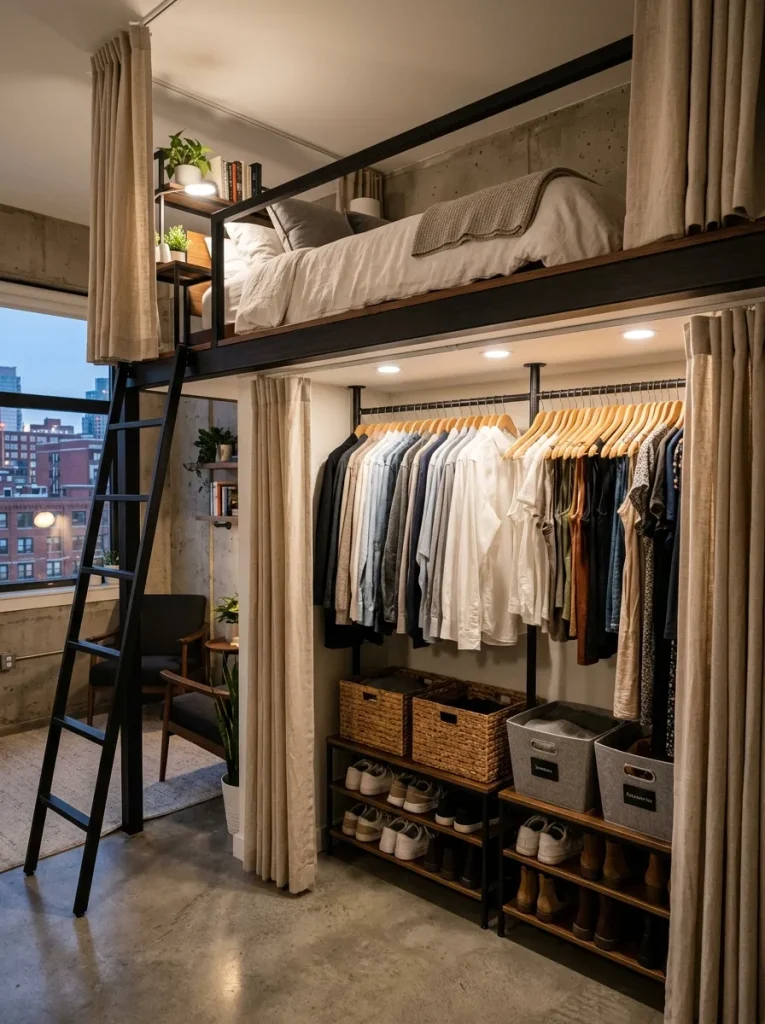
For bedrooms or studio apartments lacking built-in storage closets, an elevated mezzanine bed with an open under-bed wardrobe system provides a complete storage transformation. Elevating the mattress platform allows the installation of full-height hanging garment rods, shoe organization racks, and tiered shelving units directly beneath the sleeping surface. This open-concept closet layout makes daily wardrobe access effortless while keeping large, bulky clothing racks from cluttering the open room floor space. To maintain a modern aesthetic and prevent visual disorganization, the under-bed closet zone can be concealed using ceiling-mounted curtain tracks featuring heavy linen drapes or sleek sliding panel doors. Integrated puck lighting installed into the underside of the bed frame illuminates the wardrobe area brightly, making outfit selection easy. Utilizing matching wooden hangers, uniform storage bins, and organized shoe trays transforms functional clothing storage into an attractive interior design feature. This practical layout optimizes vertical dimensions to solve common bedroom storage deficiencies while preserving the surrounding floor area for general movement.
Step-by-Step Guide
Construct the upper bed frame structure using two-by-six structural joists set on sixteen-inch centers, creating a strong load-bearing platform capable of handling mattress and user weight. Secure the frame perimeter firmly into three adjacent walls using structural framing screws anchored deeply into load-bearing timber studs. Install a sturdy sheet of three-quarter-inch tongue-and-groove plywood over the platform joists to construct a flat, squeak-free sleeping surface deck. Beneath the platform, install robust metal clothing rods anchored into heavy flange fittings screwed directly into the structural bed support beams above. Build vertical shelving towers using pre-laminated furniture boards to create organized cubbies for folded garments, shoes, and storage baskets beneath the hanging rods. Attach a ceiling-recessed or beam-mounted curtain track along the outer front edge of the loft frame, sliding smooth glide rollers into the track channel. Hang full-length fabric drapery panels from the track to allow easy opening and closing of the under-bed closet area, ensuring all hardware is fully concealed from external view.
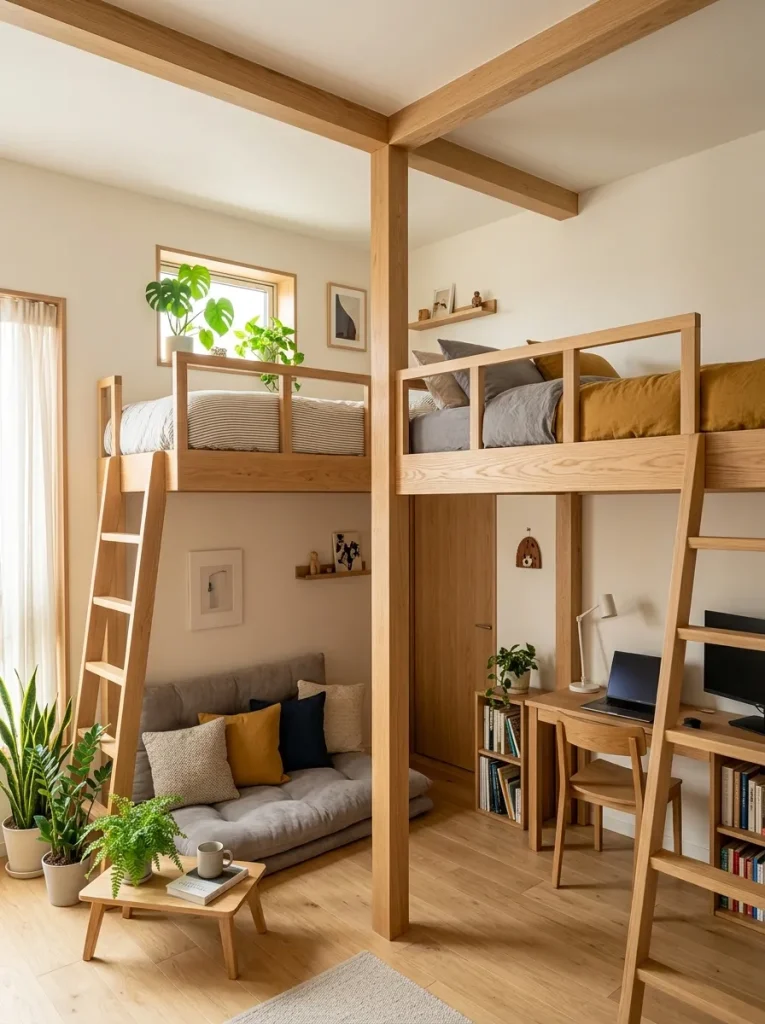
Idea 5: Corner L-Shaped Dual Elevated Beds
How to Make
Designing a corner L-shaped dual elevated bed system presents an exceptional layout strategy for shared children’s bedrooms, guest spaces, or vacation rentals where floor space must be shared efficiently. By arranging two elevated beds along perpendicular walls meeting at a single corner, the entire central floor area of the room remains totally open for activities, study desks, or play zones. The upper beds intersect cleanly at the corner, requiring a shared structural corner post or intersecting beam network that reinforces both frames simultaneously. This layout establishes clear personal sleeping quarters for multiple occupants while using only the room’s perimeter footprint. The space beneath each bed can be customized independently; one side can feature an integrated study desk, while the opposite side houses low-rise drawer storage or cozy lounge seating. Maintaining a unified color scheme and consistent wood finishes across both bed frames creates a cohesive, custom-built architectural installation that elevates the overall room decor.
How to Make
Start construction by mapping the wall stud locations along both perpendicular corner walls using an electronic stud sensor, marking installation lines for structural ledger boards. Secure two-by-six ledger boards horizontally to both walls at the desired bed height using heavy structural lag bolts driven deeply into every available wall stud. Construct two identical rectangular bed frames from two-by-six timber, connecting them at the room’s corner junction using a shared, heavy-duty four-by-four corner post anchored to the floor. Reinforce all frame corner joints with heavy steel structural tie plates, securing them with heavy structural screws to prevent frame shifting under movement. Install cross-support joists inside each bed frame, covering them with three-quarter-inch plywood panels to form firm mattress support bases. Attach continuous, code-compliant guardrails along all exposed sides of both beds, maintaining a minimum seven-inch height above the mattress top. Secure separate vertical access ladders or step modules to the foot of each bed, ensuring both ladder installations are solidly bolted to the main frame timber.
Idea 6: Low-Riser Platform with Sliding Trundle Desk
Execution Process
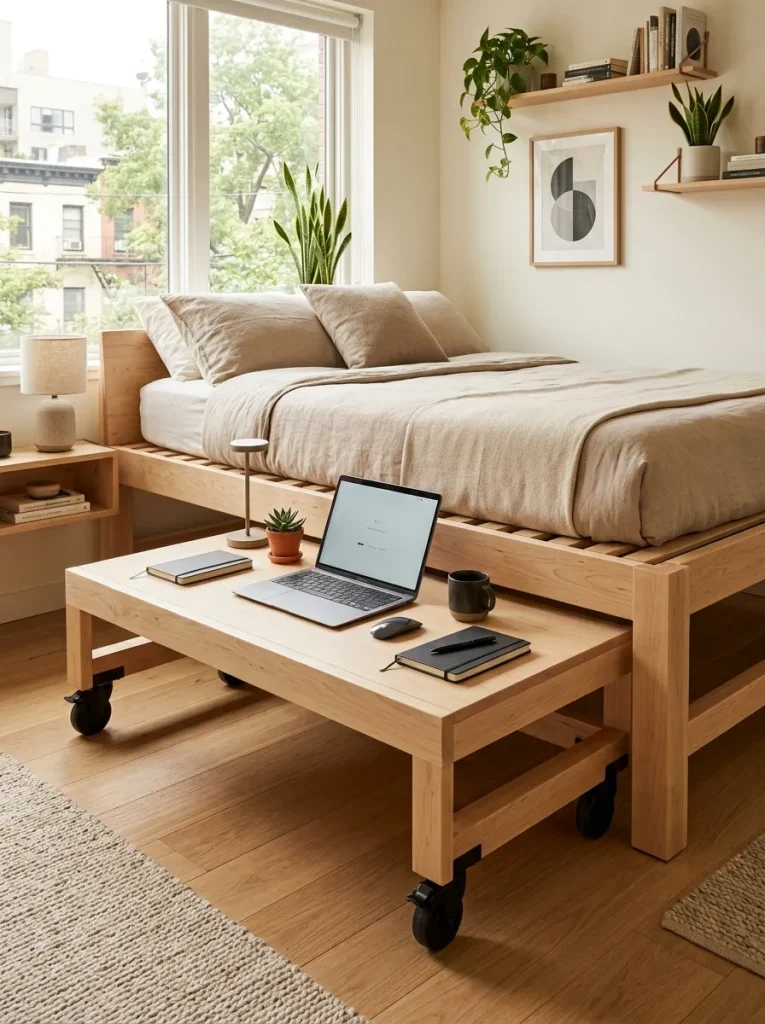
A low-riser platform bed elevated approximately thirty to thirty-six inches features a hidden, heavy-duty pull-out trundle desk that rolls away completely when not in use. This hybrid design is ideal for flexible multi-purpose rooms or home offices that double as sleeping spaces, as it offers full workspace utility without permanent visual clutter. When the desk is stowed underneath, the room maintains a spacious, open appearance with only a sleek platform bed visible. Pulling the desk out on heavy-duty casters instantly creates a wide, stable work surface suitable for computers, drawing gear, or study materials. Additional storage compartments built into the open platform perimeter can house office supplies, printer equipment, and books, making the desk setup fully functional. The modest elevation of the bed keeps the room feeling open and light, avoiding the imposing visual footprint that full-height loft beds can sometimes create in rooms with standard ceiling heights.
Execution Process
Construct the outer platform support matrix using three-quarter-inch cabinet plywood reinforced internally with two-by-four support ribs to form a rigid perimeter shell. Design the central lower opening with wide dimensions, ensuring ample clearance to accommodate a large mobile desktop box built on heavy-duty caster wheels. Mount smooth, non-marking polyurethane swivel casters with locking brakes to the bottom four corners of the custom mobile desk assembly. Build the mobile desk using three-quarter-inch plywood, creating a wide desktop top surface paired with shallow under-desk storage drawers for flat office supply storage. Slide the assembled desk unit into the central platform void to test horizontal alignment, verifying smooth, uninhibited rolling motion over floor surfaces. Cover the top of the main bed platform with a solid plywood deck, installing perimeter edge trim to keep the mattress firmly centered. Apply a high-durability clear finish or painted enamel across all outer surfaces to protect against frequent rolling movement and daily contact.
Idea 7: Built-In Bookcase Frame Loft
Step-by-Step Guide
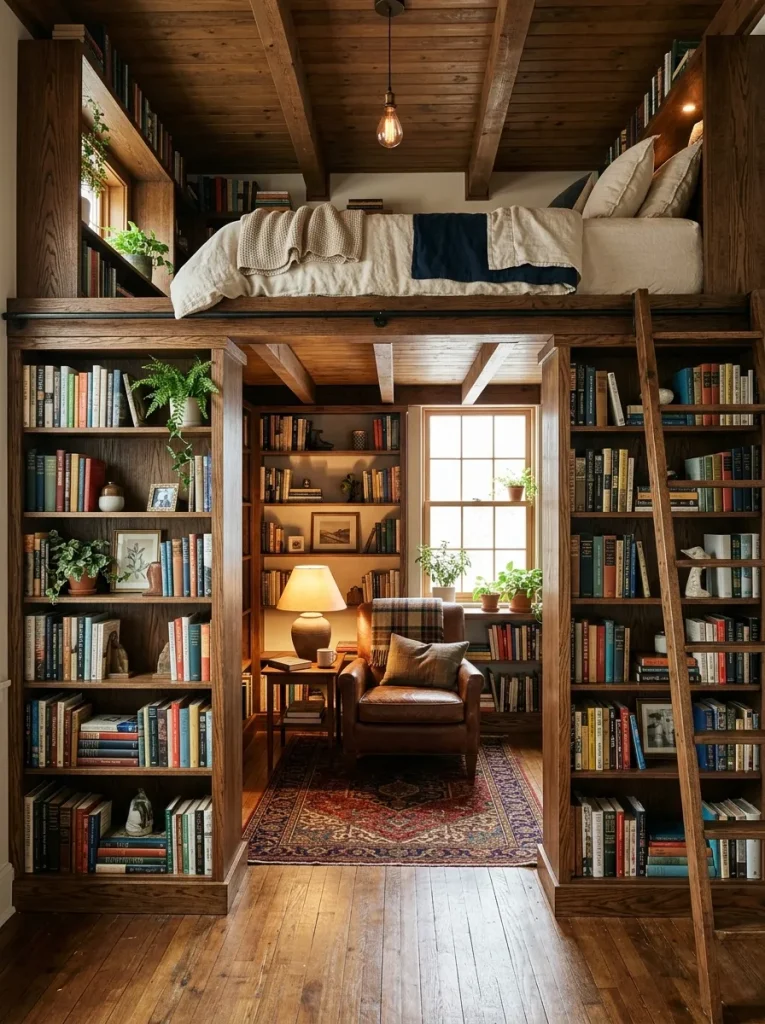
Utilizing sturdy, floor-to-ceiling bookshelf units as the structural side supports for an elevated loft bed creates a highly functional, library-inspired layout ideal for avid readers and students. In this setup, two thick, structural bookcase towers serve double duty as load-bearing upright posts and expansive open storage systems for books, display decor, and storage bins. Elevating the mattress platform across the tops of these bookshelf towers maximizes utility by fully integrating storage into the support architecture of the furniture piece. The central space beneath the bed frame remains completely open, allowing room for an extra lounge chair, an accent rug, or a secondary storage unit. The open shelves of the exterior-facing bookcases remain accessible from the room floor, providing quick access to media without occupying extra wall space. Using rich wood stains or dark matte paint finishes gives this design a sophisticated, classic aesthetic that feels built into the room’s permanent architecture.
Step-by-Step Guide
Build two matching, heavy-duty bookshelf units from three-quarter-inch solid hardwood or structural plywood, reinforcing the internal shelf joints with dadoes and pocket hole screws for maximum load capacity. Position the two bookshelf units parallel to each other at the required bed length distance, anchoring them directly to wall studs using metal L-brackets. Span the top span between the two bookshelf towers with heavy two-by-six timber perimeter beams, securing them firmly into the top structural plates of the shelves. Lay intermediate floor joists spaced sixteen inches apart across the main timber beams, securing them with metal joist hangers to ensure structural rigidity under heavy weight loads. Fasten a three-quarter-inch sheet of sanded plywood across the joist matrix, countersinking all screws beneath the wood surface to protect the mattress base. Install protective safety rails along the outer elevated edges, anchoring the rail supports directly into the outer structural framing of the bed. Finish all visible timber edges with matching wood edge banding and sand smooth before applying wood stain and protective topcoats.
Idea 8: Floating Wall-Mounted Suspended Loft Bed
How to Create
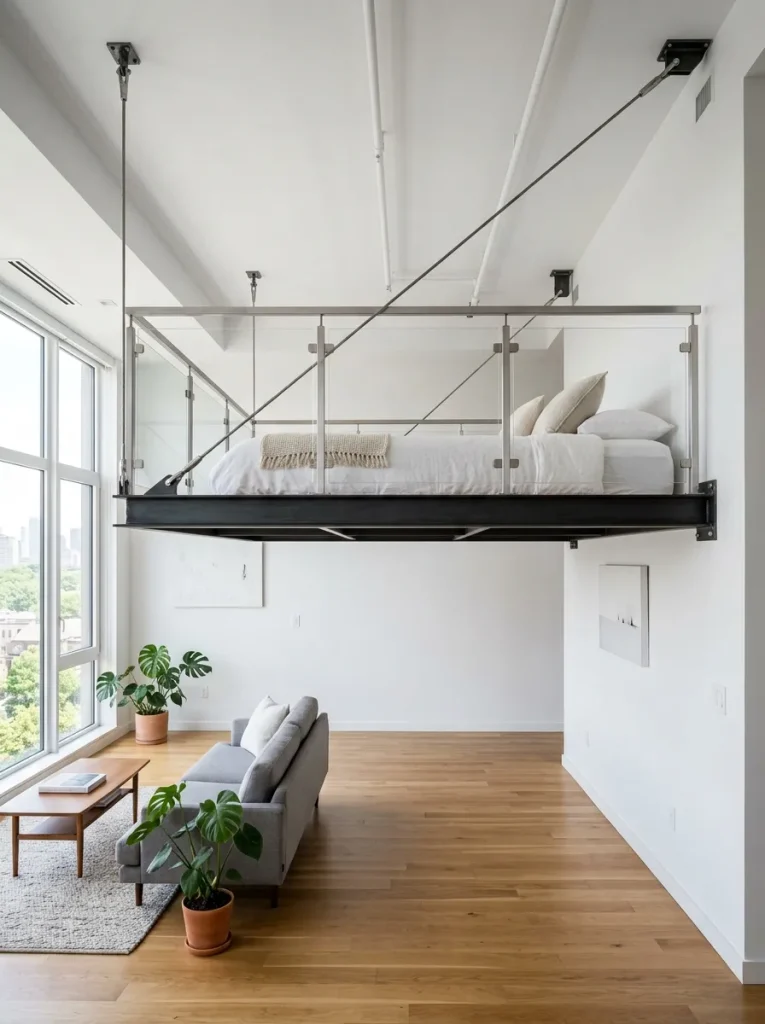
A floating wall-mounted loft bed relies on heavy-duty internal wall anchoring and structural support cables or steel cantilever brackets, eliminating the need for traditional floor posts entirely. This advanced design concept creates an exceptionally open, uncluttered visual aesthetic, as the floor space beneath the bed remains entirely unobstructed by vertical legs. The completely clear floor area beneath the floating platform can be used for flexible furniture arrangements, such as low modular seating, mobile storage carts, or open floor play areas. The minimal visual weight of the suspended structure makes small rooms feel significantly larger and brighter by allowing light to flow freely across the floor surface. Clean, sharp lines and concealed steel hardware complement modern minimalist home decor styles, providing a sleek focal point that appears to float effortlessly in space. Achieving this layout requires solid wall framing support, precise structural engineering, and careful execution to guarantee safe weight distribution.
How to Create
Begin by opening or carefully verifying the internal wall structure using a high-precision stud finder to identify double stud locations or concrete wall anchors capable of supporting heavy loads. Secure a heavy structural steel angle iron ledger or three-by-six hardwood ledger beam horizontally along the wall stud line using half-inch structural lag bolts. Construct the cantilevered bed platform frame using thick-walled steel tubing or high-strength structural lumber, attaching it directly to the wall ledger with heavy steel hinges or structural brackets. Install high-tensile steel aircraft cables or solid steel support rods from the outer elevated corners of the bed frame up to structural wall plates mounted high on wall studs at a forty-five-degree angle. Test the suspended platform for deflection and structural load capacity before securing a lightweight plywood mattress support deck to the internal frame. Install smooth perimeter safety guardrails along exposed outer edges, ensuring all cable tensioners and mounting hardware are fully tightened and locked into place. Complete the build by mounting a lightweight, removable aluminum or timber ladder to access the floating sleeping deck securely.
Idea 9: Split-Level Storage Platform with Step Drawers
Setup Method
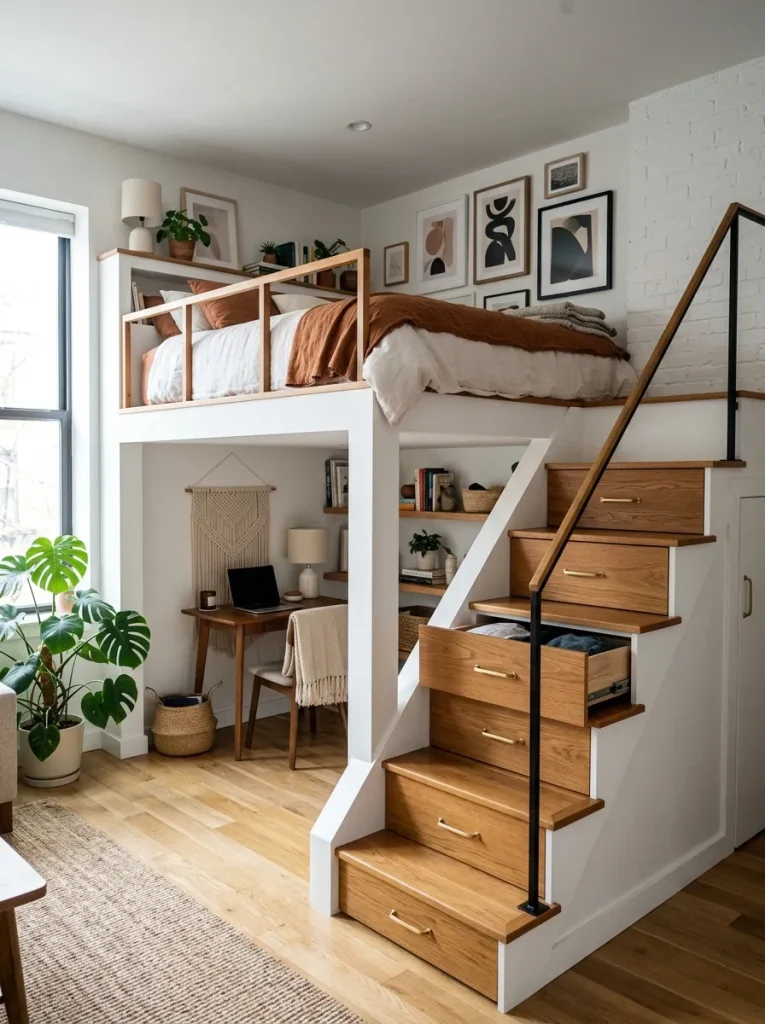
A split-level storage platform elevated four to five feet high incorporates a integrated staircase unit where every step double functions as a deep, functional storage drawer or open cubby. This layout eliminates the vertical discomfort associated with traditional rungs on narrow ladders, replacing them with wide, stable stair treads that are easy to ascend safely. The integrated staircase adds structural mass to the side of the bed frame while providing accessible storage space for shoes, linens, or heavy books inside each step module. Underneath the main elevated bed platform, the generous open headroom can accommodate a pull-out wardrobe, a small study desk, or an open storage cavern. The stepped silhouette creates an appealing architectural profile that enhances the visual character of modern small spaces. Painting the step treads in contrasting wood tones while keeping the riser structure a crisp white accentuates the geometric design lines, turning functional furniture into an attractive interior design feature.
Setup Method
Construct the main raised bed platform using two-by-six framing lumber, anchoring the rear ledger board firmly into wall studs with structural lag screws and supporting the front edge with four-by-four vertical posts. Build the stepped access module independently using three-quarter-inch cabinet-grade plywood, designing three to four cascading box steps with precise rise and run dimensions. Install heavy-duty bottom-mount drawer slides inside each step cavity, constructing custom plywood drawer boxes fitted with sturdy hardwood treads that function as drawer lids or front faces. Position the completed stair assembly flush against the front corner of the elevated bed frame, securing the two structures together using multiple structural connector bolts. Install a continuous, rigid handrail along the outer open side of the staircase step module, anchoring it to both the steps and the upper bed guardrail frame. Cover the upper sleeping platform with smooth, slatted mattress support panels to promote air circulation beneath the mattress base. Apply a non-slip textured polyurethane finish to the step treads to ensure safe footing during daily use.
Idea 10: Multi-Functional Reading Nook Loft with Privacy Screen
Step-by-Step Guide
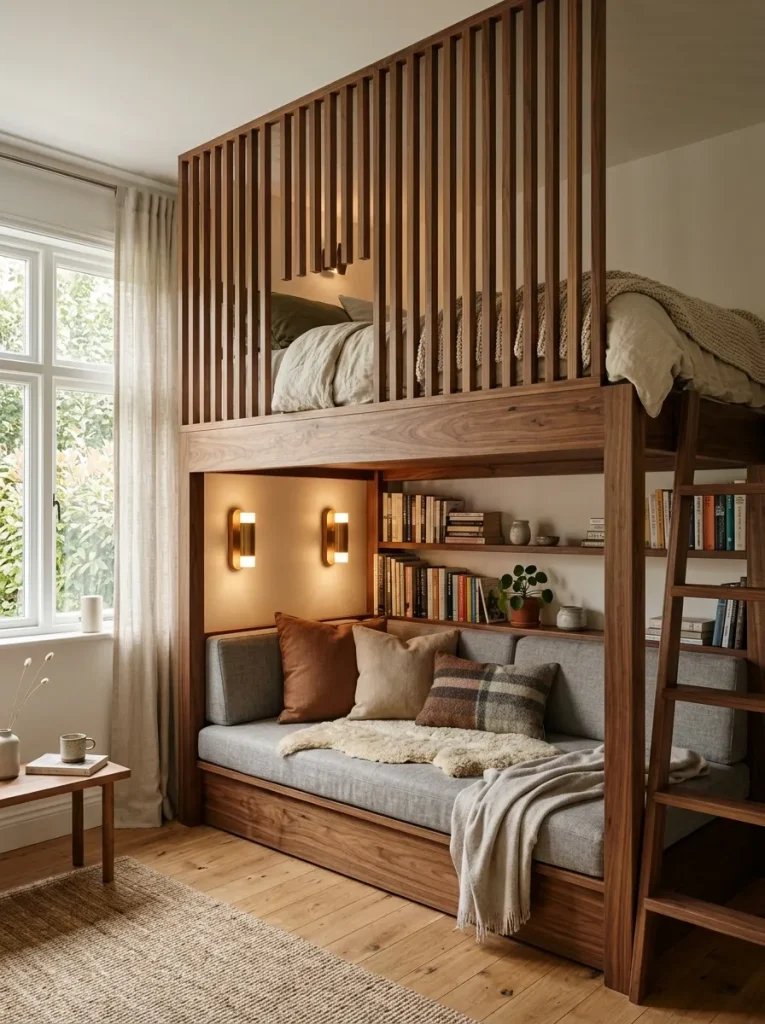
Combining an elevated sleeping loft with a cozy lower reading nook and integrated acoustic privacy screen creates a luxurious multi-functional sanctuary within a tiny room layout. Raising the bed platform allows the installation of a built-in upholstered bench seat complete with plush accent pillows, warm wall sconces, and surrounding book display ledges underneath. The upper bed platform features an aesthetic wood slat screen or geometric divider panel that provides privacy for the sleeper while allowing natural light to filter through the room. This layout is especially useful in shared studio spaces or multi-use rooms where personal privacy and quiet relaxation areas are highly valued. The lower nook functions as a peaceful retreat for reading, resting, or listening to audio during the day, completely separated from the room’s main traffic zones. The combination of natural wood slatted screens, warm ambient lighting, and soft upholstery fabrics creates a tranquil, high-end feel that elevates standard small-space living.
Step-by-Step Guide
Assemble the main upper bed frame platform using heavy structural lumber, anchoring the rear and side frames directly to load-bearing wall studs with structural lag bolts. Erect vertical wooden support posts at the front corners, connecting them with horizontal support beams to form a sturdy, square box framework. Construct the lower reading bench base using three-quarter-inch plywood, building a lift-up bench top attached with piano hinges to access concealed interior storage space. Install vertically aligned timber slats made from clear pine or oak to construct the privacy screen along the front or side of the upper bed platform, leaving uniform one-inch gaps between slats for light passage. Mount low-voltage LED wall sconces inside the lower nook cavity, routing all wiring cleanly behind false wall panels or decorative conduit to maintain a sleek appearance. Place custom high-density foam cushions covered in textured fabric onto the reading bench base, completing the cozy lower seating environment. Finish the entire wood assembly with a natural matte wax or polyurethane finish to highlight the wood grain and protect all surfaces from daily wear.
Common Beginner Mistakes and How to Avoid Them
When constructing elevated or lofted bed structures, several critical design and structural mistakes can compromise safety, comfort, and usability if not properly addressed during planning. The most frequent error is underestimating vertical headroom clearance; failing to leave at least thirty-six inches between the mattress top and the ceiling results in an uncomfortably cramped sleeping area where sitting up is difficult. Another common oversight involves inadequate wall anchoring; relying solely on free-standing legs without securing the framework to load-bearing wall studs leads to frame swaying, squeaking, and potential structural instability over time. Beginners also frequently neglect mattress ventilation; placing a mattress directly onto a solid, non-breathable plywood sheet without air slats can trap body moisture, leading to mold growth under the mattress. Additionally, installing steep, narrow access ladders with sharp steps causes daily discomfort and safety hazards; opting for wide, angled ladder rungs or integrated stair steps ensures comfortable, safe ascension. Finally, choosing overly thick mattresses for high loft frames reduces the effective height of safety guardrails; using a slim profile mattress between six to eight inches deep preserves maximum guardrail safety protection above the bedding line.
Practical Tips for Better Results
Achieving professional-quality results with a lofted bed project requires careful attention to detail, proper surface preparation, and smart functional enhancements during construction. Always pre-drill pilot holes and countersink all screw heads when assembling wood framing to prevent structural timber splitting and ensure a flush, clean surface finish. Sand all lumber systematically through progressive sandpaper grits, starting at eighty grit for rough shaping and finishing with two-hundred-twenty grit for a smooth surface before applying paint or stain finishes. Incorporating integrated electrical wiring, such as USB charging ports and recessed lighting fixtures directly into the bed frame structure, eliminates messy dangling extension cords and keeps the surrounding space tidy. For upper loft platforms, installing a small floating side shelf or wall pocket near the head of the bed provides a convenient spot for holding water bottles, phones, and glasses without requiring a full nightstand. Selecting lightweight, durable textiles for under-bed curtains or upholstery helps absorb ambient room sound, creating a quieter, more relaxing environment underneath the loft platform. Taking time to carefully plan lighting placements, cord routing, and structural finishing touches elevates a simple DIY build into a refined, high-end custom built-in feature.
Styling, Presentation, or Organization Ideas
Styling an elevated bed layout involves creating visual balance so the furniture piece enhances the room’s overall aesthetic without overwhelming the space. Choose light, monochromatic paint finishes such as soft whites, muted greys, or natural wood stains to keep large structural frames visually light and airy. Coordinate under-bed storage containers by using uniform woven baskets, fabric bins, or matching wooden boxes that conceal personal items while adding warm textural contrast. Layering low-profile bedding, crisp linen duvet covers, and compact accent pillows maintains a neat, streamlined appearance on the upper platform without creating excessive visual height. In the space beneath the loft, use targeted accent lighting—such as warm LED strip lights, small brass sconces, or table lamps—to illuminate dark corners and make the under-bed zone feel inviting. Adding a low-pile area rug directly beneath the elevated structure anchors the lower functional zone, clearly defining the space as a distinct living area detached from the rest of the bedroom. Decorating surrounding walls with minimalist artwork or sleek floating shelves keeps the focus on clean lines, maintaining an open, organized, and tranquil environment.
Budget or Time Planning
Planning a lofted bed build around realistic budget expectations and time allocation ensures a smooth, stress-free construction process from start to finish. Simple platform beds with basic under-bed drawer units can generally be built over a single weekend using standard construction lumber and off-the-shelf hardware, keeping overall material costs modest. More complex high-loft structures featuring integrated study desks, custom wardrobes, or built-in staircases require detailed planning, precise material lists, and typically two to three full days of assembly work. To control material costs, source standard-dimensional softwoods like pine or fir for concealed structural framing, reserving higher-grade Baltic birch plywood or hardwoods for visible exterior facings and desktops. Purchasing structural hardware, heavy-duty drawer slides, and fasteners in bulk packs online often yields significant savings compared to buying individual components at local home centers. Allocating a specific contingency budget—typically fifteen percent above estimated material costs—accounts for extra hardware, miscuts, or finishing supplies needed during the build. Breaking the project into manageable phases—such as cutting lumber on day one, priming and finishing components on day two, and final assembly on day three—prevents builder fatigue and guarantees precise structural execution.
Creative Expansion and Advanced Inspiration
Once a core lofted bed framework is successfully installed, numerous creative expansions can further enhance its functionality and visual charm over time. Incorporating fold-down drop-leaf desk panels or hinged dining surfaces onto the exterior support legs creates instant workspace or dining areas that fold completely flat when not required. Installing a retractable projector screen along the front ledger beam transforms the under-bed lounge into an immersive home cinema setup at night with minimal spatial footprint. Advanced builders can integrate smart automation features, such as app-controlled LED mood lighting, hidden pop-up electrical sockets, or motorized storage lifts beneath the platform. Adding modular add-on components, like clip-on side tables, removable hanging planters, or interchangeable pegboard organizer panels, allows the structure to adapt dynamically as storage needs change over time. For homes with slanted ceiling lines or attic conversions, custom-building asymmetrical loft frames that match wall angles maximizes every cubic inch of awkward vertical space. These creative custom additions allow simple elevated beds to evolve into comprehensive, multi-functional architectural hubs perfectly tailored for tiny living environments.