
10 Cute Miniature Succulent Plant Clay Figure Ideas
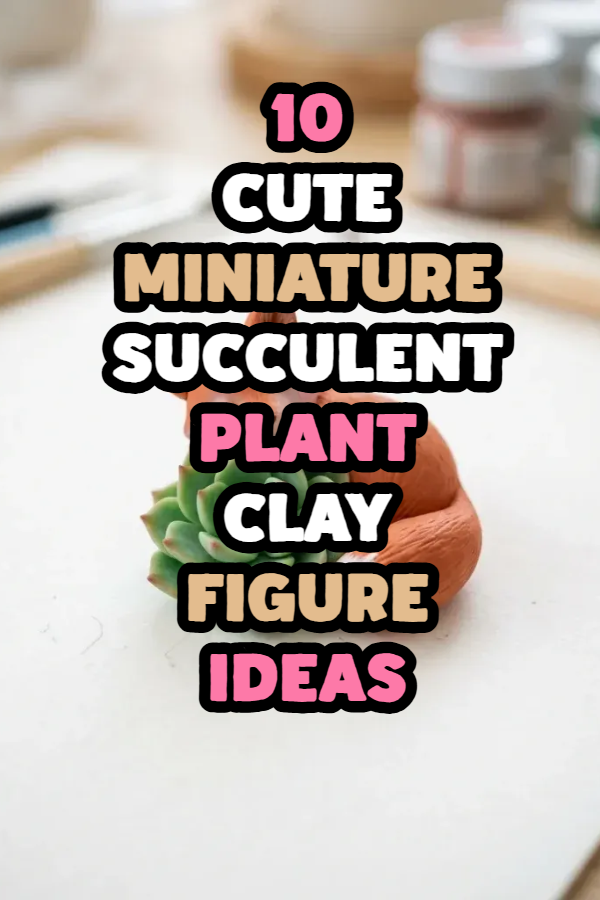
Miniature polymer clay sculpting provides a rewarding avenue for makers to craft charming botanical decorations without the demands of live plant maintenance. Sculpting tiny succulents paired with whimsical character figures allows crafters to explore delicate modeling techniques, subtle color blending, and intricate textural detailing on a compact scale. This comprehensive tutorial delivers ten complete, actionable ideas for crafting miniature succulent clay figures, ranging from sleeping woodland animals cradling rosettes to geometric desk mascots adorned with pastel flora. Readers will discover the structural mechanics of building sturdy internal armatures, blending realistic gradient petal shades with soft chalk pastels, and baking delicate polymer components safely without scorching. These small-scale sculptures serve as versatile decor accents, personalized gifts, planner charms, or collectible desk companions that bring a cheerful natural aesthetic into compact living spaces. By understanding the step by step fabrication techniques detailed throughout this guide, crafters of all skill levels can easily turn basic blocks of oven-bake or air-dry clay into durable, detailed botanical keepsakes that maintain their vibrant colors and lifelike forms indefinitely.
Why This Idea Is Trending or Useful
Miniature clay crafting has experienced a significant resurgence across modern DIY platforms, establishing itself as one of the most engaging trending ideas in the home decor and craft spaces. Compact handmade sculptures offer immense practical value because they require minimal storage space, use very small quantities of raw materials, and produce zero organic waste compared to traditional gardening projects. The design relevance connects directly with contemporary minimalist style and kawaii desk aesthetics, where tiny, intentional focal points bring personality and warmth to modern workstations and floating shelves. From a DIY appeal standpoint, sculpting miniature succulent figures is an exceptionally beginner friendly activity that introduces essential ceramic and polymer modeling skills without requiring expensive pottery wheels or high-temperature kilns. Beginners can complete a full figure during a single crafting session using basic household tools and standard craft store clay. This creative project bridges the gap between sculptural art and practical room decoration, offering an accessible, budget-friendly hobby that yields tangible, charming results suitable for gifting, collecting, or selling at artisan markets.
Materials and Preparation
Thorough preparation and proper material selection ensure your miniature succulent figures hold their structural integrity during sculpting, baking, and display. Essential materials include premium polymer oven-bake clay in botanical hues such as sage green, dusty rose, mint, lavender, and terracotta, alongside white translucent clay for mixing realistic petal gradients. Fundamental sculpting tools comprise silicone-tipped clay shapers, fine-point metal needle tools, mini ball styluses for curling petal cups, acrylic rolling pins, and rigid tissue blades for precision slicing. Surface preparation requires working over a clean, smooth ceramic tile or tempered glass craft mat to prevent lint contamination and allow seamless baking directly on the work slab. Structural integrity for larger figures relies on thin twenty-four gauge floral wire, aluminum foil cores, and liquid polymer clay to serve as an adhesive bond between baked and raw clay components. Planning considerations involve pre-conditioning clay thoroughly through manual kneading or a clay conditioning machine to eliminate air pockets, ensuring smooth, crack-free surfaces before shaping tiny botanical elements.
Sleeping Fox Curled Around Jade Rosette
Step-by-Step Guide
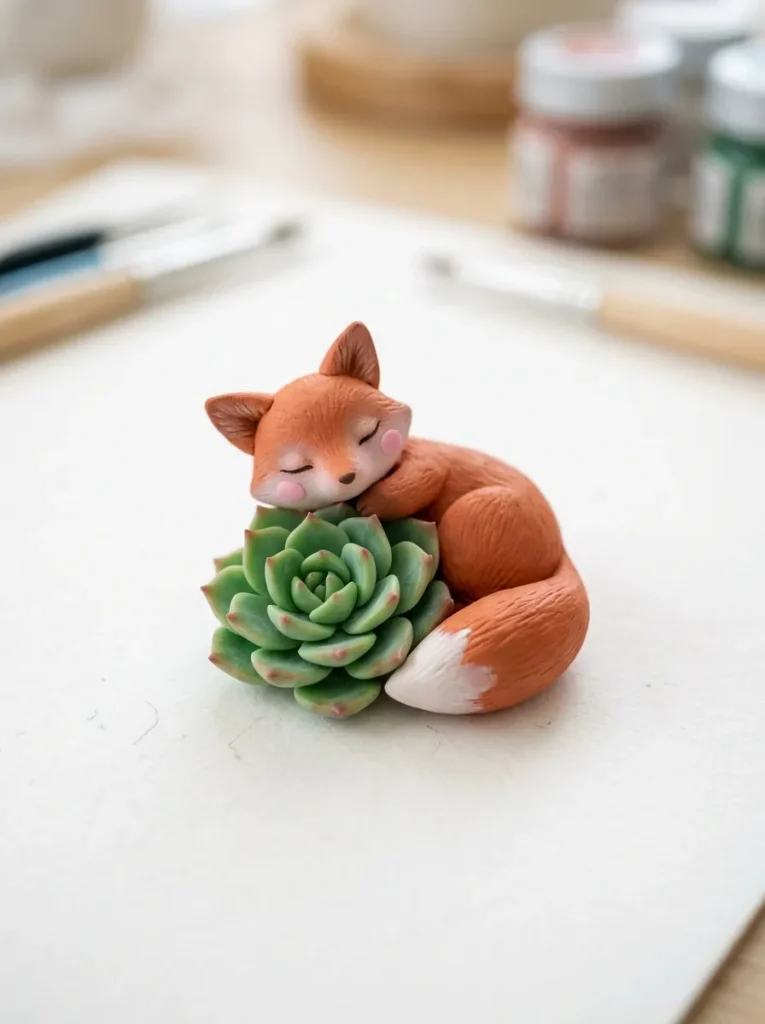
The sleeping fox curled around a jade rosette design merges warm woodland animal aesthetics with the cool, symmetrical geometry of classic succulent leaves. In this concept, a tiny terracotta-orange fox body rests in a crescent shape, wrapping its bushy white-tipped tail protectively around a vibrant green echeveria succulent cluster nestled in the hollow of its belly. The contrasting warmth of the fox fur and the cool jade tones of the botanical leaves create an eye-catching visual balance that feels organic and tranquil. The closed eyes and peaceful posture give the figure a calming presence, making it an ideal decorative accent for bedside tables, quiet study nooks, or terrarium displays. Because the animal wraps snugly around the plant base, the entire figure forms a solid, unified structure that resists chipping and tipping over during daily handling.
To create this woodland succulent companion, begin by conditioning a marble-sized ball of terracotta-orange polymer clay and rolling it into a tapered log shape with one rounded head end. Curve the tapered log into a tight C-shape upon a ceramic baking tile, shaping the wide end into a sleeping head with two small pointed ears and indenting thin curved eye slits using a needle tool. Next, condition sage green and pale yellow clay together to produce thirty tiny teardrop-shaped succulent petals, flattening each petal slightly with a mini ball stylus to create natural hollows. Assemble the jade rosette by layering petals concentrically starting from the center outward, pressing the finished succulent cluster into the interior curve of the fox belly. Blend a small piece of white clay onto the tip of the fox tail, curl the tail over the front edge of the succulent leaves, apply a drop of liquid clay at the connection points, and bake at the manufacturer recommended temperature.
       +---------------------------------------------+
       |   Sculpted Terracotta Fox Head & Closed Eyes|
       +---------------------------------------------+
                              |
       +---------------------------------------------+
       |   Concentric Sage Green Echeveria Rosette   |
       +---------------------------------------------+
                              |
       +---------------------------------------------+
       |   Curled Tail with White Tip Base Anchor    |
       +---------------------------------------------+
Kawaii Bunny Planter with String of Pearls
Execution Process
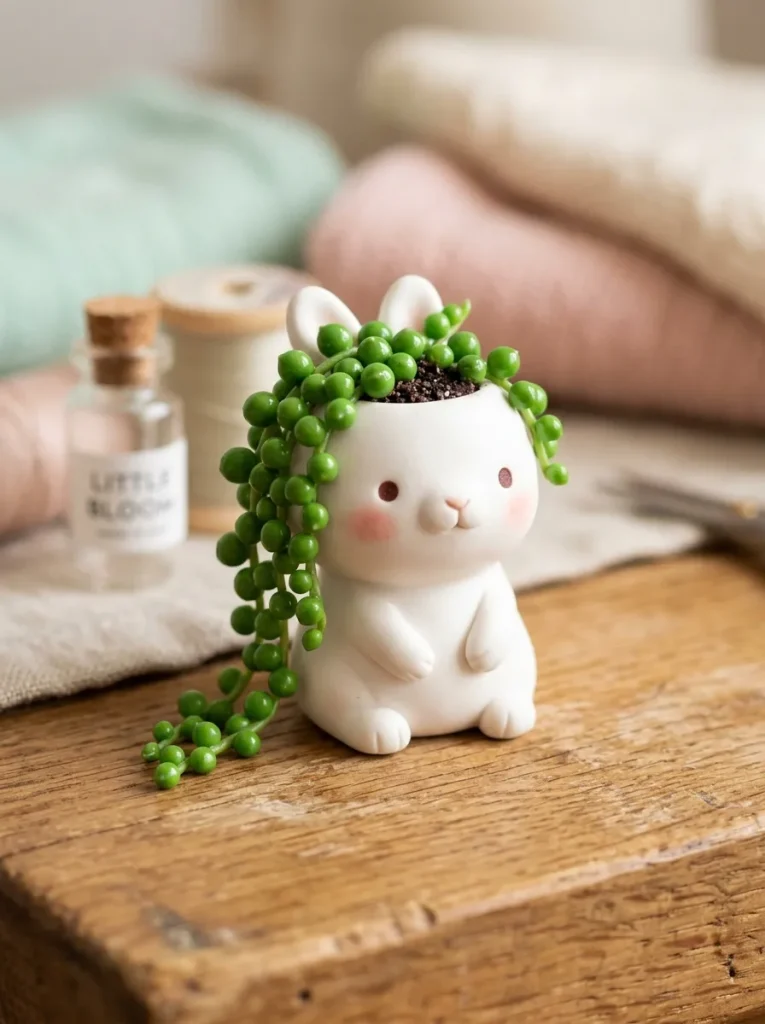
The kawaii bunny planter with a trailing string of pearls presents a delightful blend of animal character styling and delicate cascading foliage. This sculpture features a plump, glossy white rabbit figure posed upright with its paws resting against the rim of an open head cavity that serves as an integrated planter bowl. Spilling out of the bunny head is a lush arrangement of cascading spherical succulent beads that drape downward like real string-of-pearls vines. Tiny pink blush cheeks, simple dotted black eyes, and delicate upright bunny ears give the sculpture an expressive, cheerful personality that brightens any windowsill or office cubicle. The trailing vines wrap organically around the side of the bunny face, adding dynamic vertical movement and soft green texture against the smooth, clean white ceramic-style finish.
Begin fabrication by rolling white polymer clay into a smooth sphere approximately one inch in diameter, flattening the base against a tile so the bunny stands stably. Use a rounded ball stylus tool to hollow out a smooth indentation in the top third of the sphere, creating a shallow bowl shape with even wall thickness. Roll two small teardrop cones for the bunny ears, tinting the inner ear hollows with soft pink chalk pastel before attaching them firmly to the upper rim of the head bowl. To construct the succulent foliage, roll numerous tiny, uniform green clay balls measuring one to two millimeters each, skewering them lightly along fine lengths of green floral wire to form trailing strings of pearls. Anchor the wire ends into the head cavity with liquid polymer clay, arranging the succulent strands so they spill over the front and sides of the bunny planter, then bake and seal the black dotted eyes with a drop of gloss glaze.
Resting Sloth Hanging from Burro Tail Branch
How to Make
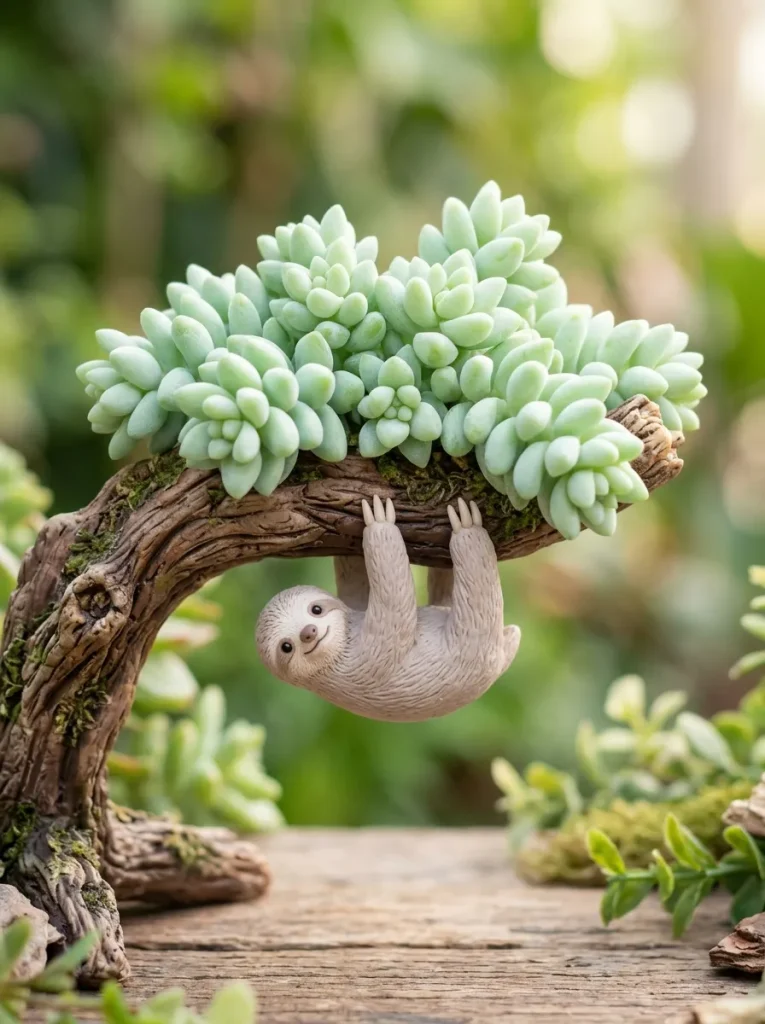
The resting sloth hanging from a burro tail branch captures a relaxed, whimsical aesthetic through suspended pose architecture and dense succulent textures. This figure depicts a light brown sloth with dark facial markings lazily clinging to a curved faux wooden branch, with lush plump burro tail succulent clusters sprouting along the top of the wood. The elongated, interlocking arms and legs of the sloth clasp around the horizontal branch, creating a charming suspension effect that makes the figure appear balanced in mid-air. The burro tail succulent leaves feature densely overlapping cylindrical teardrops in soft pastel mint and powder blue, contrasting against the rough, bark-textured brown branch underneath. This sculpture works wonderfully as a hanging rear-view mirror charm, a plant pot hanger, or a miniature garden focal point.
Constructing this dynamic suspended figure begins by shaping an armature from eighteen-gauge craft wire into a gentle horizontal arch, wrapping the wire with textured brown clay to resemble a tree branch with realistic wood grain lines. Next, roll light taupe clay into a small oval body and four elongated limb cylinders, scoring and blending the feet around the underside of the branch so the sloth hangs securely beneath it. Use a fine needle tool to texture the sloth body with soft, directional fur grooves, adding a cream facial mask with dark brown eye stripes and a miniature black nose. For the burro tail succulent, form dozens of tiny, plump mint-green rice grain shapes, dusting each leaf with white chalk pastel to mimic natural succulent farina powder. Press the mint succulent leaves in overlapping rows along the top surface of the branch above the sloth, secure all joints with liquid bakeable adhesive, and bake thoroughly.
Pastel Hedgehog with Spiky Aloe Quills
Setup Method
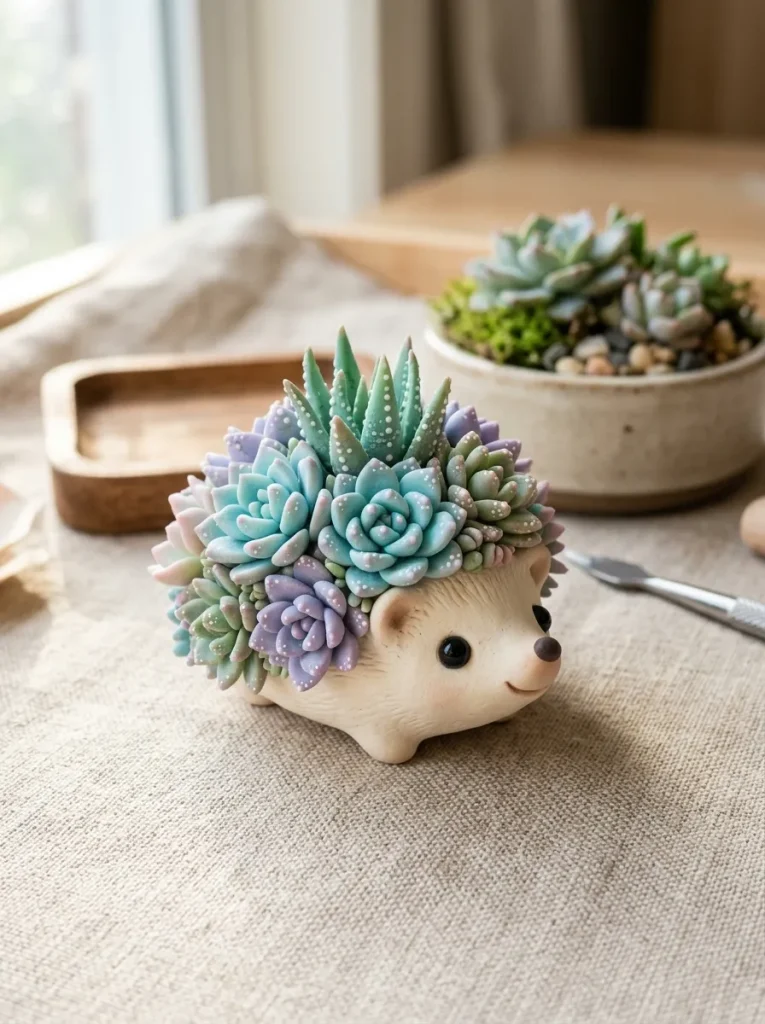
The pastel hedgehog with spiky aloe quills reimagines traditional animal textures by replacing sharp woodland spines with vibrant, fleshy succulent leaves. This sculpture features a soft cream-colored hedgehog face with rounded ears and a tiny upturned snout, while its back is covered in a dense crown of tapered, upright aloe vera or haworthia leaves. The succulent spines feature rich turquoise, seafoam, and lavender gradients, accented with tiny raised white clay dots that simulate realistic botanical variegation. This playful concept turns a prickly creature into a soft, approachable tabletop companion that brings tactile texture and playful pastel coloring into your home decor collection.
| Component Layer | Optimal Clay Color | Structural Detailing Method |
|---|---|---|
| Hedgehog Underbody | Warm Bisque Cream | Smooth teardrop shape with flattened bottom surface |
| Facial Features | Jet Black & Soft Rose | Micro-dot baked clay eyes and pastel dusted blush cheeks |
| Aloe Succulent Quills | Mint, Turquoise & Lavender | Tapered cones scored with vertical central spine ridges |
| Variegated Accents | Opaque Bright White | Microscopic clay dots applied along outer quill edges |
Start by conditioning warm cream clay into an egg-like shape, pinching one end slightly upward to form a pointed hedgehog snout. Flatten the bottom surface firmly against your baking tile to ensure stable upright seating, and attach two tiny curved ear flaps on either side of the head. Prepare the succulent quills by rolling multiple small cones of lavender and turquoise clay, pinching the tips sharp and indenting a fine crease down the center of each leaf with a blade. Begin attaching the aloe quills at the rear base of the hedgehog body using liquid clay, working forward in overlapping layers until the entire back is blanketed in upright succulent foliage. Using a needle tool, place microscopic white clay dots along the margins of each aloe leaf for authentic texture, add tiny black clay beads for the eyes and nose, and bake until firm.
       +---------------------------------------------+
       |   Cream Snout with Dotted Eyes & Nose Tip   |
       +---------------------------------------------+
                              |
       +---------------------------------------------+
       |   Layered Turquoise & Lavender Aloe Quills  |
       +---------------------------------------------+
                              |
       +---------------------------------------------+
       |   Variegated White Edge Dots & Solid Base   |
       +---------------------------------------------+
Kawaii Boba Cup Sprouting Rosette Straw
Step-by-Step Guide
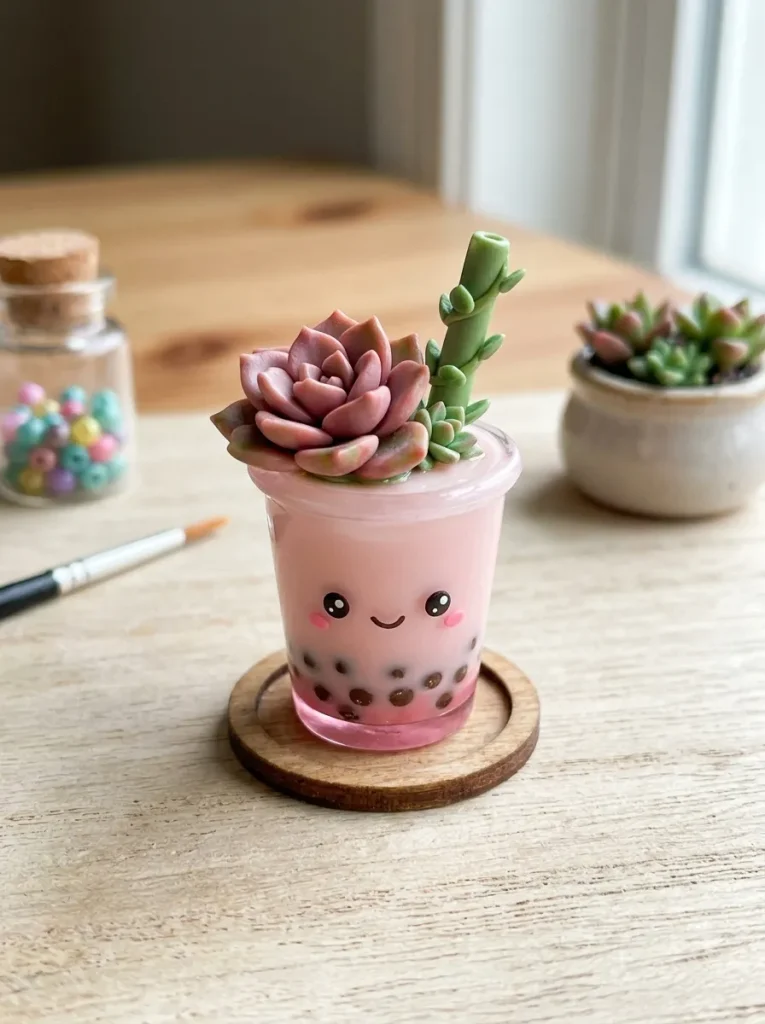
The kawaii boba cup sprouting a rosette straw merges popular beverage aesthetics with botanical succulent art in a playful, modern desk accessory. The sculpture is shaped like a miniature tapered bubble tea cup filled with pastel pink or milky tan clay, featuring translucent brown boba pearls visible along the lower perimeter. The top lid is sealed with a smooth white clay dome that acts as the soil bed, from which a large, blooming echeveria rosette sprouts directly upward alongside an angled green succulent straw. The front of the miniature cup features a sweet kawaii face with wide glossed eyes and a subtle smile, creating a trendy, cheerful accent that fits perfectly next to computer monitors, pencil organizers, and study materials.
To build this refreshing craft, roll a cylinder of light tan or pastel pink polymer clay, trimming the base slightly narrower than the top to mimic a tapered boba cup silhouette. Roll tiny spheres of translucent dark brown clay, pressing them around the lower interior wall of the cup to create the look of tapioca pearls resting at the bottom. Cap the top of the cup with a rounded disc of white clay, smoothing the edge seams cleanly against the cup rim. Roll a thin cylinder of green clay around a wire core to form the succulent straw, inserting it diagonally through the white lid. Sculpt a multi-petaled roseette using dusty pink and pale green clay, attaching the bloom centrally onto the cup lid using liquid clay adhesive. Cure the piece in the oven, and once cooled, paint a delicate smiling face on the cup front with black acrylic ink, sealing the face and boba pearls with a crystal-clear gloss varnish.
Miniature Terracotta Pot Turtle with Moss Back
Execution Process
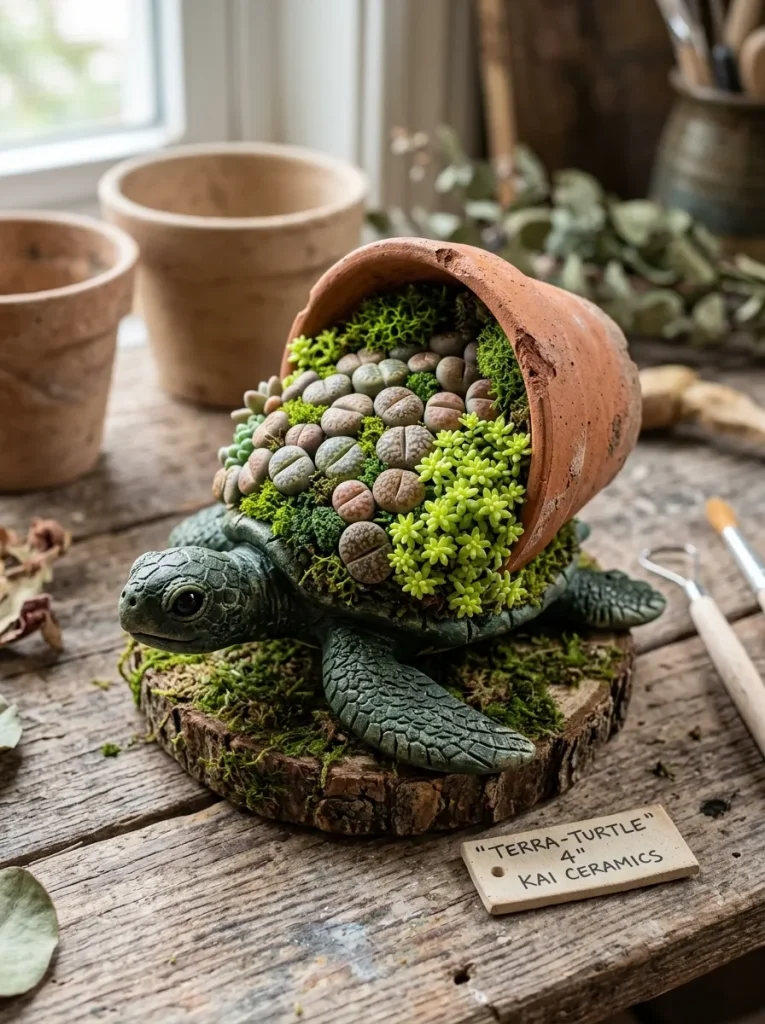
The miniature terracotta pot turtle with a moss back transforms the natural dome shape of a turtle shell into a thriving micro-garden landscape. The turtle features a warm moss-green head, four textured flippers, and a stubby tail extending from beneath a handmade faux terracotta flowerpot base that serves as its shell. Inside the overturned pot cavity on the turtle back is a rich assemblage of micro-succulents, including mini lithops living stones, tiny sedum clusters, and textured green clay moss. This charming hybrid design evokes the feeling of a wandering desert garden, offering intricate botanical details that reward close inspection and make it a standout showpiece on a tiered display tray.
                 +---------------------------------+
                 |  Micro Lithops & Sedum Clusters |
                 +---------------------------------+
                                  |
            +-------------------------------------------+
            |  Handmade Faux Terracotta Pot Shell Bowl  |
            +-------------------------------------------+
                                  |
            +-------------------------------------------+
            |  Textured Green Turtle Flippers & Head    |
            +-------------------------------------------+
Begin by shaping terracotta-colored polymer clay into a small, hollow inverted bowl with a flattened rim, texturing the outer surface lightly with a toothbrush to simulate real earthenware ceramic. Next, roll sage green clay into four oval flippers and a round head, scoring fine wrinkling details at the neck and ankle joints before attaching them around the bottom rim of the terracotta shell. Fill the hollow interior of the pot shell with dark brown textured clay to represent potting soil, stippling the surface vigorously with a stiff-bristled brush. Sculpt three distinct varieties of miniature succulents—tiny cleft lithops stones in tan clay, micro jade rosettes in olive green, and tiny spherical sedum clusters in lime green—pressing them firmly into the brown soil base with liquid clay. Bake the completed turtle sculpture on a ceramic tile, allowing it to cool before applying a matte varnish over the terracotta shell and a satin sheen over the succulent leaves.
Tiny Cat Peeking from Hanging Macrame Planter
How to Make
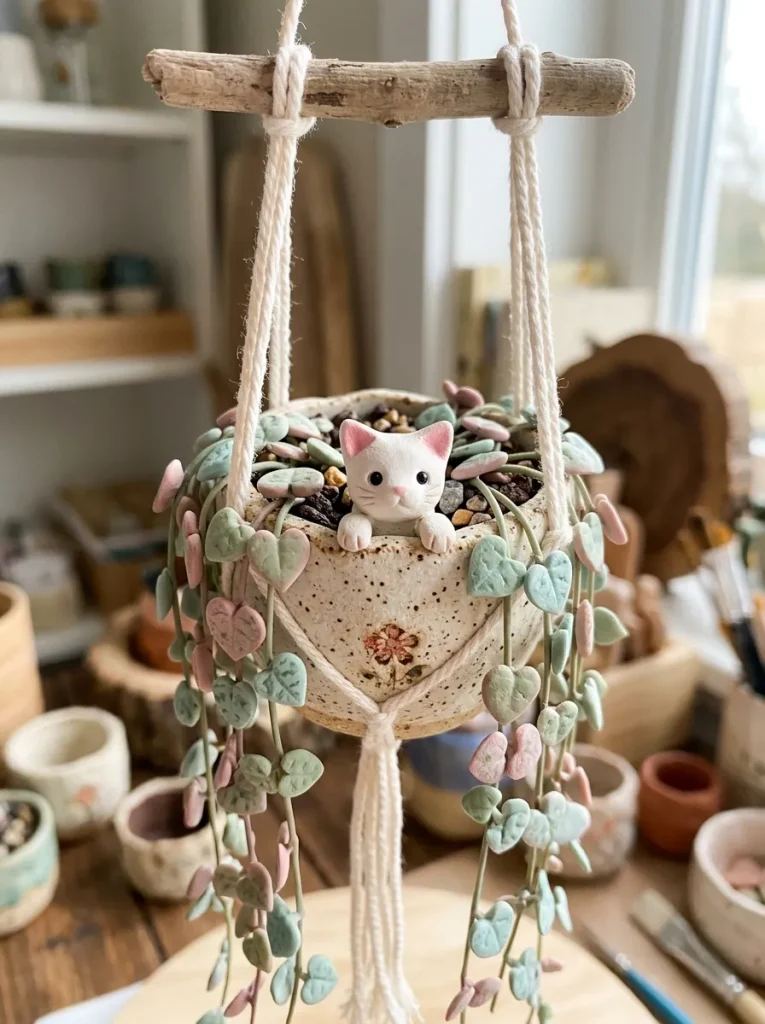
The tiny cat peeking from a hanging macrame planter combines feline charm with retro textile styling and delicate hanging succulent foliage. This sculpture depicts a curious little white or calico cat resting inside a clay-sculpted hanging bowl, with its front paws and chin resting over the front edge. Trailing string-of-hearts or calico kitten succulent leaves tumble down from the planter around the cat, featuring heart-shaped leaves tinted in dusty rose and pale sage. The bowl is suspended by delicate braided white clay cords or real embroidery floss attached to a miniature wooden ring, allowing the entire sculpture to hang gracefully from shelf brackets, wall hooks, or window frames.
Construct the planter bowl by pressing a marble-sized ball of white clay over a round wooden bead to create a uniform hemispherical cup, trimming the rim cleanly with a craft blade. Shape the cat figure using white clay, forming a small head with triangular pink-lined ears, two resting front paws, and a curved tail, anchoring the cat inside the bowl so only the upper body and paws peek over the rim. To make the trailing succulents, roll tiny heart-shaped petals from rose-tinted translucent clay, dusting the leaf surfaces with dark green chalk pastel before stringing them along fine embroidery threads anchored into the bowl base. Pierce three tiny holes equidistant around the rim of the planter cup before baking. Once baked, thread white cotton embroidery floss through the holes, braiding the strands upward to form a miniature macrame hanger tied securely to a small brass or wooden craft ring.
Sitting Panda Holding a Pink Moonstone Succulent
Setup Method
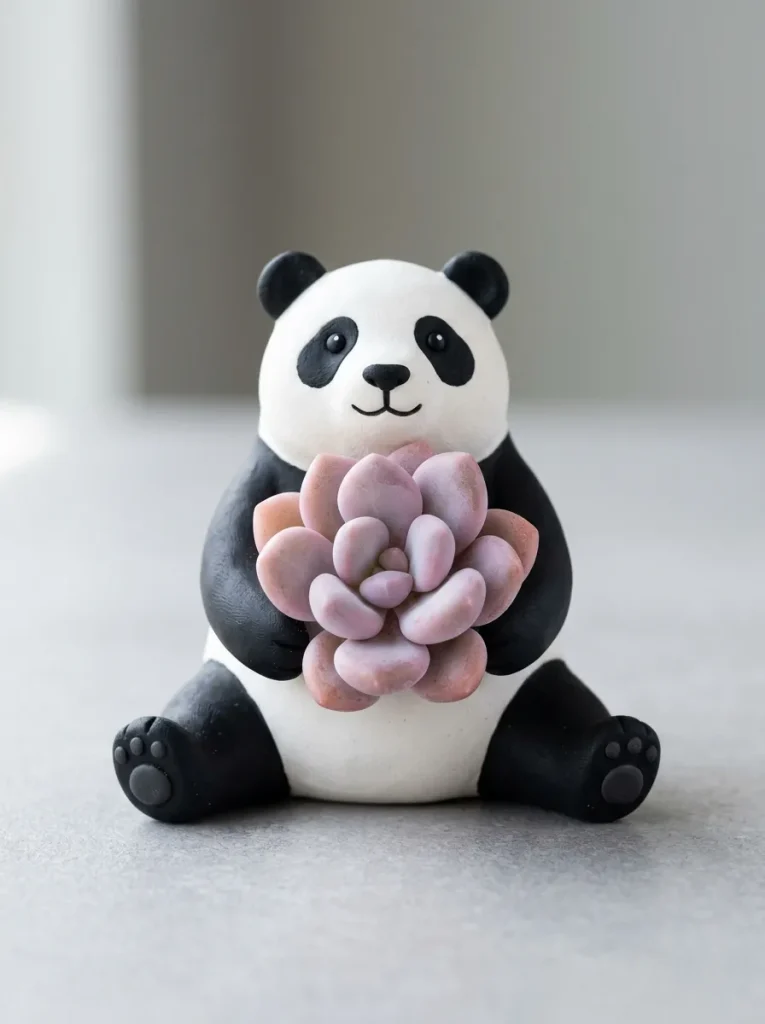
The sitting panda holding a pink moonstone succulent pairs high-contrast monochrome animal modeling with soft, pastel botanical geometry. The figure features a classic black-and-white panda seated with its back legs splayed out in a relaxed, chubby pose, holding a large, plump pachyphytum moonstone succulent bloom in its front paws like a treasured treat. The moonstone succulent features thick, egg-shaped leaves in delicate lavender and pastel pink, dusted with white chalk powder to create a soft frosted appearance. The bold contrast between the deep black panda limbs and the glowing pastel succulent creates a striking decorative balance that commands attention on any desktop or floating display ledge.
| Figure Section | Material Selection | Sculpting & Assembly Technique |
|---|---|---|
| Panda Body & Head | Solid White Opaque Clay | Smooth round shapes blended seamlessly at the neck joint |
| Panda Limbs & Ears | Deep Velvet Black Clay | Teardrop arms and splayed leg cylinders attached with liquid clay |
| Moonstone Petals | Translucent Pastel Pink | Plump, rounded teardrop leaves dusted with white chalk pastel |
| Facial Expression | Black Clay & Fine Ink | Slanted black eye patches with white micro-dot highlights |
To assemble this adorable panda figure, roll a walnut-sized ball of white clay for the chubby torso and a slightly smaller sphere for the round head, smoothing the neck junction firmly with a silicone blending tool. Roll four tapered cylinders of black clay for the arms and legs, attaching the back legs flat along the bottom of the body so the panda sits independently without support. Attach two small black half-spheres to the top of the head for the ears, adding teardrop-shaped black eye patches with tiny white pupil dots to create a sweet expression. Sculpt the moonstone succulent by shaping seven to nine plump, rounded petal ovals from translucent pink clay, dusting each leaf thoroughly with shaved white chalk pastel. Assemble the petals into a tight, chunky rosette, place it centrally against the panda chest, wrap the black panda arms securely around the bloom with liquid clay, and bake at the recommended heat setting.
       +---------------------------------------------+
       |   White Panda Head with Black Ear & Eye Spots|
       +---------------------------------------------+
                              |
       +---------------------------------------------+
       |   Chubby Black Arms Holding Pink Moonstone  |
       +---------------------------------------------+
                              |
       +---------------------------------------------+
       |   Splayed Black Back Legs & Stable Flat Base|
       +---------------------------------------------+
Pastel Mushroom House with Succulent Chimney Smoke
Step-by-Step Guide
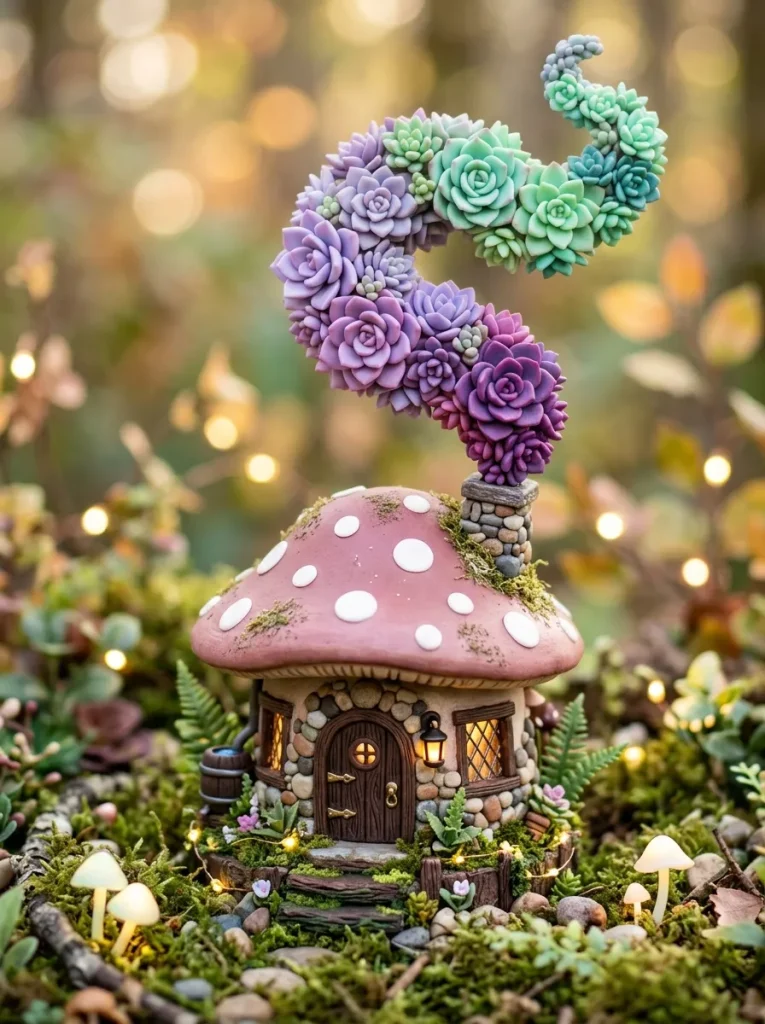
The pastel mushroom house with succulent chimney smoke introduces an imaginative fairy-tale aesthetic into miniature clay modeling. The sculpture is structured as a tiny, whimsical cottage with a cream-colored stalk base, tiny arched wooden door, and a wide mushroom cap roof in soft dusty rose accented with white polkadots. Spilling out from a tiny stone chimney on the mushroom roof is a swirling plume of small, graduated succulent rosettes and sedum beads that mimic curling chimney smoke rising into the air. This narrative-driven sculpture captures the imagination, making it a wonderful conversation piece for bookshelf vignettes, fairy garden bowls, or tabletop curio cabinets.
To build this whimsical mushroom cottage, roll a cone of cream clay for the stem base, flattening the bottom and indenting wood grain textures along a tiny brown clay door applied to the front. Form a wide, domed mushroom cap from dusty rose clay, hollowing the underside slightly to fit snugly over the top of the stem base with a bead of liquid clay. Roll a small cylinder of gray clay scored with stone lines to serve as the chimney, mounting it onto the slope of the mushroom cap. To create the succulent smoke plume, insert a curved piece of twenty-gauge floral wire into the top of the chimney, sculpting a series of echeveria rosettes that transition from dark purple at the base to pale lavender and mint green at the top. Press the succulent blooms along the wire curve so they appear to billow outward like magical botanical smoke, add tiny white clay dots across the mushroom cap, and bake until completely set.
Miniature Whale Surfacing with Succulent Blowhole Spout
Execution Process
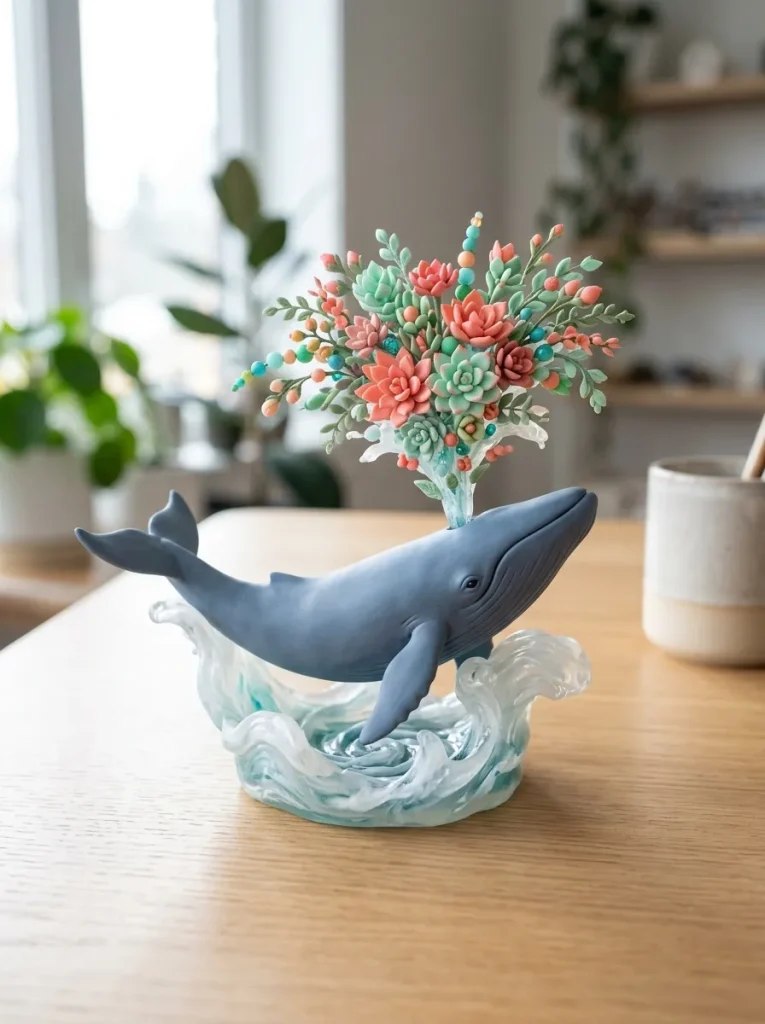
The miniature whale surfacing with a succulent blowhole spout pairs marine wildlife forms with desert flora in an unexpected, visually delightful composition. The figure depicts a smooth, stylized blue-gray whale swimming across a flat translucent white clay base that resembles calm ocean water. Emerging vertically from the blowhole on the whale back is a vibrant, blooming spray of variegated string-of-pearls and tiny coral-colored succulent petals that represent an oceanic water spout. The clean, hydrodynamic lines of the whale body contrast with the textured, botanical spray emerging from its back, creating an artistic, modern design that fits beautifully into coastal or contemporary room themes.
                 +---------------------------------+
                 |  Coral & Mint Succulent Spout   |
                 +---------------------------------+
                                  |
            +-------------------------------------------+
            |  Streamlined Slate Blue Whale Figure      |
            +-------------------------------------------+
                                  |
            +-------------------------------------------+
            |  Translucent White Swirling Water Base    |
            +-------------------------------------------+
Fabricate this aquatic botanical sculpture by conditioning slate blue polymer clay into a smooth, streamlined teardrop whale body with an upturned tail fluke and two side pectoral fins. Flatten the underside of the whale against a thin, textured disc of translucent clay swirled with white to represent ocean ripples. Pierce a clean two-millimeter hole in the upper back of the whale using a needle tool to serve as the blowhole mount. Sculpt the succulent water spout by combining tiny teardrop petals in coral pink, mint green, and pale yellow around a central vertical wire, fanning the leaves outward at the top to simulate bursting water. Insert the wired succulent spray into the blowhole with a drop of liquid bakeable adhesive, score tiny smiling eyes along the sides of the whale head, and bake the entire sculpture on a ceramic tile before finishing with a semi-gloss protective coat.
Common Beginner Mistakes and How to Avoid Them
When sculpting miniature succulent clay figures, beginners often encounter several recurring challenges that can compromise the appearance and durability of their creations. A frequent error is failing to condition polymer clay thoroughly before shaping, which leads to brittle finished figures that crack easily along petal edges during or after baking. Always knead clay firmly between your palms or pass it through an acrylic conditioning roller until it becomes completely pliable and warm to the touch. Another widespread mistake is baking miniature sculptures at excessive temperatures or placing them too close to heating elements, which causes delicate pastel petals to scorch and turn brown.
+-------------------------------------------------------------+
|              Common Error: Overheating Thin Petals          |
|        (Scorches delicate pastels and causes brittleness)   |
+-------------------------------------------------------------+
                               |
                               v
+-------------------------------------------------------------+
|       Solution: Oven Thermometer & Foil Baking Tent         |
|         (Ensures precise temperature & heat diffusion)      |
+-------------------------------------------------------------+
Beginners also frequently struggle with lint and fingerprint transfer onto smooth clay surfaces, which ruins the clean aesthetic of light-colored figures. To prevent this, wash hands frequently, wipe work surfaces with rubbing alcohol, and smooth finished surfaces with a cotton swab dipped in isopropyl alcohol before baking. Furthermore, relying entirely on raw clay friction to join small limbs and petals often results in broken components later. Always reinforce joints with liquid polymer clay, bakeable adhesive, or internal wire armatures to guarantee long-term structural durability.
Practical Tips for Better Results
Achieving professional, realistic results with miniature clay succulents relies on refined texturing methods, subtle color grading, and proper curing techniques. Always incorporate soft chalk pastels into your coloring routine by scraping pastel sticks into a fine powder with a craft blade and applying the pigment to raw clay petals using a soft makeup brush. Shading the tips of green succulent petals with dusty rose, burgundy, or lavender powder before baking mimics natural sun stress and gives flat clay realistic botanical depth. When shaping petals, use a smooth metal ball stylus to roll over the edges on the palm of your hand, creating realistic cupped contours that make the clay look fleshy and alive.
+-------------------------------------------------------------+
|          Apply Chalk Pastel Dust to Raw Petal Tips          |
|             (Recreates natural botanical sun stress)        |
+-------------------------------------------------------------+
                               |
                               v
+-------------------------------------------------------------+
|         Use Metal Ball Stylus to Cup Petal Centers          |
|           (Builds organic, three-dimensional curves)        |
+-------------------------------------------------------------+
                               |
                               v
+-------------------------------------------------------------+
|         Bake Directly on Ceramic Tiles with Foil Tent       |
|            (Prevents flat spots and maintains even heat)    |
+-------------------------------------------------------------+
To preserve the delicate matte finish characteristic of real succulents, avoid using high-gloss varnishes over the entire figure. Instead, use a clear matte polymer sealant over the botanical leaves, reserving high-gloss glazes exclusively for tiny eyes, wet noses, or water droplets to create eye-catching textural contrast. Always use a dedicated freestanding oven thermometer to verify the true internal temperature of your baking oven, as built-in appliance dials are often inaccurate by ten to twenty degrees.
Styling, Presentation, or Organization Ideas
Curating and displaying a collection of miniature succulent clay figures elevates individual handmade crafts into an organized, eye-catching home decor feature. Arrange your completed figures across tiered wooden display steps or floating wall ledges, grouping complementary color palettes together to establish balanced visual vignettes. Placing miniature figures inside glass geometric terrarium bowls alongside real river stones, preserved reindeer moss, and dried wood slices creates an enchanting fairy garden display that protects the clay pieces from household dust.
+-------------------------------------------------------------------+
|               MINIATURE FIGURE CURATED DISPLAY MAP                |
+-------------------------------------------------------------------+
|   [ Glass Terrarium ]    [ Tiered Wood Ledge ]  [ Desk Station ]  |
|   - Reindeer Moss Bed    - Pastel Woodland Set  - Monitor Mascot  |
|   - Polished Pebbles     - Symmetrical Spacing  - Pen Cup Guard   |
|   - Protected from Dust  - Variable Heights     - Daily Companion |
|                                                                   |
|   [================= Visual Harmony Maintenance ==================]|
|   - Balanced mix of animal figures, pastel flora & natural wood   |
+-------------------------------------------------------------------+
For crafters who enjoy gift-giving, presenting a miniature succulent figure inside a tiny repurposed ceramic espresso cup or an upcycled mini wooden box turns a small craft into a thoughtful, personalized present. Line the container with preserved sheet moss or shredded kraft paper, nestling the clay figure securely in the center. You can also embed a small neodymium craft magnet into the base of the figure before baking, transforming your sculptures into decorative magnetic organizers for memo boards, refrigerators, and metal desk lamps.
Budget or Time Planning
Sculpting miniature succulent clay figures is an exceptionally economical hobby that provides high creative value with very little financial investment. A single standard two-ounce block of polymer clay can yield six to eight complete miniature succulent figures, meaning a starter set of basic colors can produce dozens of unique sculptures for a minimal initial spend. Most fundamental sculpting tools—such as needle probes, toothpicks, rolling cylinders, and baking tiles—can be repurposed from standard household items or acquired in affordable multi-piece starter kits.
| Project Phase | Active Crafting Time | Estimated Cost Window | Essential Tools & Materials |
|---|---|---|---|
| Clay Conditioning & Mixing | 15 – 20 Minutes | $3 – $6 | Polymer clay blocks, acrylic roller |
| Figure & Petal Sculpting | 30 – 45 Minutes | $1 – $3 | Ball stylus, needle tool, tile mat |
| Pastel Shading & Assembly | 15 – 20 Minutes | $2 – $4 | Chalk pastels, soft brush, liquid clay |
| Baking & Protective Sealing | 30 – 45 Minutes | Nominal | Oven, foil tent, matte/gloss glaze |
From a time management perspective, crafting a single miniature figure takes approximately one to two hours from initial conditioning to final baking. To optimize efficiency during multi-piece projects, work in organized assembly-line batches by conditioning and rolling all base bodies first, followed by mass-producing petal teardrops in varying color gradients. Preparing multiple completed figures on a single ceramic tile allows you to bake an entire collection simultaneously, saving both electrical energy and craft preparation time.
Creative Expansion and Advanced Inspiration
Once you have mastered foundational miniature sculpting and petal assembly techniques, advanced creative variations offer limitless potential for artistic expansion. Consider integrating functional accessories into your clay sculptures, such as embedding threaded metal eye pins into the top of animal heads before baking to transform tiny figures into charming charm pendants, zipper pulls, or stitch markers. You can also experiment with translucent and glow-in-the-dark polymer clays, blending luminous pigments into succulent leaf tips to create magical nightlight desk companions that glow softly in dark rooms.
Key Takeaway: Embedding functional metal hardware or exploring luminescent specialty clays transforms basic miniature sculptures into wearable jewelry, practical desk tools, and enchanting illuminated accents.
Another rewarding expansion involves combining your miniature clay figures with real living air plants (Tillandsia). By sculpting custom hollowed-out animal saddles or mini cradle bowls, your baked polymer figures can serve as functional, water-safe holders for tiny live air plants. You can also experiment with embedding micro LED fairy lights into hollow clay bases to create illuminated botanical sculptures. These creative variations elevate simple miniature crafts into dynamic, multi-medium art pieces that bring nature, craft, and functional design together seamlessly.