

10 Easter Hand Crafts For Kids
Easter hand crafts for kids combine creativity, learning, and seasonal celebration into one practical activity that fits perfectly within Pinterest ideas and DIY culture. These creative projects help children develop fine motor skills, color recognition, patience, and planning while producing handmade decorations that can be used at home, in classrooms, or during family gatherings. A well-designed craft project gives children a clear process to follow while allowing room for personal expression, which is why step by step tutorials remain highly popular across Pinterest inspiration boards. Easter themes naturally include bright colors, spring symbols, eggs, bunnies, and flowers, making them ideal for beginner friendly creative projects. The focus of this article is not only to present decoration ideas but also to explain how each project works, what materials are needed, and how parents or teachers can guide children effectively. Every idea is designed to be realistic, safe, and easy to execute with common materials, avoiding complicated tools or advanced techniques. These projects also support minimalist style organization because they use simple supplies and clear preparation methods. By following structured instructions, children can complete each project successfully while learning how to plan, create, and display their work in an aesthetic and meaningful way that matches modern Pinterest trends.

Why Easter Hand Crafts Are Trending and Useful
Easter hand crafts continue to grow in popularity because they combine seasonal celebration with hands-on learning and practical home decor outcomes. Parents, teachers, and caregivers increasingly search for easy project ideas that keep children engaged without relying on screens, and Pinterest ideas offer visual inspiration that encourages real-world creativity. Crafting activities support child development by improving hand coordination, concentration, and problem-solving skills while introducing basic concepts of design and organization. In addition, these projects are budget ideas because most materials can be reused from household supplies such as paper, cardboard, paint, and glue. The trend toward handmade decoration also connects with modern design preferences where personalized items feel more meaningful than store-bought alternatives. Easter crafts are especially useful because they can serve multiple purposes, including table decoration, classroom displays, gift tags, or festive wall art. Another reason for their popularity is flexibility; projects can be adjusted based on age and skill level, making them accessible for beginners while still engaging for older children. Structured tutorials with step by step instructions make execution easier, reducing frustration and increasing completion rates. As a result, these creative ideas provide both practical value and emotional satisfaction, turning simple materials into memorable seasonal experiences that align perfectly with Pinterest-inspired planning and aesthetic presentation.
Materials and Preparation for Successful Craft Sessions
Preparation plays a critical role in ensuring Easter hand crafts run smoothly and remain enjoyable for children. Before starting any DIY tutorial, it is helpful to organize materials into clearly labeled groups so kids can focus on creating rather than searching for supplies. Basic materials commonly used across these projects include colored paper, safety scissors, glue sticks, washable paint, markers, cotton balls, cardboard, ribbons, and reusable containers for organization. Setting up a dedicated workspace also improves efficiency and reduces mess, especially when working with younger children. Covering tables with reusable mats or newspaper allows children to experiment freely without worrying about spills. Preparation should also include explaining the project goal in simple language so kids understand what they are making and why each step matters. Demonstrating one example helps beginners visualize the final result while still leaving room for creativity. Safety remains important, so only child-friendly tools should be used, and small parts should be monitored carefully. Planning time limits for each activity helps maintain attention and prevents fatigue. When materials are arranged in advance and instructions are clear, children feel confident and motivated. This organized approach reflects Pinterest-style planning, where structured preparation supports creativity while keeping the process practical, efficient, and enjoyable for everyone involved.
Idea 1: Handprint Easter Bunny Card
How to Create
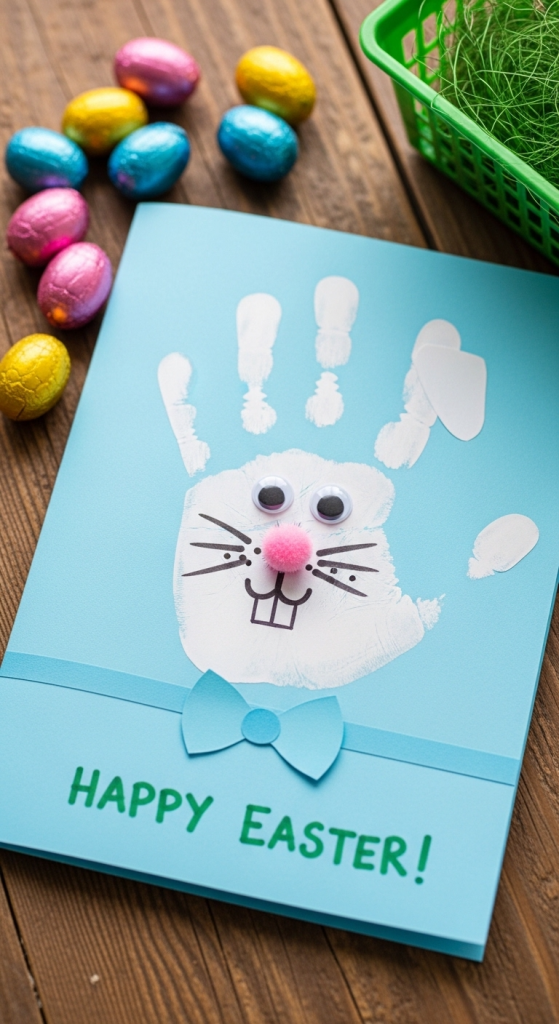
This Easter hand craft transforms a simple handprint into a personalized bunny card that children can gift or display as decoration. Begin by folding thick paper or cardstock to form a card base, ensuring it is sturdy enough to hold paint without bending. Children place their painted hand on the paper, pressing gently to create a clear print that will later form the bunny’s body and ears. Once the paint dries, guide them in adding facial details such as eyes, a small nose, and whiskers using markers or colored pencils. Cotton balls can be glued onto the fingers to create a soft tail or textured ears, adding a tactile element that makes the craft more engaging. This project works well as a beginner friendly tutorial because the main shape comes naturally from the child’s hand, reducing the need for complex drawing skills. Materials remain simple and budget-friendly, while the result feels meaningful and personalized. Encourage children to write a short Easter message inside the card, turning it into a complete creative project. The finished piece fits perfectly within Pinterest inspiration themes because it combines handmade charm with practical use as a greeting or keepsake.
Idea 2: Paper Plate Easter Chick
Step-by-Step Guide
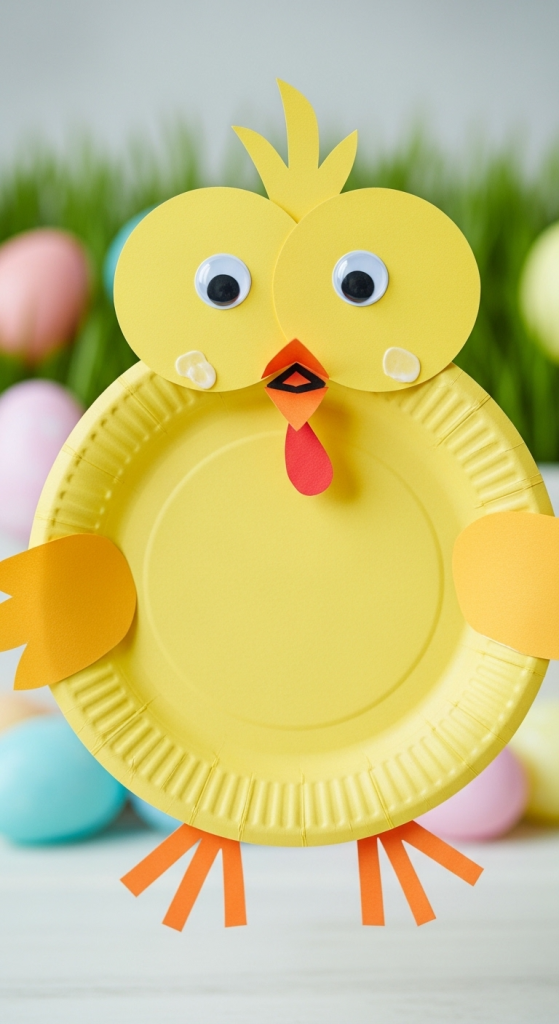
A paper plate Easter chick is an easy project that introduces children to layering shapes and assembling simple designs. Start by painting a paper plate bright yellow and allowing it to dry completely. This plate forms the chick’s body and provides a strong base for additional elements. Cut small triangles from orange paper to create the beak and feet, then glue them into place carefully. Large paper circles or pre-made craft eyes can be added to give the chick personality and visual balance. Feathers or small strips of tissue paper can be attached around the edges to add texture and movement, making the decoration more dynamic. The step by step process teaches children how individual components come together to create a recognizable character, reinforcing planning and organization skills. This craft also works well for group settings because materials are inexpensive and easy to distribute. Once completed, the chicks can be hung on walls, placed on doors, or used as festive table decoration. The design aligns with modern Pinterest ideas because it combines bright colors, clear shapes, and beginner-friendly construction, allowing children to produce an aesthetic result without complicated instructions or advanced techniques.
Idea 3: Egg Collage Art
Execution Process
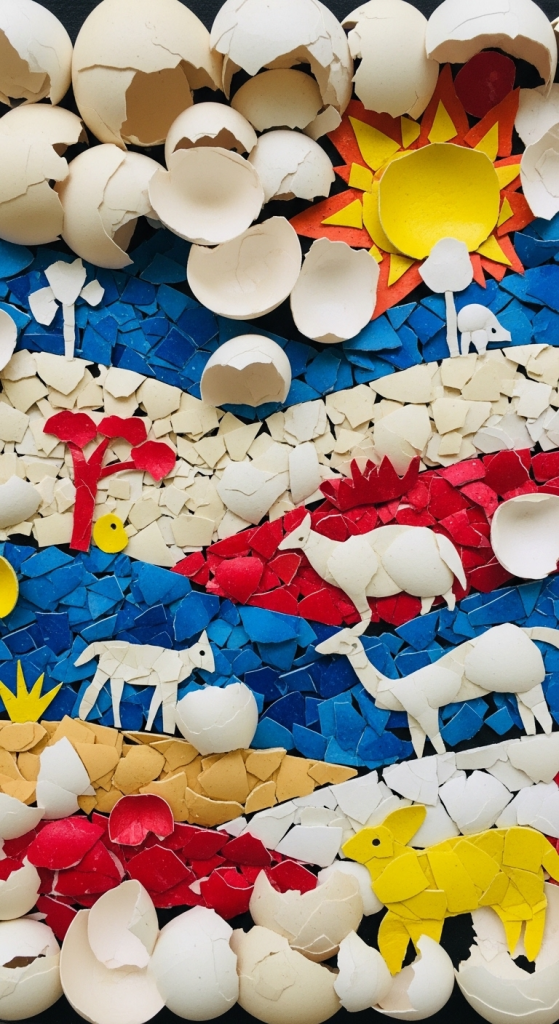
Egg collage art focuses on creativity and color exploration while keeping the process structured and manageable for children. Begin by cutting large egg shapes from sturdy paper or cardboard to create a solid base. Provide children with a selection of decorative materials such as tissue paper pieces, stickers, ribbons, or patterned scraps, encouraging them to arrange colors thoughtfully before gluing. The execution process teaches planning because children decide placement and patterns prior to fixing elements permanently. This method helps develop visual organization and introduces simple design concepts like symmetry and contrast. Glue should be applied lightly to prevent wrinkles and maintain a clean finish. Once the collage dries, outlines can be added with markers to define shapes and enhance the overall aesthetic. This project is highly adaptable, making it suitable for various age groups and skill levels while remaining beginner friendly. It also reflects Pinterest inspiration trends where layered textures and handmade decoration create visually appealing results. Finished egg collages can be displayed as wall art or used as part of seasonal garlands, turning a simple creative idea into practical home decor that celebrates Easter through color and personal expression.
Idea 4: Cotton Ball Lamb Craft
How to Make
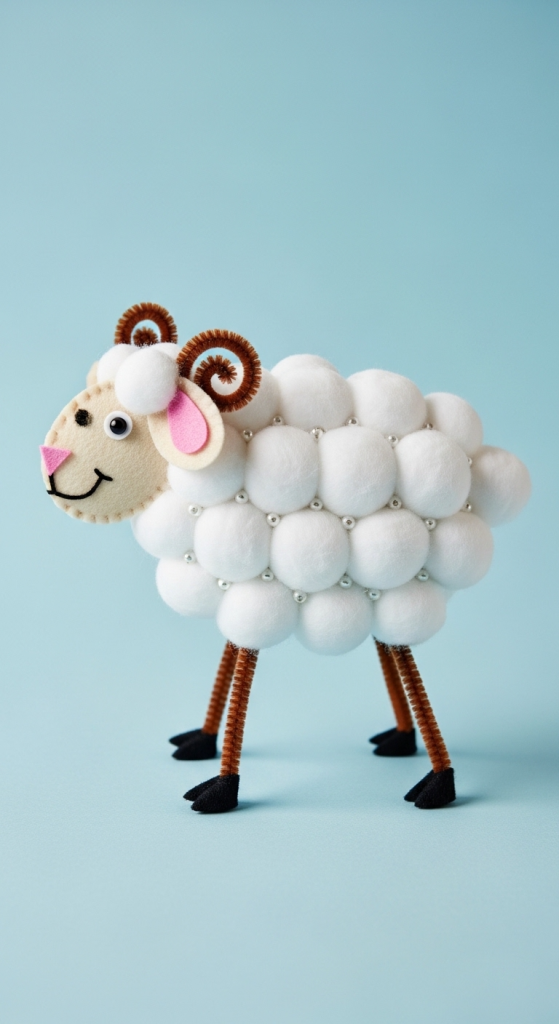
The cotton ball lamb craft introduces children to texture-based design while using simple materials that are safe and accessible. Begin by drawing or printing a lamb outline on sturdy paper, ensuring the shape is large enough for small hands to work comfortably. Children apply glue within the outline and place cotton balls closely together to create a fluffy wool effect. This step helps improve fine motor control and patience as they position each piece carefully. Once the body is complete, the face and legs can be colored using markers or cut from black paper and glued into place. Adding small details like ears or a smile personalizes the project and encourages creativity. The process remains straightforward, making it an ideal beginner friendly DIY tutorial for younger children. Materials are minimal and affordable, supporting budget ideas while producing an aesthetic result suitable for seasonal decoration. The finished lambs can be displayed on walls or attached to cards, adding a soft and playful element to Easter decor. This craft aligns with Pinterest creative project trends because it balances simplicity with visual impact, allowing children to explore texture while creating something recognizable and festive.
Idea 5: Easter Egg Garland
Setup Method
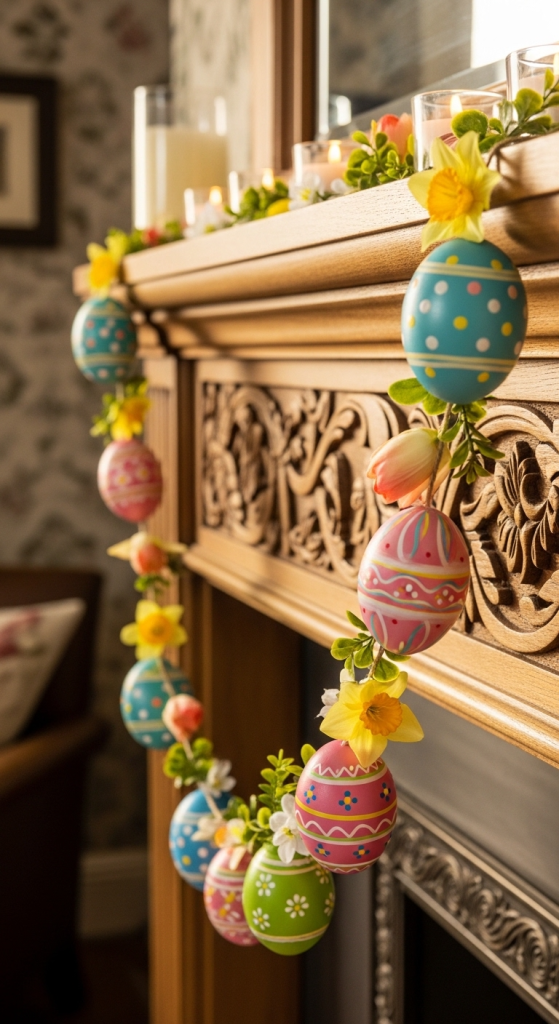
An Easter egg garland transforms individual craft pieces into a cohesive decoration that can brighten any room or classroom. Begin by cutting multiple egg shapes from colored paper or cardstock, encouraging children to experiment with different patterns and color combinations. Each egg can be decorated using markers, stickers, or small paper cutouts, allowing for creative ideas that reflect personal style. Once the eggs are finished, punch small holes at the top and thread them onto string or ribbon, spacing them evenly for visual balance. The setup method teaches sequencing and planning because children must arrange the eggs before securing them. This project also introduces basic organization skills as kids learn to repeat patterns or alternate colors for a more aesthetic presentation. The garland can be hung across windows, walls, or tables, making it a practical decoration rather than a single-use craft. Materials remain simple and widely available, ensuring the project stays beginner friendly and budget conscious. Pinterest-style inspiration often emphasizes decorations that combine multiple handmade elements, and this garland achieves that effect by turning small individual crafts into one cohesive and visually pleasing Easter display.
Idea 6: Bunny Ear Headband
How to Create
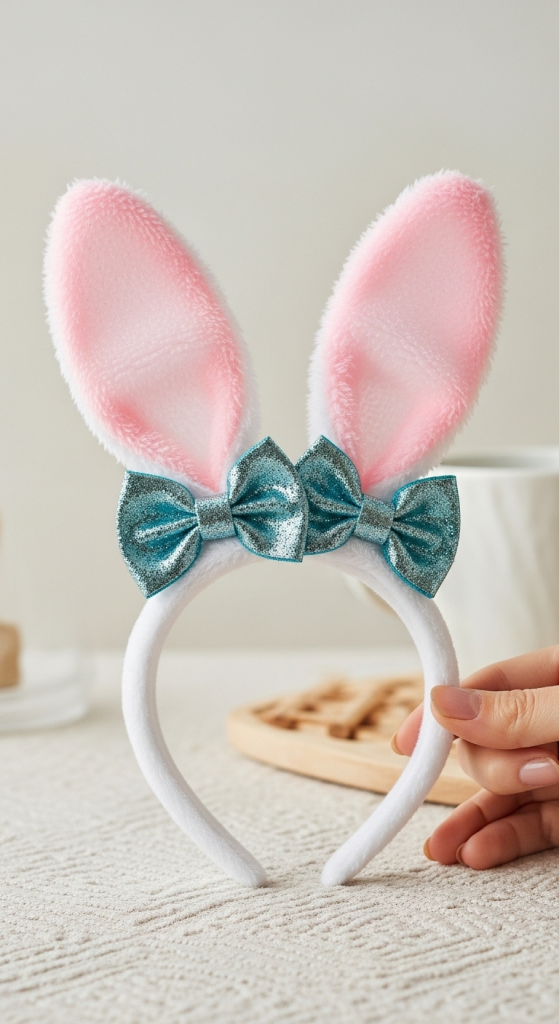
A bunny ear headband is a playful Easter craft that doubles as wearable decoration, making it highly engaging for children. Start by measuring a strip of paper or lightweight cardboard to fit comfortably around the child’s head, securing the ends with tape or glue. Cut two large ear shapes from white paper and smaller inner ear shapes from pink paper, then glue them together to create contrast and depth. Attach the ears to the headband securely so they stand upright without bending. Children can personalize their headbands with drawings, glitter-free decorations, or small stickers to match their own creative style. This project teaches basic construction skills and introduces the concept of wearable DIY design. Because the craft has an immediate functional result, children often feel more motivated to complete it. Materials are inexpensive and preparation is simple, making the project ideal for group activities or classroom settings. The finished headbands can be worn during Easter celebrations or used for themed photos, connecting creativity with playful interaction. This idea fits perfectly within Pinterest trending ideas because it blends handmade fun, practical use, and aesthetic appeal in a beginner friendly format.
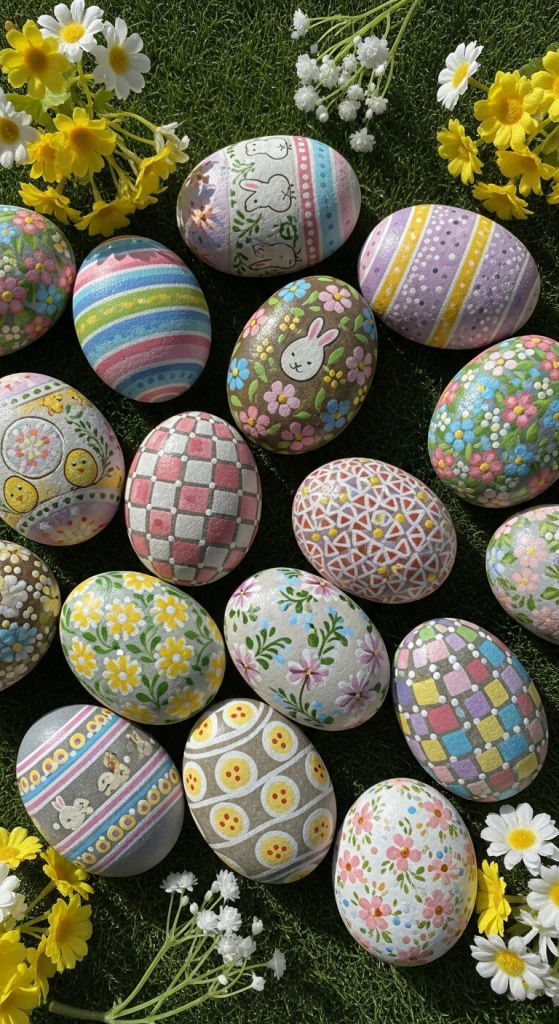
Idea 7: Painted Rock Easter Eggs
Execution Process
Painted rock Easter eggs offer a durable alternative to fragile decorations while encouraging creativity through color and pattern design. Begin by selecting smooth, clean stones that resemble egg shapes, then wash and dry them thoroughly before painting. Children can apply a base coat of light paint to create a smooth background, allowing it to dry before adding patterns such as dots, stripes, or simple floral designs. The execution process teaches layering and patience, as each stage must dry before moving to the next. Using small brushes or cotton swabs helps children create detailed patterns without frustration. Once finished, a protective clear layer can be added if available to preserve the designs. These painted rocks can be used as table decoration, garden accents, or Easter basket fillers, making them practical beyond the crafting session. The project aligns with Pinterest inspiration because it combines natural materials with creative expression and modern minimalist style. It also supports budget ideas since stones are often free or easily collected. This craft encourages children to think about color combinations and pattern balance while producing long-lasting handmade decorations.
Idea 8: Tissue Paper Easter Basket

Step-by-Step Guide
The tissue paper Easter basket is a practical creative project that combines construction skills with decorative design. Start with a small paper bowl or folded cardstock base to form the basket structure. Children tear tissue paper into small pieces and glue them onto the surface, layering colors to create a textured mosaic effect. This tearing and layering process improves hand coordination while keeping the activity beginner friendly. Once the basket is covered and dry, a paper handle can be attached using glue or staples under adult supervision. Additional decorations such as paper flowers or drawn patterns can be added to personalize the final design. The step by step guide helps children understand how structural elements and decoration work together in one project. The finished baskets can hold small treats, paper eggs, or notes, making them both decorative and functional. This craft reflects Pinterest DIY trends because it emphasizes handmade charm and customizable design while using simple materials. It also encourages planning, as children must balance decoration with structural stability to ensure the basket remains usable.
Idea 9: Fingerprint Easter Egg Art
How to Make
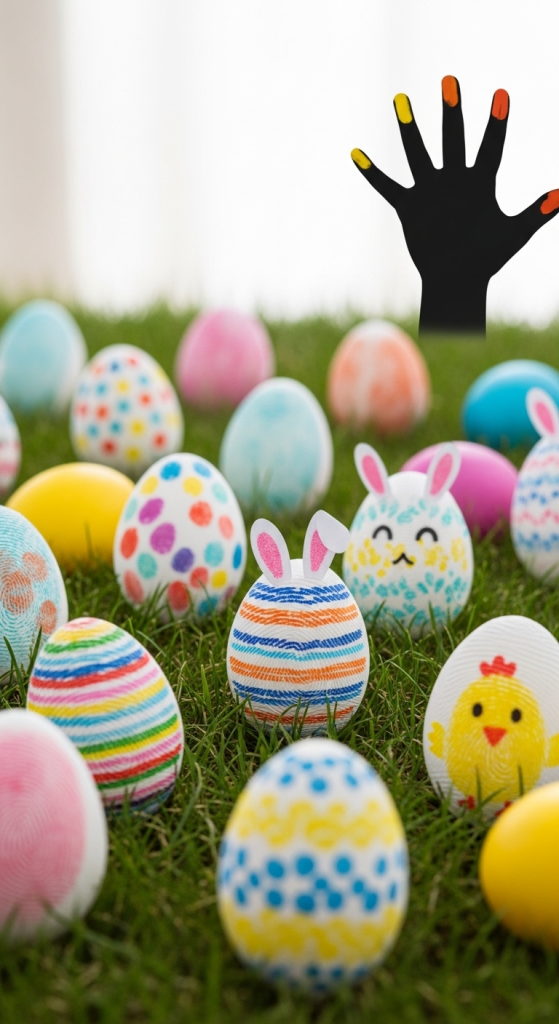
Fingerprint Easter egg art is a simple yet creative project that allows children to explore patterns through repeated shapes. Begin by drawing large egg outlines on paper and preparing washable paints in multiple colors. Children dip their fingertips lightly into paint and press them inside the egg shape, creating dots that can later be turned into flowers, chicks, or abstract designs. This method is highly beginner friendly because it requires no drawing skill while still producing visually interesting results. Encourage children to clean their fingers between colors to maintain clear patterns and prevent muddy tones. Once the paint dries, small details can be added with markers to transform fingerprints into decorative elements. The process teaches pattern recognition and color coordination while keeping the activity playful and engaging. Materials are minimal and cleanup is manageable, making this project practical for home or classroom use. Finished artwork can be framed or displayed as seasonal wall decoration, aligning with Pinterest aesthetic trends that highlight handmade, colorful, and personal designs. This easy project demonstrates how simple techniques can produce attractive results with minimal preparation.
Idea 10: Cardboard Bunny Mask
Setup Method
A cardboard bunny mask combines imaginative play with crafting skills, creating a project that children can both make and use. Begin by cutting a mask shape from lightweight cardboard, ensuring eye holes are large enough for comfortable visibility. Children paint the mask in soft Easter colors and add details such as whiskers, noses, and eyebrows using markers or paper cutouts. Long ears can be attached to the top using glue or tape, reinforcing them with extra cardboard if needed. The setup method involves testing the fit with string or elastic so the mask stays secure during use. This step introduces practical problem-solving as children adjust placement for comfort. The project encourages creativity while teaching basic construction and decoration techniques. Materials are affordable and often recycled, supporting budget ideas and sustainable crafting. Once finished, the masks can be used for Easter games, storytelling, or photos, extending the value of the project beyond decoration. Pinterest-style inspiration often focuses on crafts that combine function and creativity, and this bunny mask perfectly captures that balance through clear steps and beginner-friendly execution.
Common Beginner Mistakes and How to Avoid Them
One common mistake in children’s Easter crafts is rushing through preparation, which often leads to missing materials and interruptions during the creative process. Another issue is using too much glue or paint, causing projects to become messy and difficult to dry properly. Clear demonstrations before starting can prevent confusion and help children understand each step. Choosing projects that match age and skill level is also important, as overly complex designs may cause frustration. Allowing enough drying time between steps improves results and prevents damaged artwork. Organized workspaces and clear instructions significantly reduce mistakes while keeping the experience enjoyable and productive.
Practical Tips for Better Results
For stronger outcomes, always prepare materials in advance and keep tools within easy reach. Encourage children to test colors on scrap paper before applying them to final projects. Use washable supplies to simplify cleanup and reduce stress. Guiding children to work slowly and focus on one step at a time improves accuracy and confidence. Displaying finished crafts proudly also motivates careful work. Consistent routines and clear expectations help maintain engagement while supporting creative exploration in a structured and beginner friendly way.
Styling, Presentation, and Organization Ideas
Presentation plays a major role in making handmade Easter crafts look polished and intentional. Group similar crafts together by color or theme to create cohesive displays. Garlands can be hung across walls, while smaller projects work well on shelves or tables. Using baskets or trays helps keep decorations organized and prevents clutter. Neutral backgrounds allow bright colors to stand out, supporting a modern design and minimalist style often seen in Pinterest inspiration boards. Proper presentation transforms simple crafts into meaningful seasonal decor.
Budget and Time Planning for Craft Sessions
Effective planning ensures crafting remains enjoyable rather than overwhelming. Set realistic time limits based on the complexity of each project and the age of participants. Many crafts can be completed in short sessions, making them suitable for busy schedules. Reusing leftover materials from previous projects helps reduce costs while encouraging creativity. Grouping similar activities together also saves preparation time. Budget-friendly planning supports consistent creative projects without requiring expensive supplies or specialized tools.
Creative Expansion and Advanced Inspiration
Once children become comfortable with basic Easter crafts, projects can be expanded by combining techniques such as painting, collage, and construction in a single design. Older children may experiment with more detailed patterns, layered decorations, or themed displays that tell a story. Encouraging experimentation with colors and textures builds confidence and originality. Advanced inspiration can include creating coordinated sets of decorations for parties or family gatherings. These expansions maintain the core DIY spirit while allowing creativity to grow naturally, ensuring Easter crafting remains engaging year after year.