
10 Metallic Gold & Glitter Party Centerpiece Ideas
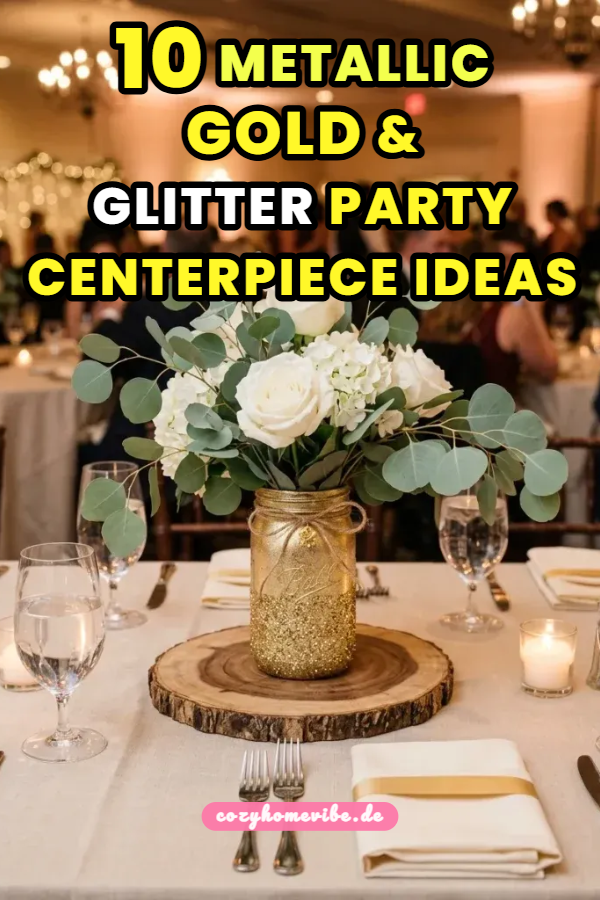
A metallic gold and glitter party centerpiece serves as a striking focal point that immediately elevates event decor across celebrations ranging from weddings to milestone anniversaries. Metallic gold introduces warmth, sophistication, and timeless luxury, while glitter elements add dynamic light reflection, festive texture, and playful visual depth. Decorators favor this decorative combination because it transforms simple, accessible craft components into high-impact party installations that capture attention across dining tables and dessert displays. Readers exploring this article will gain practical knowledge on selecting appropriate reflective materials, constructing balanced floral and geometric bases, applying glitter without mess, and styling cohesive event tablescapes. Understanding how to work with gold leaf, spray finishes, chunky craft glitters, and complementary structural containers allows event planners to achieve professional results efficiently. By balancing brilliant metallic surfaces with soft natural textures or clear glass elements, anyone can craft durable, visually appealing centerpieces suitable for formal banquets or intimate home celebrations. This comprehensive guide details step-by-step techniques, essential prep work, structural ideas, and practical planning strategies needed to execute ten original gold centerpiece concepts successfully.
Metallic gold and glitter decor continue to dominate modern event design feeds on Pinterest due to their exceptional versatility, high visual impact, and strong DIY appeal. Party planning enthusiasts appreciate how gold accents instantly bridge the gap between traditional glamour and contemporary minimalist design principles. Reflective metallic surfaces bounce ambient venue lighting across table settings, creating a warm, inviting atmosphere that photograph exceptionally well for social media and event albums. The accessibility of modern crafting mediums, such as metallic spray paints, glitter sealants, and adhesive vinyl, enables beginners to create luxury-style centerpieces without requiring expensive materials or specialized floral skills. Gold tones complement virtually every color palette, pairing seamlessly with crisp white, deep jewel tones, pastel pinks, or moody emerald greens depending on the event theme. Furthermore, glitter accents allow hosts to customize the level of sparkle, ranging from subtle shimmer dusted along vase rims to bold, full-coverage geometric statements. The cost-effective nature of upgrading standard glass containers, cardboard forms, and natural elements with gold finishes makes this decorating style both practical and popular.
Executing durable metallic gold centerpieces requires thorough preparation, appropriate protective gear, and structural craft supplies before starting assembly. Recommended base materials include clear glass vases, wooden blocks, dense floral foam, geometric wire frames, and artificial or fresh botanical stems. For surface finishing, decorators require metallic gold spray paint, liquid gold leaf, fine and chunky craft glitters, spray adhesive, clear acrylic sealer, and decoupage glue. Proper preparation steps are essential to ensure finishes adhere smoothly without flaking during the event; glass vessels must be scrubbed with rubbing alcohol to eliminate oil residue, while wooden bases require light sanding to create a smooth binding surface. Work space planning demands a well-ventilated area lined with protective drop cloths to contain spray paint fumes and wandering glitter particles. Securing appropriate application tools, such as soft-bristle foam brushes, painter tape for crisp masking, and drop-cloth trays, prevents accidental messes and guarantees clean execution. Allocating sufficient drying time between glue application, glitter dusting, and protective sealing preserves the integrity of the finished centerpieces.
Sparkling Gold Mason Jar Floral Nest
Setup Method
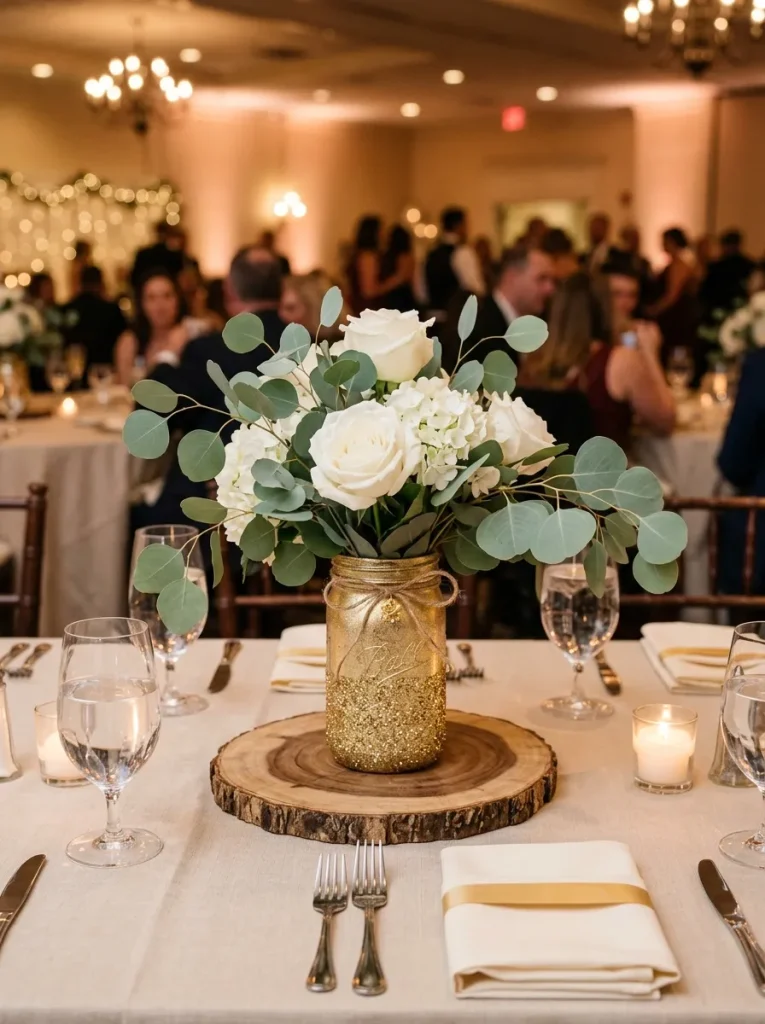
The sparkling gold mason jar floral nest combines rustic charm with shimmering modern glamour, creating an approachable centerpiece suitable for casual or semi-formal celebrations. This concept utilizes inexpensive glass mason jars transformed into radiant vessels using a combination of solid metallic base paint and textured glitter application. Soft floral arrangements, such as white roses, pale eucalyptus, or baby’s breath, balance the high-shine finish of the gilded jar, preventing the display from feeling overwhelming. The transparent interior allows water or floral foam to support live stems, while the external glittering texture catches overhead lighting to produce a soft ambient glow. Placing these jars atop slice-wood chargers or mirrored bases grounds the arrangement, establishing a clear visual boundary on crowded party tables. Decorators can vary the height of the floral blooms to create dynamic vertical lines without obstructing conversation views across dining tables. This project provides an ideal starting point for beginners seeking a reliable, high-yield crafting process for large events requiring multiple matching table centerpieces.
Step-by-Step Guide
Begin by selecting clean quart-sized glass mason jars, thoroughly wiping the outer surface with rubbing alcohol to remove grease and dust. Apply a thin, even coat of metallic gold spray paint over the entire exterior of each jar and allow it to dry completely for thirty minutes. Coat the lower half of the painted jar with decoupage glue using a foam brush, creating an even layer without dripping. Hold the jar over a tray and sprinkle extra-fine gold glitter liberally over the wet glue until full coverage is achieved along the base. Gently tap the rim to drop excess glitter, then set the jar upright to dry for two hours before misting it with a clear acrylic sealer. Once the protective sealer dries, insert a soaked cylinder of floral foam inside the jar base or fill it with clean water. Arrange fresh white roses and silver dollar eucalyptus stems into a rounded crown rising three to five inches above the jar rim, completing a balanced, shimmering floral nest.
Gilded Geometric Lantern with Pillar Candle
Execution Process
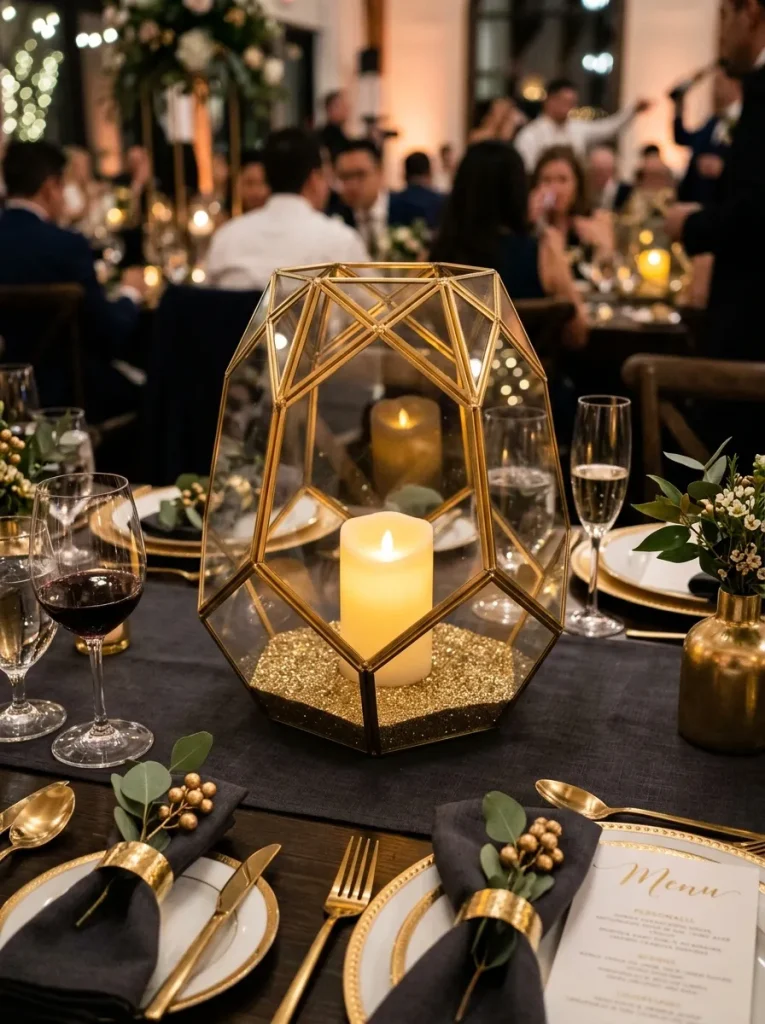
The gilded geometric lantern centerpiece introduces sharp modern architecture into event tablescapes, utilizing metallic gold framework to enclose warm, flickering light. Geometric wire frames provide structural interest while maintaining open sightlines across dining tables, making them functional options for formal seated dinners. Coating the metal structure in smooth gold paint creates a sleek frame that reflects candle flame reflections across clear glass table surfaces. Surrounding the internal pillar candle with fine glitter accents at the base adds a sparkling floor that amplifies the warm glow of the light source. This arrangement pairs exceptionally well with sleek runners, geometric confetti, or minimal greenery sprays laid flat along the table surface. The balance of warm candlelight and structured metallic angles produces a sophisticated decor element suitable for evening receptions, galas, and anniversary dinners. Designers can easily adjust the size of the glass enclosure and pillar candle to accommodate different table scales while maintaining consistent visual proportions across the venue.
Step-by-Step Guide
Select a multi-faceted geometric glass-and-metal lantern measuring eight to ten inches in height with clear glass panel inserts. Mask off all glass panes using painter tape and craft paper to protect them from paint overspray during the transformation process. Apply two smooth coats of bright metallic gold spray paint over the exposed metal framework, allowing twenty minutes of drying time between coats. Remove the masking tape carefully once the final coat is dry to reveal clean, polished metallic lines along the glass frame. Coat the inner floor of the lantern base with a thin layer of liquid adhesive and dust coarse gold glitter across the bottom surface to create a sparkling bed. Position a tall white LED pillar candle firmly in the center of the glittered base, ensuring the flame flame-effect rests centrally within the glass structure. Surround the outer base of the lantern with a subtle ring of faux gold-dusted ivy leaves to anchor the geometric structure gracefully onto the table.
Glittered Gold Monogram Table Number Block
Construction Method
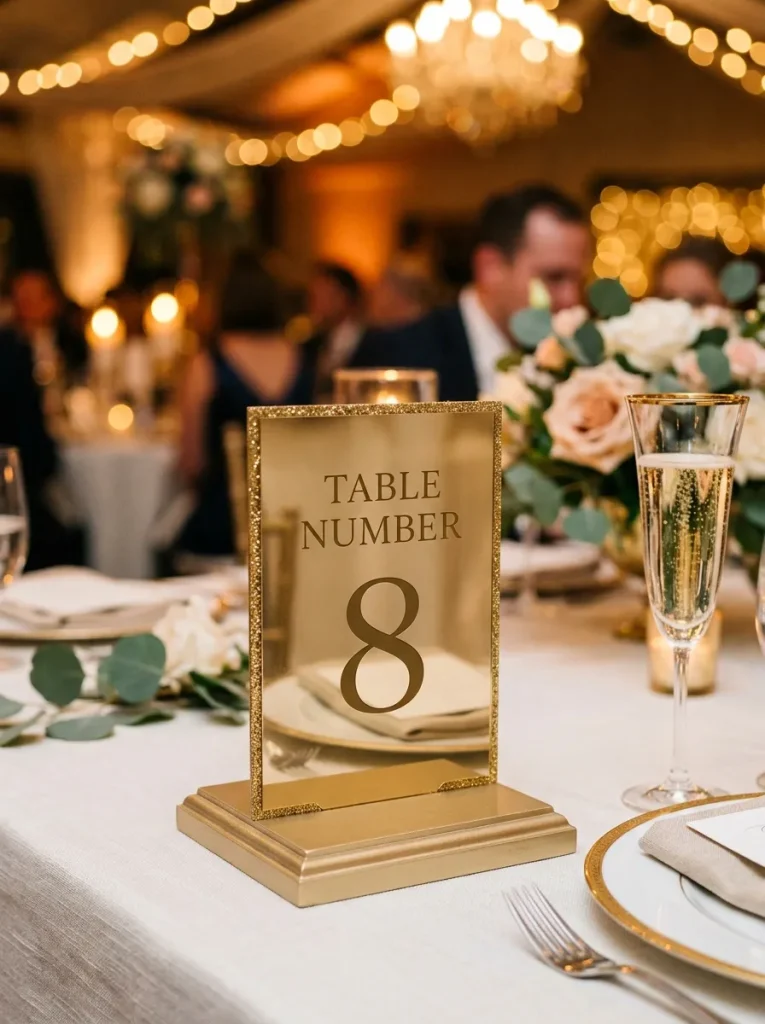
The glittered gold monogram table number centerpiece combines practical guest navigation with personalized party decor, offering a highly functional decorative element. This design features large wooden or paper-mache numbers coated in brilliant gold finishes and framed by subtle decorative bases. Incorporating dimensional typography into centerpieces adds clear structure while ensuring guest seating charts remain easy to read from across the event space. The combination of solid gold paint on the flat face of the number paired with dense glitter along the side edges creates a dual-texture visual effect. Elevating the monogram block on a small gilded platform ensures visibility above dinner plates and glassware without requiring massive floral structures. This concept works remarkably well for milestone birthdays, anniversary dates, or numbered wedding tables where personalized details enhance the event theme. The durable nature of solid wooden blocks makes these centerpieces long-lasting keepsakes that hosts can repurpose after the celebration concludes.
Step-by-Step Guide
Obtain eight-inch freestanding wooden numbers corresponding to your party table layout, along with small square wooden plaque bases. Sand any rough edges on the numbers using fine-grit sandpaper, then wipe clean with a dry microfiber cloth to remove wood dust. Spray the front and back surfaces of each wooden number with metallic gold paint, letting them dry thoroughly for one hour. Apply decoupage adhesive along the side edges of the numbers using a small detail brush, ensuring clean lines along the front boundaries. Press fine gold glitter into the wet adhesive along the edges, wiping away any stray particles from the painted front face immediately. Spray the square wooden base with gold paint, coat its top surface in matching glitter, and seal both pieces with clear acrylic spray once dry. Secure the glittered number onto the center of the wooden base using high-strength clear epoxy glue, holding it firmly for sixty seconds until the bond sets.
Metallic Gold Wine Bottle Trio with Dip-Dipped Sparkle
Creation Guide
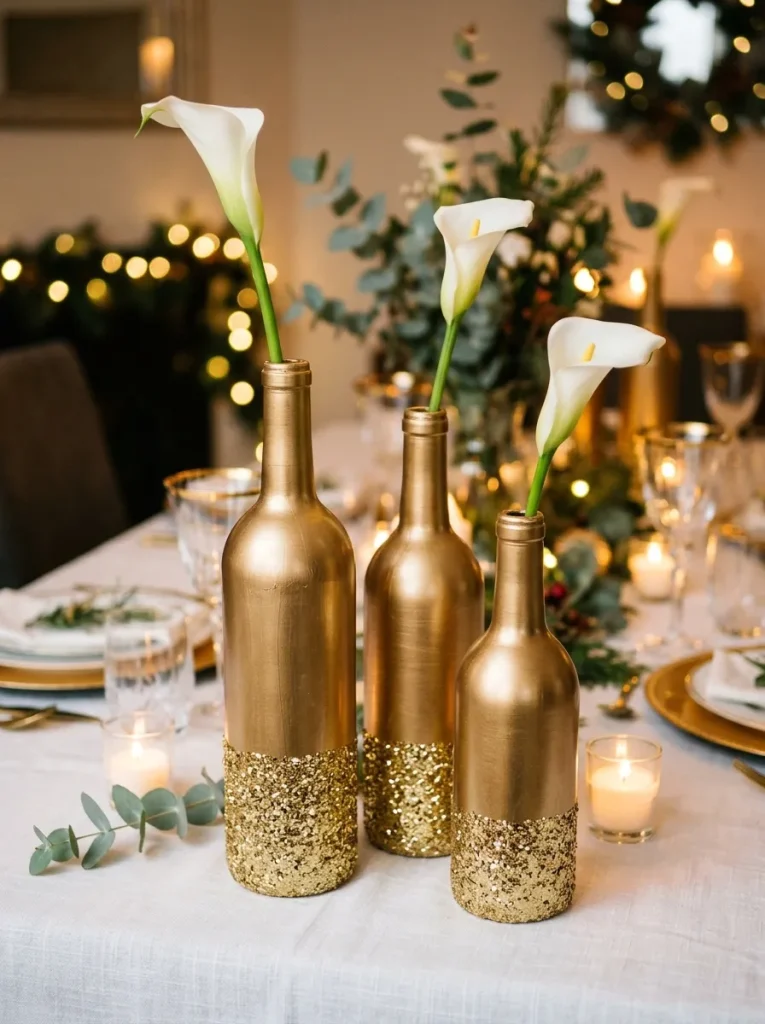
Transforming recycled glass wine bottles into a grouped metallic centerpiece offers an eco-friendly decor strategy that delivers impressive height and variation. Grouping three bottles of varying heights creates a dynamic triangular composition that captures visual interest from every angle around the table. The dip-dipped glitter effect, where the sparkle covers only the lower third of the bottle, provides a clean contrast between smooth metallic paint and heavy glitter texture. This structural design works as an effective holder for long-stemmed flowers, slender taper candles, or tall gold-dusted feather plumes. The narrow profile of bottle necks keeps table arrangements compact, leaving ample space for food platters and place settings on busy dining surfaces. Using a uniform palette of metallic gold across different bottle shapes unifies mismatched glass vessels into a cohesive, curated decor collection. This accessible project is ideal for budget-conscious hosts aiming to create dozens of sophisticated party centerpieces efficiently.
Step-by-Step Guide
Collect three empty glass wine bottles of varying heights and shapes, removing all paper labels completely by soaking them in warm soapy water. Dry the bottles thoroughly and wipe the exterior glass clean with alcohol to prepare the surface for long-lasting paint adhesion. Spray all three bottles with two thin coats of brilliant gold spray paint, allowing thirty minutes for the paint to cure completely. Wrap painter tape horizontally around the middle section of each bottle to create a sharp, straight masking line for the glitter application. Apply a thick layer of craft glue to the bottle surface beneath the tape line, then roll the lower section in a tray of chunky gold glitter. Peal the painter tape off immediately while the glue is still wet to reveal a crisp, clean line between the paint and glitter, then allow two hours to dry. Fill each bottle with water and insert a single long-stemmed white calla lily or gold-sprayed palm spear into each neck to complete the grouped arrangement.
Gold Leaf and Glitter Floating Candle Bowl
Setup Method
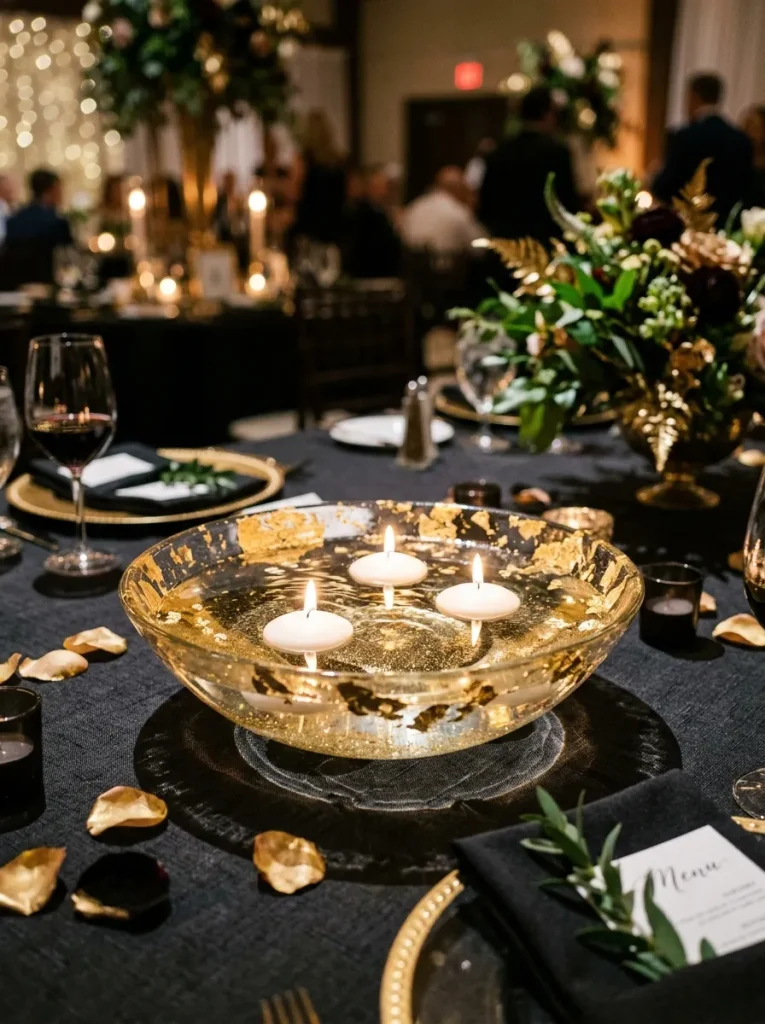
The gold leaf and glitter floating candle bowl centerpiece presents a serene, water-focused lighting feature that adds soft movement and radiant reflections to evening events. By applying delicate gold leaf flakes and subtle floating glitter around clear glass bowl rims, water dynamics interact directly with metallic surfaces. Floating candles casting light downward onto reflective gold accents create shimmering visual ripples across tabletop surfaces. This low-profile centerpiece choice ensures totally unobstructed sightlines across tables, fostering comfortable conversation among seated guests. The clear water acts as a natural optical lens, magnifying the gold leaf textures applied to the glass while keeping the overall design light and airy. Combining floating candle flames with sparkling liquid elements creates a soothing ambient feature suitable for formal dinners, winter galas, and romantic wedding receptions. Decorators can customize the water base by adding gold-dyed water drops or submerged waterproof LED lights to enhance the bottom illumination further.
Step-by-Step Guide
Select a wide, shallow glass bowl measuring ten to twelve inches in diameter, cleaning both interior and exterior glass to a streak-free shine. Apply gilding adhesive in irregular, painterly strokes around the outer upper rim of the glass bowl using a small soft-bristle brush. Allow the gilding adhesive to become tacky for five minutes, then gently press sheets of imitation gold leaf onto the treated areas using a dry brush. Buff away excess foil flakes using a clean, soft cloth to reveal a fragmented, distressed gold rim along the glass edge. Paint a thin band of clear glue along the bottom outer base of the bowl and roll it in fine gold glitter to form a shimmering foundation ring. Fill the bowl three-quarters full with fresh room-temperature water, ensuring no liquid spills onto the exterior glittered base during filling. Float three white disc candles and a handful of waterproof gold star confetti on the water surface, lighting the wicks right before guests arrive.
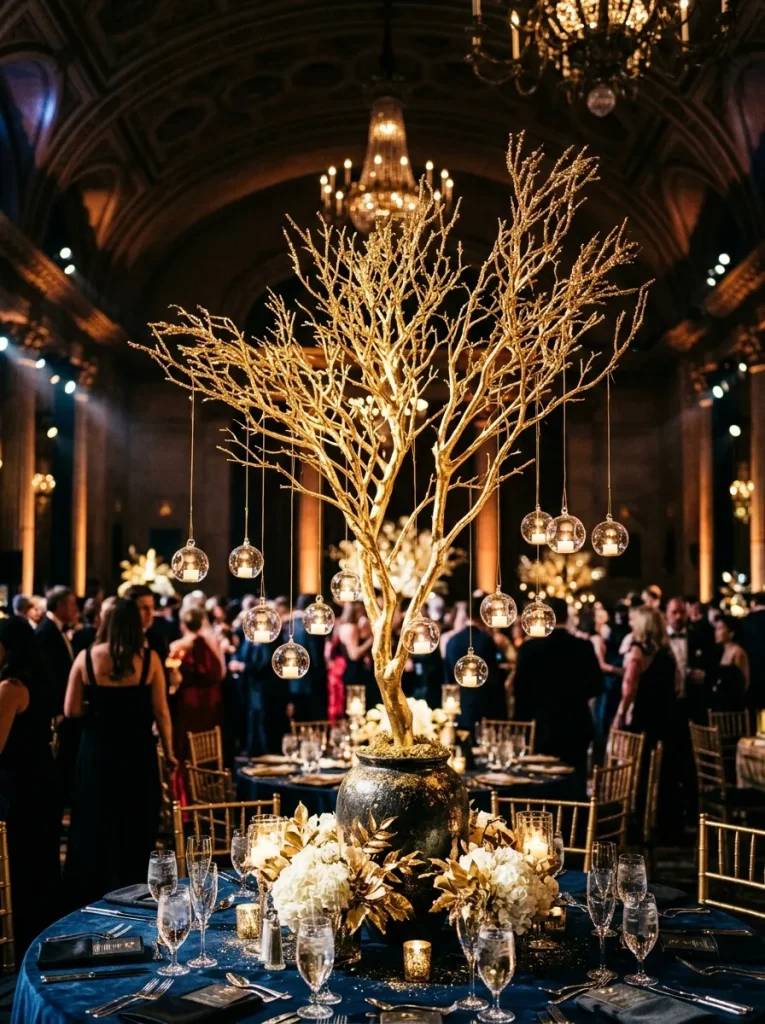
Golden Branch Tree with Glittered Hanging Ornaments
Execution Process
The golden branch tree centerpiece introduces dramatic vertical height and dynamic spatial presence, drawing eyes upward to frame the higher dimensions of event spaces. Utilizing natural or artificial botanical branches painted in solid metallic gold creates an architectural tree structure capable of supporting delicate hanging elements. Dextrous glitter applications along branch tips add subtle sparkle that catches ambient light as guests move around the table settings. Hanging glass globes, crystal prisms, or golden baubles from the branches introduces gentle kinetic movement, reacting to room air currents. This dramatic centerpiece style works exceptionally well in venues with high ceilings, filling spatial volume without cluttering the physical table surface below. Securing the branch base inside a heavy, weighted container ensures physical stability, preventing top-heavy arrangements from leaning or tipping during busy party events. The versatility of branching centerpieces allows event planners to attach seasonal elements, such as hanging place cards or mini floral vials, directly to the gilded limbs.
Step-by-Step Guide
Source sturdy dried manzanita or blast-cleaned natural tree branches measuring roughly twenty-four to thirty inches in height with multiple fork points. Coat the branches entirely with metallic gold spray paint in a well-ventilated area, applying two coats to cover all bark crevices fully. While the second coat of paint is slightly tacky, dust fine gold glitter lightly onto the upper tips of the branches to create a frosty sparkle effect. Prepare a heavy ceramic or metal vase, filling the lower half with quick-setting plaster or heavy decorative stones to provide a stable weighted base. Insert the bottom trunk of the gold branch firmly into the center of the vase, securing it upright until the mounting material sets completely. Cover the top opening of the vase base with golden moss or glittered shred filler to conceal the internal structural anchoring material. Hang six to eight small clear glass globe candles or crystal drops from various branch joints using thin gold wire, balancing the weight evenly around the tree.
Sparkling Gold Crown and Floral Pedestal
Creation Guide
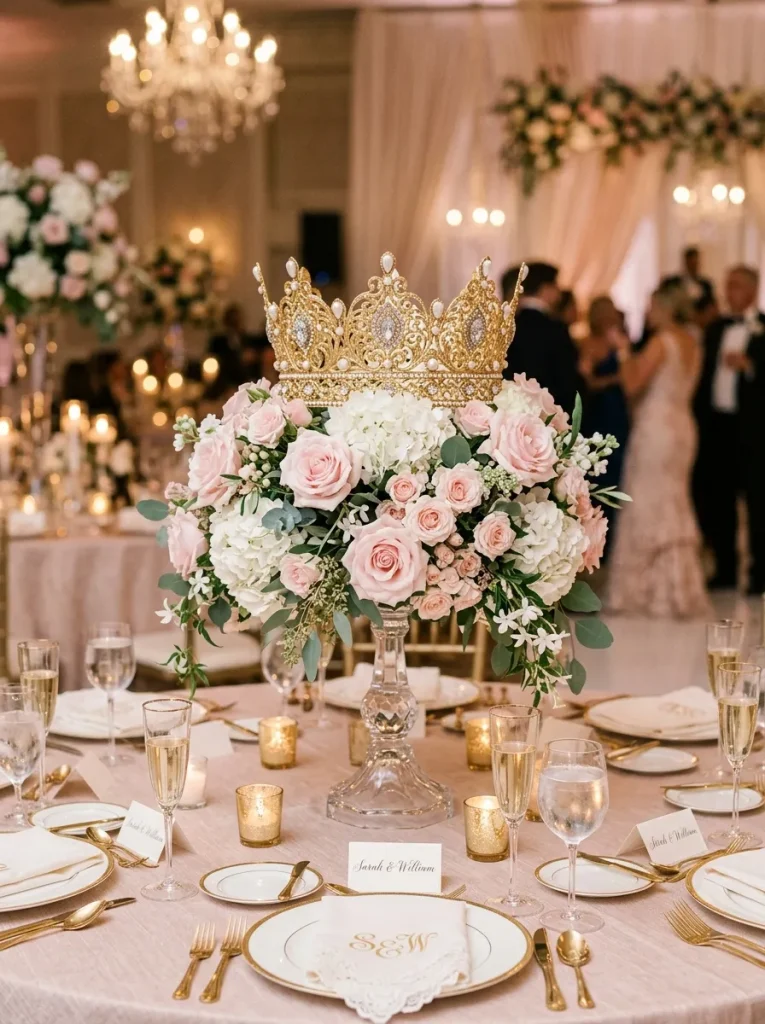
The sparkling gold crown centerpiece offers a regal, whimsical visual design perfect for princess-themed birthdays, royal baby showers, or extravagant gala tables. Placing a hollow metal or resin crown atop a raised glass or metal pedestal base elevates the main motif, giving it a commanding, formal presentation. Coating the crown in vibrant gold paint and highlighting its ornamental filigree with chunky glitter creates rich surface texture and royal charm. Nestling dense floral arrangements inside or beneath the crown structure softens the hard metallic lines, creating a harmonious balance between structure and nature. The elevated pedestal base raises the decorative crown above dinner settings, making it clearly visible from entryways across the venue. Utilizing classic floral elements like blush roses, ivory carnations, and gold-sprayed foliage reinforces the luxurious, celebratory tone of the centerpiece. This highly detailed concept delivers strong thematic clarity, acting as an instant focal point that grounds surrounding table linens and party accessories.
Step-by-Step Guide
Obtain a detailed metal filigree crown measuring six to eight inches in diameter, alongside a sturdy glass compote or raised pedestal stand. Spray the metal crown with a base coat of rich gold paint, ensuring all intricate scrollwork and inner surfaces receive full paint coverage. Use a fine detail paintbrush to apply clear craft glue exclusively along the raised gems, tips, and outer ridges of the painted crown. Press chunky gold glitter onto the wet glue sections, shaking off excess particles to highlight the structural filigree of the crown design. Spray the pedestal base with matching gold paint or keep it clear glass, applying a thin glitter band around the outer foot rim for consistency. Place a wet block of floral foam into the pedestal top, sculpting a dense, rounded dome of blush roses and white hydrangeas. Position the glittered gold crown directly atop the floral dome, pressing its base base firmly into the stems to anchor it securely in place.
Gilded Terrarium with Sparkled Succulent Display
Construction Method
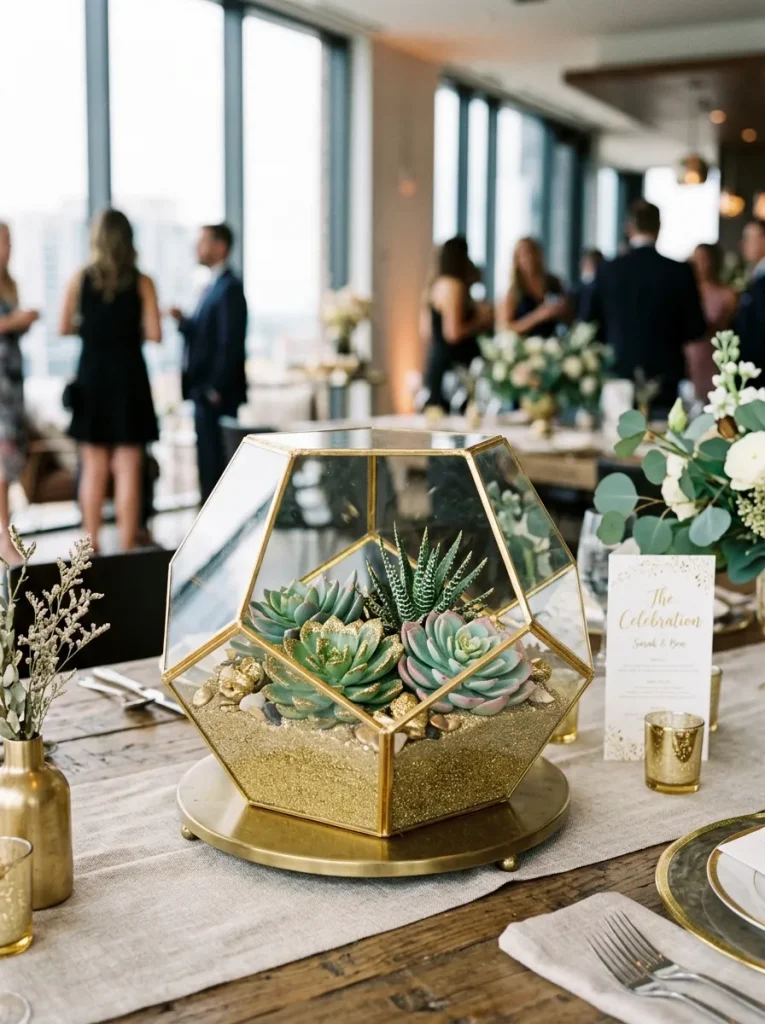
The gilded terrarium with sparkled succulents merges contemporary geometric glass design with low-maintenance botanical aesthetics, producing a modern centerpiece option. Coating the structural lead or brass seams of geometric glass terrariums in bright gold paint converts simple geometric shapes into elegant display cases. Substituting standard soil with layers of gold sand, crushed glass, and glitter creates an eye-catching decorative foundation inside the clear glass panels. Faux or live succulents accented with light gold leafing on their leaf tips bridge the gap between organic plant life and metallic party themes. This low-profile arrangement is particularly suitable for daytime events, modern weddings, and corporate luncheons that favor sleek visual lines. The durable nature of faux succulents ensures these centerpieces can be assembled days in advance without risk of wilting or color loss. Furthermore, glass terrariums enclose internal elements neatly, preventing loose glitter or sand from spilling onto table linens during the event.
Step-by-Step Guide
Select a geometric glass terrarium featuring clear glass panes bound by metal seams, measuring seven to nine inches across. Use a small detail brush to paint all external metal seams with brilliant gold liquid leaf paint, taking care to keep lines straight along glass edges. Wipe away any accidental paint splatters from the glass panels immediately using a cotton swab dipped in rubbing alcohol. Fill the bottom interior of the terrarium with a two-inch layer of coarse gold decorative sand mixed with fine gold glitter flakes. Lightly brush liquid adhesive onto the outer leaf tips of three artificial succulent plants, then dip them gently into fine gold craft glitter. Arrange the glitter-tipped succulents firmly into the gold sand base inside the terrarium, positioning the largest succulent centrally for visual balance. Scatter a few polished gold craft pearls or clear glass crystals around the succulents on the sand bed to finish the internal composition cleanly.
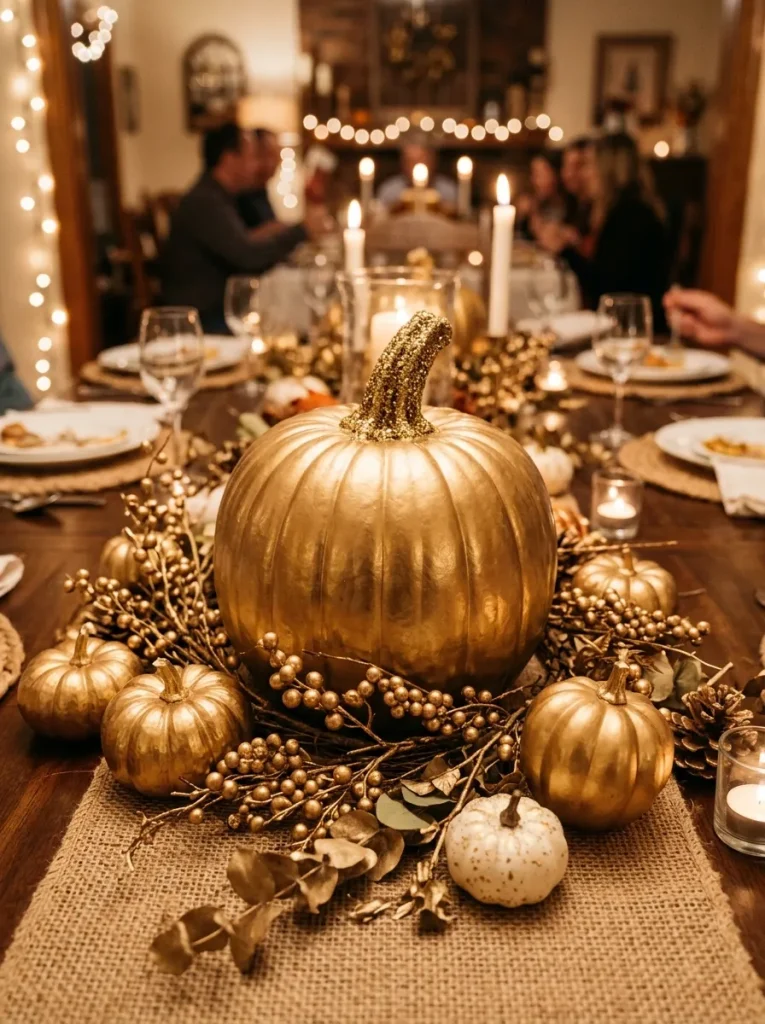
Metallic Gold Pumpkin and Glitter Vine Centerpiece
Setup Method
The metallic gold pumpkin centerpiece offers a seasonal decorative solution ideal for autumn weddings, Thanksgiving banquets, and festive fall harvest parties. By transforming natural or foam pumpkins with full-coverage gold finishes and glitter stems, rustic agricultural symbols become chic party focal points. Arranging a large central gold pumpkin flanked by smaller glittering gourds creates a natural hierarchical grouping that fills horizontal table space effectively. Weaving gold-sprayed artificial ivy, berry garlands, or dried eucalyptus around the pumpkin bases integrates the individual elements into a continuous, flowing centerpiece display. The smooth, rounded surfaces of the pumpkins contrast beautifully with the detailed, textured leaves and sparkling stems surrounding them. This design works exceptionally well on long banquet tables, where the vine framework can extend seamlessly down the table center to connect multiple pumpkin clusters. The sturdy nature of synthetic pumpkins allows hosts to reuse these crafted elements across multiple seasonal events without decay.
Step-by-Step Guide
Select one large central foam pumpkin and two smaller accent gourds, ensuring their surfaces are clean, dry, and free of loose dust. Spray all pumpkins with an initial coat of metallic gold spray paint, applying a second coat after twenty minutes for complete opacity. Paint the top stems of each pumpkin with a thick layer of decoupage glue, extending slightly down onto the main pumpkin shoulders. Coat the wet stems thoroughly with chunky gold glitter, pressing the glitter flakes gently into the glue to ensure strong adhesion. Allow the pumpkins to dry completely for two hours, then apply a misting of clear acrylic sealer over the glittered stems to stop shed. Position the large gold pumpkin in the middle of a woven table runner, placing the two smaller gourds on opposing sides at slight angles. Twine a gold-painted artificial berry garland around the bases of the pumpkins, tucking metallic gold leaves under the edges to complete the harvest display.
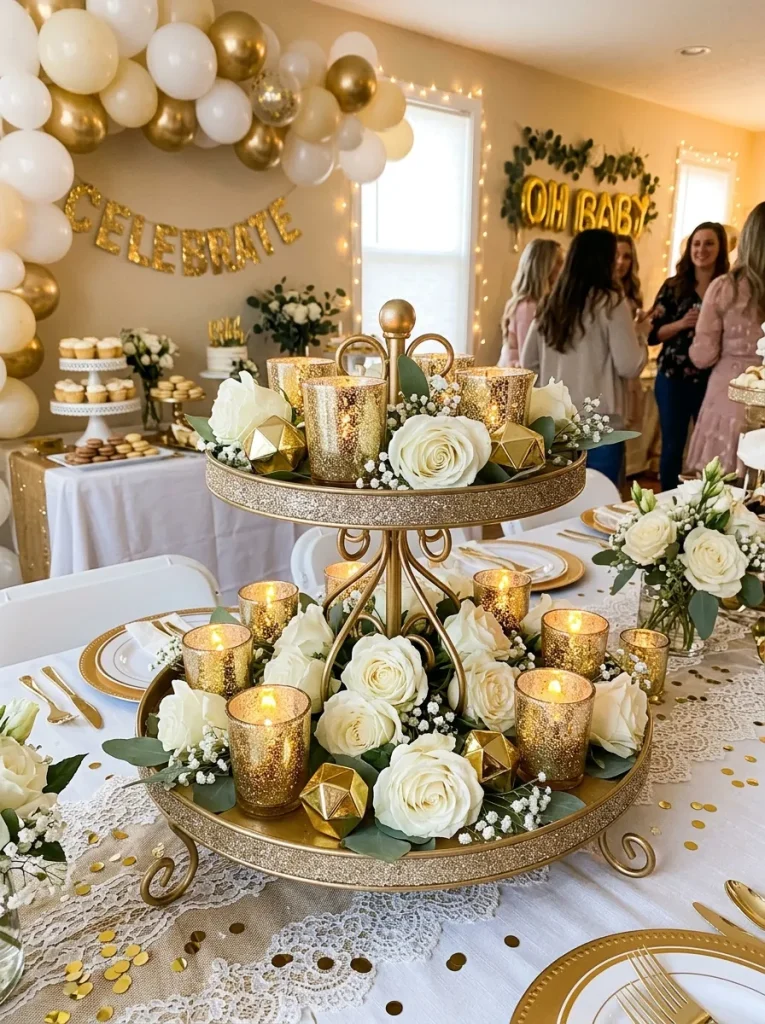
Gold Tiered Tray with Glittered Party Accents
Execution Process
The gold tiered tray centerpiece introduces multi-level visual interest, allowing hosts to combine various small decorative accents into one organized, impactful structure. Utilizing a two-tier or three-tier metal tray painted in metallic gold maximizes vertical space efficiency while keeping table footprints compact. Each tier acts as a display shelf for small glittered elements, such as votive candle holders, golden geometric figures, mini floral clusters, or favor boxes. This approach provides exceptional flexibility, enabling event planners to tailor the internal components precisely to the specific party theme or color scheme. The open architecture of tiered trays ensures light passes through the structure, casting varied metallic reflections across the surrounding table space. Elevating small decorative pieces on multiple levels prevents clutter while establishing a clear sense of abundance and celebration. This centerpiece style is particularly useful for dessert tables, cocktail receptions, and interactive party stations where functional space management is crucial.
Step-by-Step Guide
Obtain a two-tier metal display tray featuring central support rods and round trays, ensuring the structure is fully assembled and stable. Spray the entire tiered tray assembly with two thin, even coats of metallic gold spray paint, allowing thirty minutes of drying time. Apply clear craft glue along the outer rim edges of both tray tiers using a foam brush, taking care not to drip glue onto flat surfaces. Press fine gold glitter along the wet rim edges, creating a sparkling frame around each display platform, then seal with acrylic spray once dry. Line the bottom surfaces of both tiers with round, custom-cut pieces of gold foil cardstock or decorative metallic paper. Arrange four glitter-coated glass votive holders carrying LED tealights across the bottom tier, alternating them with small white rose heads. Place a central geometric gold ornament flanked by two small glittered pinecones or mini floral clusters on the top tier to complete the multi-level arrangement.
Common Beginner Mistakes and How to Avoid Them
Working with metallic paint and loose glitter presents specific crafting challenges that can compromise the durability and appearance of party centerpieces if handled improperly. The most frequent error is skipping surface preparation; applying paint or glue directly over dusty, greasy glass or smooth plastic results in peeling, flaking finishes during transport. Always clean non-porous surfaces with rubbing alcohol and lightly sand slick wood or plastic before applying base coats. Another common mistake is applying heavy, single layers of spray paint, which leads to unsightly runs, drips, and extended drying times; apply multiple light coats instead. Failing to seal glitter after application is another widespread issue that causes loose particles to shed onto dining plates, linens, and guest clothing throughout the event. Fix glitter in place by applying a thorough coat of clear acrylic spray sealer or hairspray once the primary adhesive has dried completely. Additionally, avoid over-saturating delicate artificial flowers or paper elements with heavy metallic paint, which can cause petals to wilt or lose natural structural detail.
Practical Tips for Better Results
Achieving professional-quality metallic gold centerpieces requires specific handling protocols and material choices that maximize shine while minimizing construction mess. Utilize fine-grit glitters for subtle sheen on delicate items like place cards or floral tips, reserving chunky glitters for structural bases and heavy glass containers where strong visual texture is desired. When applying gold leaf flakes, use a dedicated soft, dry mop brush to burnish the foil gently into tacky adhesive without tearing the delicate sheets unevenly. Mix small amounts of clear glass glitter into gold glitter batches to create multi-dimensional light refraction that sparkles under venue spot lighting. Work within a tall cardboard box lined with plastic when spraying paint or applying loose glitter to catch airborne particles and keep crafting areas clean. Assemble centerpieces in modular steps—painting bases first, applying glitter second, and inserting live florals last—to keep moisture from contaminating dry adhesive surfaces. Finally, always test paint and glue compatibility on a small hidden area or scrap material before committing to full-sized centerpiece components.
Styling, Presentation, or Organization Ideas
Integrating metallic gold and glitter centerpieces into cohesive event tablescapes requires thoughtful coordination with surrounding table elements, linens, and room lighting. Pair warm gold centerpieces with dark table runners, such as navy blue, hunter green, or deep burgundy, to create dramatic color contrast that highlights the reflective metallic surfaces. Alternatively, place gold arrangements over crisp white or ivory tablecloths for a clean, classic aesthetic that feels airy and sophisticated. Incorporate low warm-toned candles around high centerpiece bases to project glowing light upward, maximizing the light-diffusing properties of glittered accents. Maintain proper scale by matching centerpiece dimensions to table shapes; select long, linear arrangements like pumpkin vines or bottle trios for rectangular banquet tables, and central circular focal points like bowls or crowns for round tables. Group centerpieces in odd numbers—such as single statements or trios—to establish natural visual balance across large venue spaces. Keep surrounding tableware, such as flatware and charger plates, within complementary warm metallic tones to unify the overall event presentation seamlessly.
Budget or Time Planning
Executing gold and glitter centerpiece projects efficiently demands organized timeline scheduling and smart material sourcing to maintain budget targets. Purchasing base vessels like mason jars, wine bottles, or simple glass bowls from thrift stores or bulk dollar outlets significantly reduces overall production costs. Buy spray paint, adhesives, and glitters in bulk sizes when preparing decor for large events with ten or more guest tables. Allocate creation schedules across multiple days to allow complete drying and curing times between cleaning, priming, glittering, and final floral styling steps. Complete all painted and glittered structural bases up to two weeks before the party date, storing them safely wrapped in tissue paper inside sturdy cardboard boxes. Reserve the day before or the morning of the event exclusively for adding fresh water, live floral stems, or delicate LED candles to prepared containers. Planning time budgets at approximately twenty to thirty minutes of active crafting per centerpiece guarantees high-quality results without forcing rushed, messy assembly right before guests arrive.
Creative Expansion and Advanced Inspiration
Once basic glittering and gilding methods are mastered, decorators can expand their event themes using advanced material combinations and interactive centerpiece designs. Experiment with ombré color transitions, blending metallic gold paint smoothly into metallic rose gold, silver, or champagne tones across tall vase structures. Combine raw natural elements—such as agate slices, geode rocks, or bleached peacock feathers—with gold leaf accents to establish high-end boho-glamour aesthetic themes. Incorporate subtle technology into centerpieces by hiding micro-wire LED fairy lights inside glittered glass vessels or wrapping them around golden branch tree limbs for self-contained illumination. Create interactive table centerpieces by hanging gold-glittered favor boxes or personalized fortune tags from branch arrangements for guests to detach at the end of the evening. Adapt seasonal motifs by swapping internal components across the year, utilizing gold-dusted pinecones for winter holidays, gold-edged palm fronds for summer events, or gilded eggs for spring celebrations. These advanced variations elevate simple craft projects into custom structural art pieces that make events memorable.