
10 Space-Saving Closet office Design Ideas with Floating Shelves
Converting a standard clothes closet into a fully functional home office, widely recognized across popular design boards as a cloffice, represents one of the most efficient spatial transformations for modern living environments. This comprehensive guide details how to turn unused closet space into an ergonomic workstation using floating shelves to maximize vertical storage while minimizing visual clutter. Readers will learn fundamental space planning methods, proper material selection processes, weight distribution principles, lighting integration strategies, and structural mounting techniques needed to build a durable work area. Maximizing tight architectural footprints requires balancing aesthetic appeal with practical functionality, ensuring that every square inch contributes directly to productivity. Whether converting a small hallway reach-in closet or a deep bedroom storage space, implementing built-in vertical elements provides essential organization without sacrificing valuable floor room. This structured DIY tutorial explores step-by-step installation strategies, structural alignment considerations, cable management methods, and aesthetic balancing rules to turn any closet layout into a high-performing workspace tailored for remote work, creative projects, or focused study environments.
The architectural movement toward converting unused closet niches into compact home office stations continues to gain massive momentum as remote work drives the demand for functional, dedicated work zones within limited floor plans. Traditional bulky desks and freestanding bookcases consume excessive square footage, whereas a custom cloffice design utilizes dead vertical wall space to deliver full operational utility without expanding the footprint of a room. Floating shelves play a pivotal role in this design aesthetic by eliminating intrusive support legs, creating clean sightlines, and visually opening up tight architectural recesses. Homeowners, apartment renters, and remote professionals favor this approach because it allows a complete workspace to disappear behind closed doors at the end of the workday, preserving work-life balance within living spaces. Furthermore, this creative project remains highly accessible for DIY enthusiasts of all skill levels, offering an affordable path to modern design without requiring extensive structural remodeling or costly custom cabinetry installations.
Proper planning and precise material selection form the backbone of a successful cloffice conversion project. Before beginning installation, clear the closet space completely, repair any wall imperfections, and apply a coat of high-durability interior paint to establish a clean backdrop. Core materials require sturdy wooden boards, such as solid oak, walnut, or heavy-duty cabinet-grade plywood, cut to the precise dimensions of the closet recess. Essential tools include a high-precision digital level, stud finder, measuring tape, power drill, wall anchors suitable for specific drywall or masonry types, structural wood screws, heavy-duty hidden shelf brackets, and protective safety gear. Careful spatial planning must account for ergonomic clearance, ensuring the primary desk shelf sits at a comfortable typing height between 28 and 30 inches from the finished floor. Additionally, measure electrical access points beforehand, locating the nearest wall outlets or planning concealed wire channels to maintain a clean, organized aesthetic throughout the installation process.
Single-Wall Minimalist Workstation Layout
How to Create
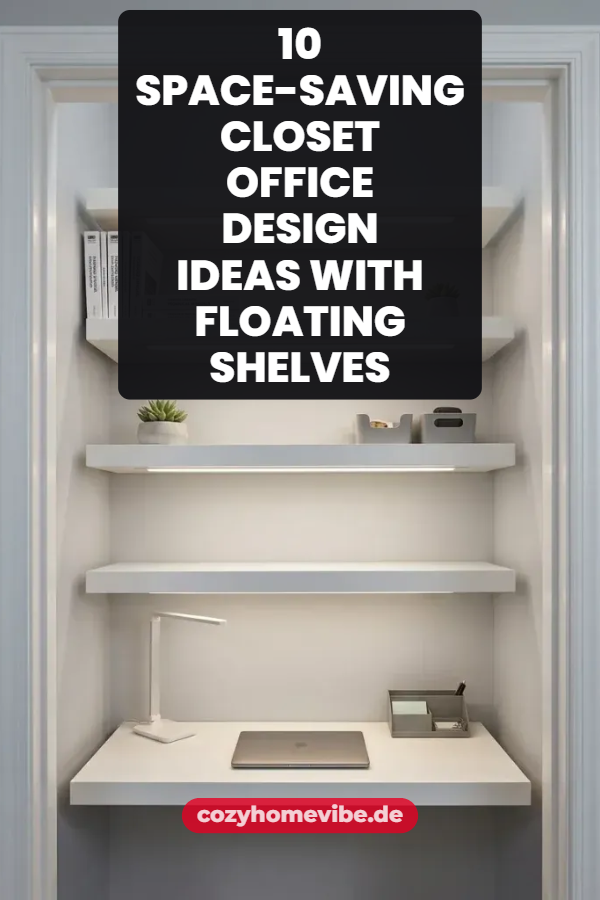
The single-wall minimalist workstation concept focuses on converting a shallow reach-in closet into a streamlined, clutter-free desk space using clean horizontal lines and hidden support hardware. This layout centers around a thick, heavy-duty lower floating desk shelf that acts as the primary work surface, paired with two parallel upper shelves for essential storage and light decor elements. By maintaining consistent shelf depth and selecting a neutral color palette, such as crisp matte white, muted soft gray, or natural light wood tones, the workspace visually recedes into the wall structure, creating an open and airy feel within tight quarters. The absence of visible brackets ensures an uninterrupted design silhouette, making it an ideal choice for compact bedrooms or multipurpose living areas where maintaining visual calmness is essential. Incorporating a flush-mounted LED strip light under the lowest floating shelf illuminates the task area evenly without occupying valuable surface area, delivering high functionality within a minimal footprint.
To build this setup, begin by locating the wall studs along the back and side walls using an electronic stud finder, marking each stud center clearly with a pencil. Install heavy-duty concealed floating shelf rods directly into the studs using structural wood screws, ensuring every mounting point is verified with a long spirit level to guarantee perfect horizontal alignment across the entire width of the closet. Custom-cut the primary desk slab from a dense hardwood board measuring at least 1.5 to 2 inches in thickness and 20 to 24 inches in depth to ensure structural stability without bowing under weight. Drill precise internal channels into the back edge of the wood slab to accept the hidden steel brackets, then slide the shelf securely over the rods until it sits flush against the rear drywall. Repeat this process for the upper floating storage shelves using slightly shallower boards, typically 10 to 12 inches deep, to maintain proper head clearance when seated at the primary desktop surface.
Dual-Tier L-Shaped Corner Workstation
Execution Process
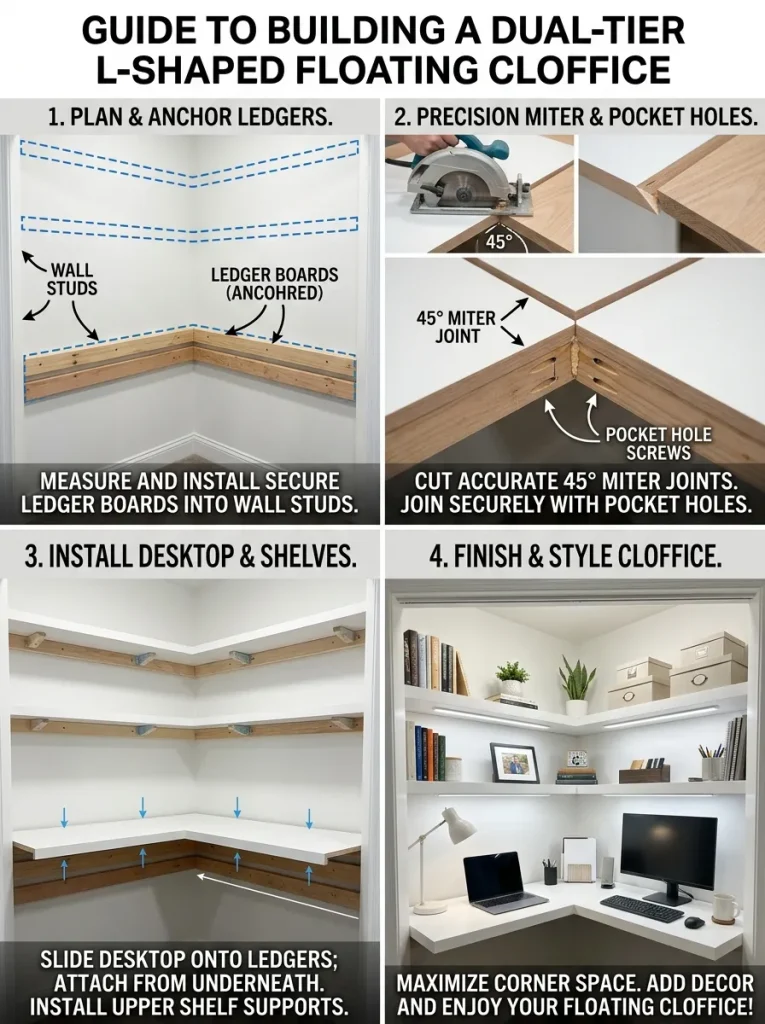
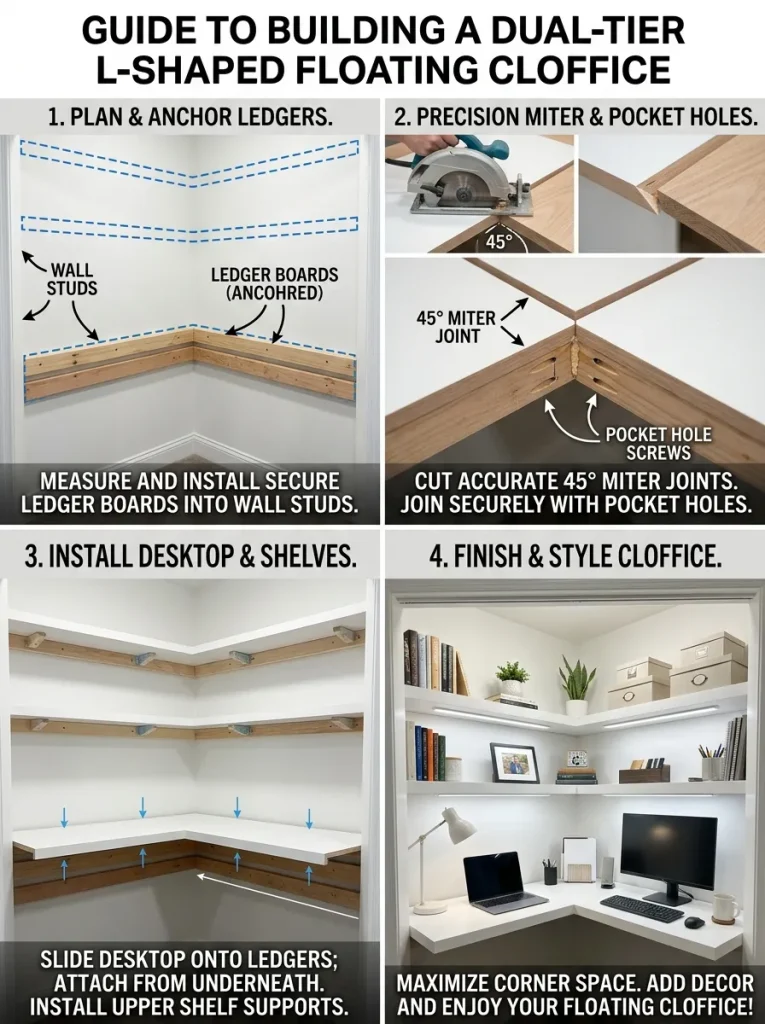
A dual-tier L-shaped corner floating shelf layout transforms a deep closet footprint into an expansive, highly accessible desk system by utilizing both the back wall and one adjacent side wall. This arrangement effectively doubles the available desktop surface area while providing a logical division between primary computing equipment and secondary administrative or paper-based tasks. The continuous lower floating surface wraps smoothly around the corner, supported by interconnected mounting frames that distribute weight evenly across two perpendicular structural walls. Above the main corner desk, off-center dual-tier floating shelves provide dedicated zones for book storage, tech docks, and small decorative items without feeling overwhelming. The asymmetric nature of this design breaks up rigid boxy proportions commonly found in standard closet frames, adding modern architectural character while optimizing every square inch of corner space that traditional straight desks leave entirely unused.
Constructing an L-shaped floating desk system requires setting up robust ledger boards along the back and side wall studs to create a rigid, hidden perimeter rail. Cut two high-grade hardwood boards with precise 45-degree miter joints where they meet in the corner, ensuring a seamless top surface connection without gaps or height variations between the joining panels. Fasten heavy-duty angle brackets into the corner studs directly beneath the meeting point, recessed far enough from the front edge to remain completely invisible from a standard standing perspective. Secure the custom-cut wooden desk surface directly onto the ledger rails using pocket hole screws driven from beneath, locking the mitered seam together with wood glue and internal joinery biscuit biscuits for structural integrity. Follow the same precision miter-cutting technique for the upper corner floating shelves, securing them onto hidden corner support brackets to maintain consistent line alignment throughout the enclosure.
Alcove Built-In Desktop with Tiered Overhead Storage
Step-by-Step Guide
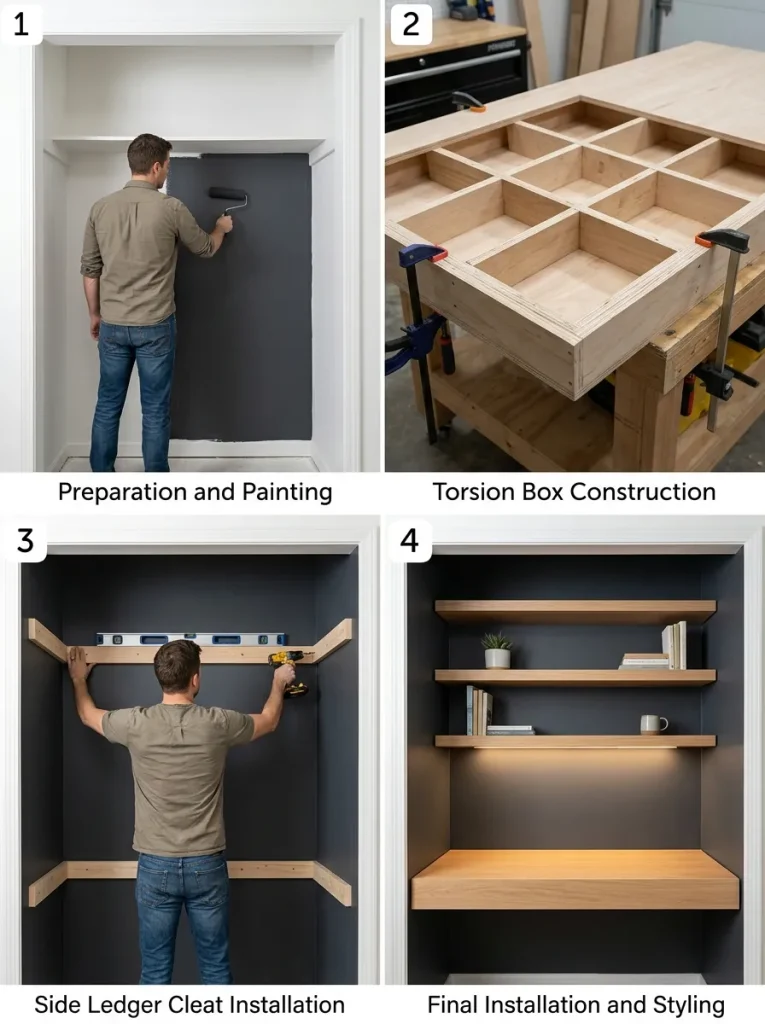
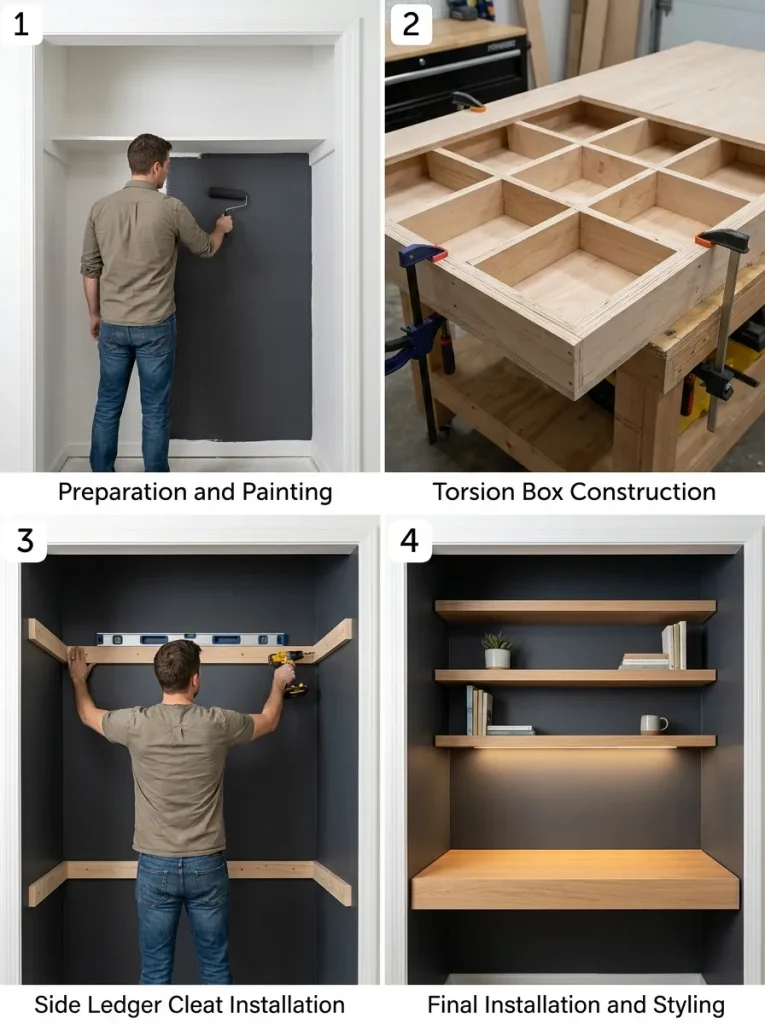
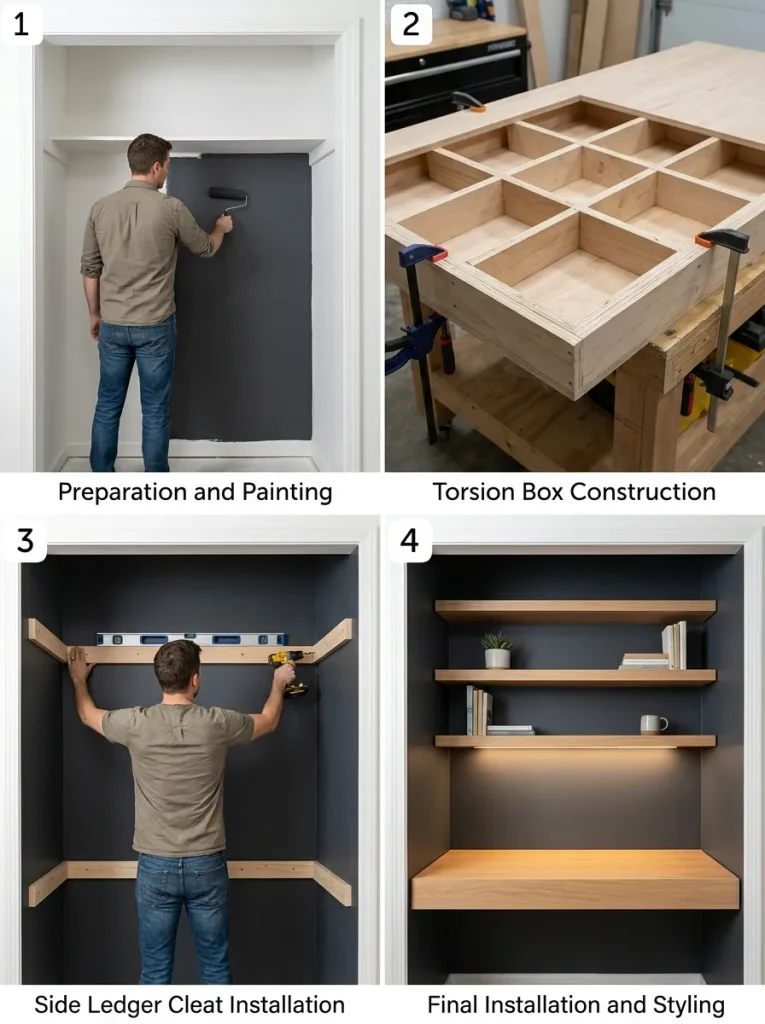
The alcove built-in style maximizes the full internal width of a recessed closet frame by mounting thick floating shelves that span wall-to-wall without any visible side gaps. This structural approach gives the impression of custom high-end architecture, creating a sleek built-in aesthetic that elevates the entire room decor. The focal point is a thick, substantial desk shelf crafted from rich hardwood or stained timber, which serves as a sturdy foundation for monitors, laptops, and desktop accessories. Positioned at calculated intervals above the desk surface, two or three full-width floating shelves establish a tiered visual structure that draws the eye upward, highlighting vertical height rather than narrow width. Painting the back wall of the alcove in a contrasting dark tone, such as deep navy, charcoal, or forest green, adds rich visual depth that makes the floating wood surfaces pop dynamically while creating an intimate, focused work atmosphere.
Begin the installation by taking exact width measurements at three different points across the back wall to account for minor drywall irregularities, custom trimming the wood boards to match these exact dimensions. Mount sturdy wooden or heavy steel ledger cleats horizontally onto the left, right, and back studs at the target desk height, ensuring every piece is completely level and securely anchored. Frame the hollow floating desk shelf using a torsion box structure—a lightweight internal grid sandwiched between thin plywood veneers—which provides exceptional structural rigidity without adding excess weight to the wall assembly. Slide the assembled box shelf over the perimeter ledger cleats, securing it from the underside with countersunk wood screws. For the upper tiered floating shelves, utilize concealed side-support wall channels or blind shelf supports, sliding the custom-cut shelf boards directly into place and sealing any hairline wall gaps with paintable acrylic caulk for a flawless built-in finish.
Vertical Stack Storage with Task Lighting Integration
Setup Method
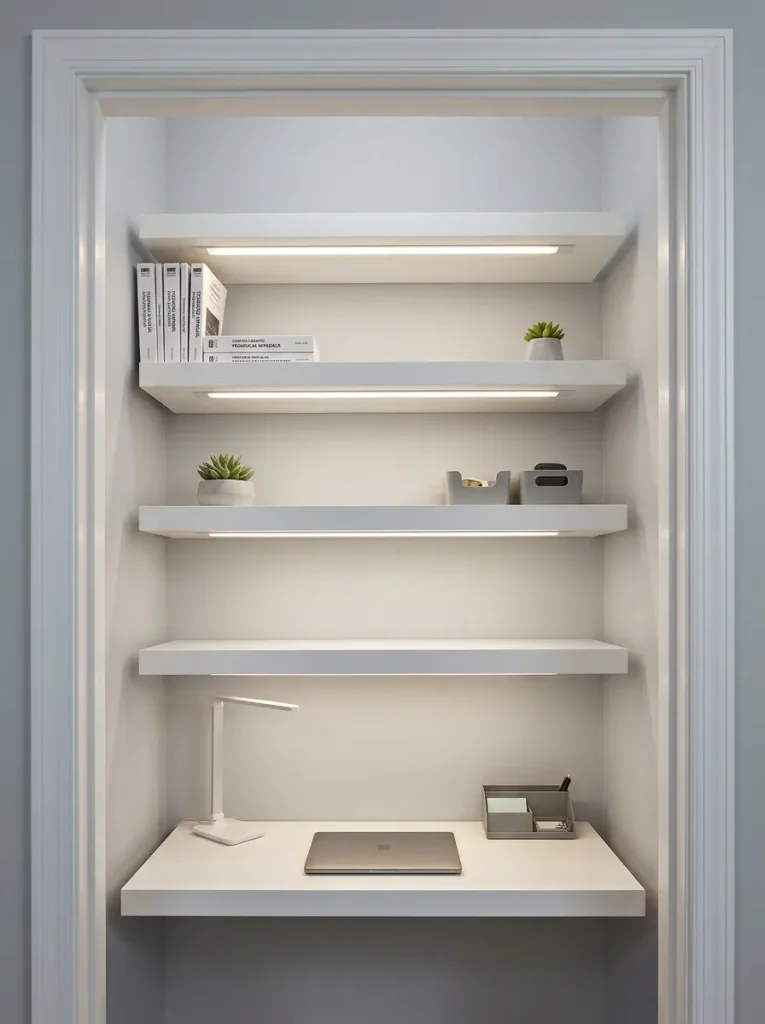
Integrating continuous vertical floating shelves with built-in task lighting creates a high-performance cloffice optimized for small space organization and long work sessions. This design uses four to five evenly spaced floating shelves stacked vertically along the central axis of the closet wall, creating a highly organized ladder effect that maximizes overhead volume. The bottom shelf operates as the main work surface, while each progressively higher shelf houses specific categories of office supplies, files, reference books, and decorative accents. The defining element of this configuration is the complete integration of low-profile LED channel lighting beneath every single shelf level. By casting warm, diffused downward illumination across each surface, harsh shadows are entirely eliminated from the workspace, reducing eye strain while dramatically highlighting the clean horizontal lines of the floating shelf structure.
Execute this build by planning an integrated electrical routing system before mounting any hardware to the wall surfaces. Install a thin vertical cable raceway or chase along the rear wall, or fish low-voltage wiring directly through the drywall cavity behind the proposed shelf locations to power the illumination network. Mount high-grade blind shelf support brackets directly into wall studs at your measured vertical intervals, ensuring precise vertical spacing of approximately 12 to 14 inches between each tier. Channel a shallow groove along the underside of each floating wooden shelf using a handheld router tool, pressing an aluminum LED light track equipped with a frosted diffuser lens flush into the wood channel. Connect the LED tracks to a single hidden low-voltage power supply hidden under the main desk surface, slide the light-embedded shelves onto their corresponding mounting rods, and connect the quick-connect wiring leads behind the wall plates to achieve a seamless, professional lighting installation.
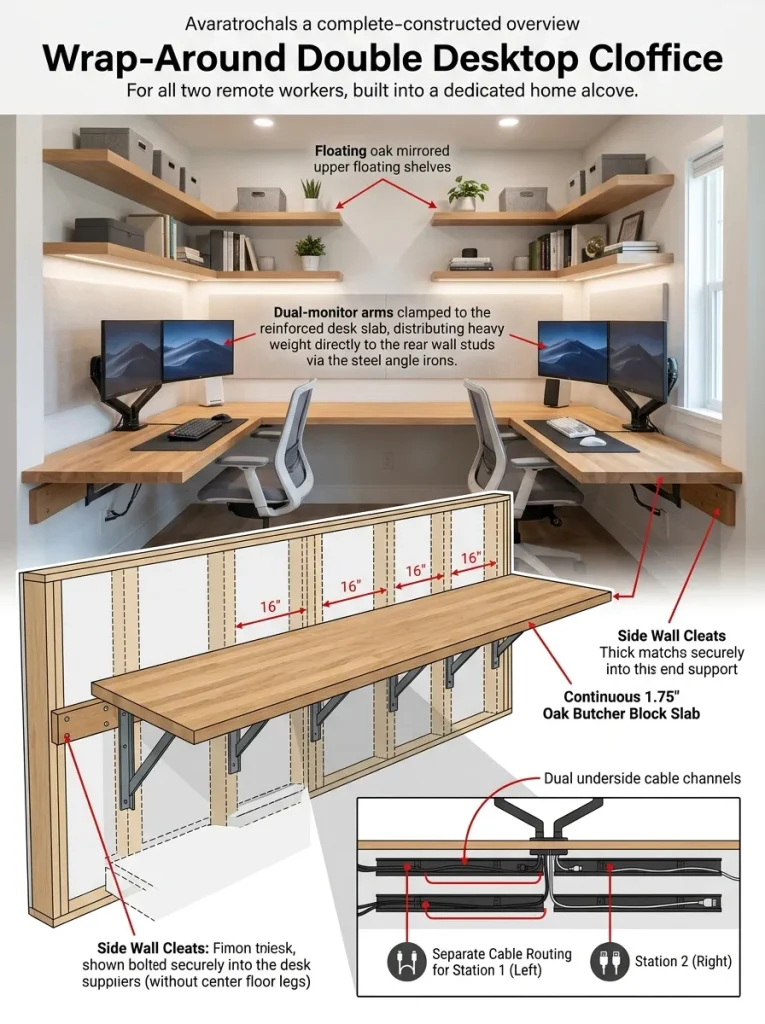
Wrap-Around Double Desktop Cloffice Setup
How to Make
The wrap-around double desktop configuration is engineered specifically for shared remote work environments or individuals requiring two distinct, dedicated work stations within a wide reach-in closet space. This layout utilizes an extra-wide continuous floating desk panel running the full length of the closet, complemented by stacked floating shelves mounted overhead that are divided symmetrically down the center. By removing all central floor supports, two individuals can sit side-by-side on rolling ergonomic chairs without hitting leg obstacles or feeling constrained by desk legs. The floating storage shelves above are organized into mirrored functional zones, giving each user their own independent storage space for books, devices, and personal supplies. This double-station layout converts an underutilized double-door closet into a fully collaborative workstation that functions seamlessly for dual remote-working households.
Start construction by securing a continuous heavy-duty steel angle iron or thick wooden ledger strip along the entire back stud wall at desk height, reinforcing the ends with heavy-duty side wall cleats. Given the wide span of a double closet, install additional heavy-duty concealed support brackets every 16 to 24 inches along the studs to prevent long-term surface sagging under heavy dual-monitor setups. Position two thick, matching solid wood slabs edge-to-edge, joining them with internal steel dowels and structural connector bolts tightened underneath to form an unbroken, perfectly flat continuous desktop. Mount two parallel rows of long floating shelves above the main surface, aligning the brackets with the structural studs to support balanced weight distribution across both workstation halves. Finish the underside of the desk surface with dual cable tray channels mounted near the back wall, ensuring all power strips, monitor cables, and charger wires from both stations remain organized and hidden from view.
Floating Corner Pocket Desk with Pegboard Accent
Execution Process
Combining a compact floating corner desk with an integrated pegboard backdrop creates a modern, highly functional cloffice that excels in organizing small supplies, craft materials, and creative tools. This design utilizes a triangular or trapezoidal floating desk shelf tucked firmly into one side of a deep closet, freeing up the remaining floor space for storage bins, printer stands, or filing cabinets. Directly above the floating desk, a custom wooden or metal pegboard mounts flat against the wall, serving as a flexible vertical hanging system for scissors, headphones, cables, and adjustable mini-shelves. Hanging floating shelves are positioned above the pegboard zone to hold larger items like books, storage boxes, and small potted plants. This multi-layered layout provides exceptional functional diversity, turning a tight closet corner into an aesthetic, highly organized creative hub.
Begin by fitting a triangular support frame constructed from thick hardwood ledger strips into the chosen closet corner, securing it firmly into the corner studs with long lag screws. Cut a solid 1.5-inch thick wooden board into a matching trapezoid shape, smoothing all exposed edges with a router to create a comfortable, ergonomic front edge. Anchor the desk board down onto the support cleats, ensuring the rear corner includes a 2-inch wide cable grommet hole for routing equipment cords beneath the surface. Mount a heavy-duty pegboard panel directly onto the wall space above the desk, using 0.5-inch plastic spacers behind the board to create the structural clearance necessary for peg hooks to snap in smoothly. Install two shallow floating shelves directly above the top edge of the pegboard using concealed steel shelf pins, completing a tight, vertically integrated organization system that keeps every desktop tool within arm’s reach.
Industrial Heavy-Duty Pipe and Floating Wood Shelves
Step-by-Step Guide
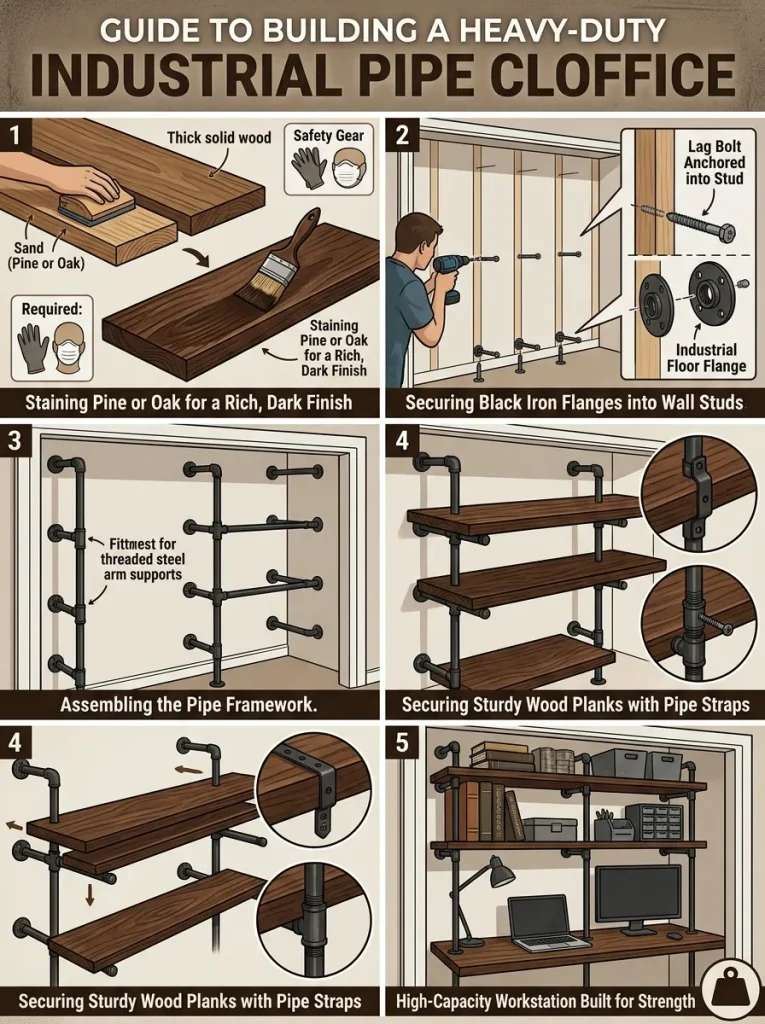
The industrial heavy-duty floating shelf design blends rugged structural elements with modern organic wood textures, offering exceptional weight capacity for heavy book collections and hardware. This style pairs thick, natural-edge or dark-stained lumber panels with sturdy black iron pipe flanges and threaded steel arm supports anchored deep into the wall framework. While traditional floating shelves rely completely on internal pins, this hybrid floating industrial approach uses clean, low-profile pipe arm extensions underneath each wooden shelf, providing an industrial structural aesthetic while supporting massive loads. The contrast between rich wood grain and dark metallic hardware creates an urban loft atmosphere inside a standard drywall closet enclosure. Paired with a matching thick timber desk surface, this setup offers an exceptionally durable, high-load work environment ideal for heavy desktop computers, reference libraries, and professional tech gear.
Begin the process by cutting solid 2-inch thick rough-sawn pine, oak, or reclaimed wood planks to the desired length, sanding the surfaces down with progressively finer sandpaper grits before applying a dark walnut stain and clear protective polyurethane finish. Locate the wall studs accurately and mark structural mounting heights for each shelf level, maintaining strict vertical alignment across all points using a plumb line. Thread heavy-duty industrial iron pipe nipples into matching floor flanges, securing the flange plates firmly into the stud centers with heavy steel lag bolts. Slide the prepared wood planks over the protruding pipe arms, securing the wood from underneath using black iron pipe straps screwed directly into the bottom of the board. Repeat this mounting procedure for the thick main desk surface using larger-diameter steel pipes and reinforced mounting plates, ensuring the complete assembly can safely support high weight loads without flexing.
Minimalist Shallow Depth Laptop Cloffice
Setup Method
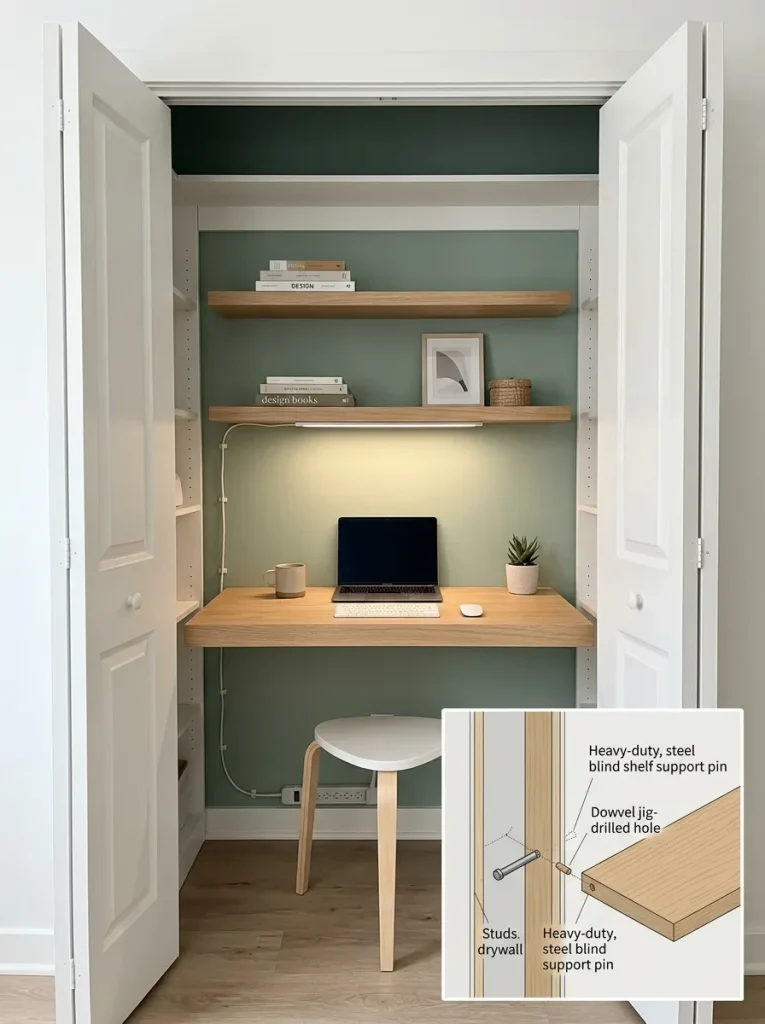
Designed specifically for modern laptop users, students, and light administrative work, the minimalist shallow-depth cloffice prioritizes extreme spatial efficiency and ultra-clean lines. This configuration uses a streamlined floating desk surface that measures only 16 to 18 inches in depth, keeping the workspace remarkably unobtrusive within extremely shallow closet recesses. Above the laptop surface, two ultra-thin, low-profile floating shelves line the upper wall, dedicated to housing flat-profile LED lamps, small notebooks, and minimal decor items. The compact dimensions of the furniture allow standard closet doors—whether sliding, bifold, or swinging—to close seamlessly without clearing off the desk or moving the office chair out of the room. This design is perfect for small apartments where space is limited, providing a fully operational workspace that vanishes when not in use.
To build this lightweight installation, select high-grade 1-inch thick hardwood panels, such as maple, birch, or oak, to keep the shelf profiles slim and visually light. Install concealed steel blind shelf supports horizontally across the back wall studs, ensuring the brackets are precisely leveled across the entire mounting span. Drill corresponding high-precision mounting holes into the rear edge of the slim desk slab using a dowel jig or drill guide to maintain absolute straightness. Slide the wooden desk slab directly onto the steel pins, pushing it tight against the wall surface until the internal locking mechanism snaps into place. Repeat the exact installation technique for the upper shallow floating shelves, maintaining uniform vertical spacing. Finish by running a thin line of color-matched sealant along the wall junction to fill any minor gaps, creating a ultra-sleek, minimalist work surface.
Architectural Recessed Niche Floating Storage
How to Create
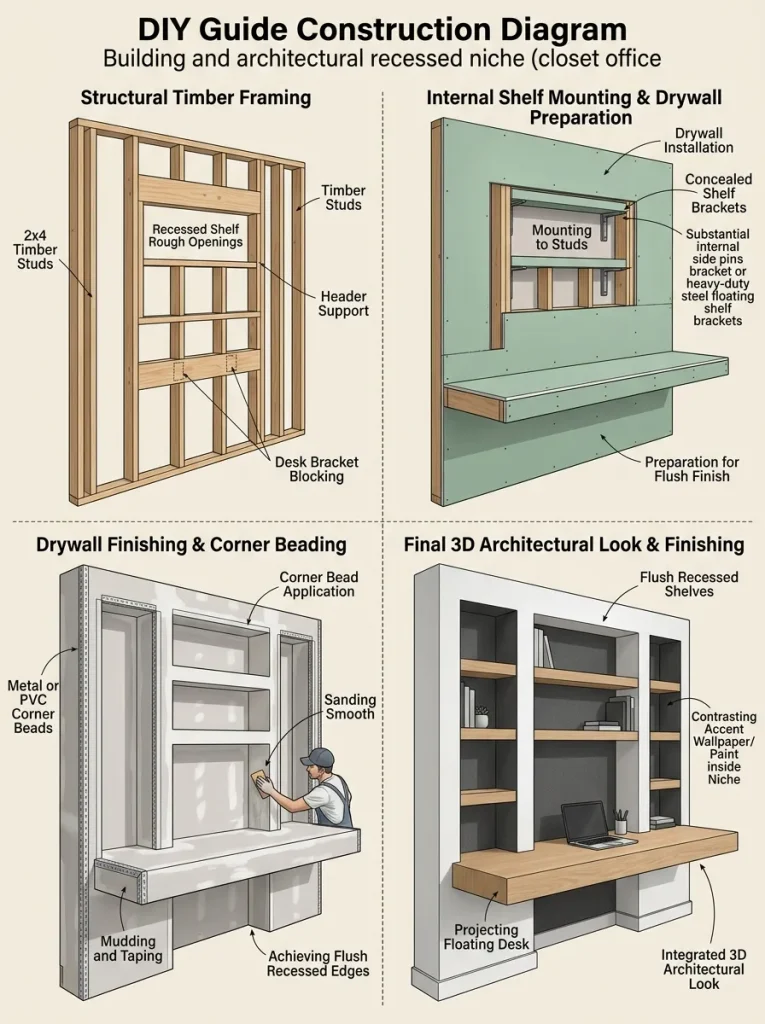
The architectural recessed niche concept approaches cloffice design by embedding floating shelves deep into drywall framing pockets, creating a built-in look with recessed geometric storage. Instead of mounting shelves onto a flat back wall surface, this approach constructs boxed inner frames or utilizes naturally occurring wall alcoves to inset floating wooden platforms directly into the wall structure. The main floating desk projects slightly forward from the wall niche, while upper shelves sit completely flush inside the recessed cavity, framed by clean drywall borders. This creates a striking 3D aesthetic that maximizes floor space while adding architectural interest to plain interior walls. Painting the interior of the niche pockets a contrasting color or applying textured wallpaper introduces visual depth, making the floating shelves look like custom architectural installations.
Building recessed niche floating storage involves constructing or modifying timber stud wall framing to form precise rectangular openings with double-header support beams. Line the internal box framing with smooth drywall panels, taping, mudding, and sanding all corners to create crisp, perfectly square interior alcove pockets. Install heavy-duty concealed mounting pins into the side stud walls within each alcove, ensuring they sit perfectly level across the recess opening. Slide custom-milled hardwood shelf blocks directly onto the side pins so they float seamlessly inside the niche boundaries without visible brackets or exposed fasteners. Position the main desk surface slightly lower than the upper alcoves, anchoring it directly into the structural wall studs with hidden heavy-duty brackets to allow the desk slab to float smoothly forward from the recessed wall niche.
Contemporary Monochromatic Floating Shelf Studio
Execution Process
The contemporary monochromatic floating shelf studio focuses on creating a high-fashion, cohesive visual environment by finishing every element within the closet alcove in a single color tone. Utilizing deep matte black, crisp warm white, or sophisticated warm taupe across the walls, floating shelves, desktop, and mounting hardware creates a seamless visual field that makes small spaces feel expansive. High-grade floating shelves with integrated front lip profiles or bevel-cut edges provide subtle surface depth without cluttering the clean color scheme. This design relies heavily on material textures—combining matte wall paint with satin-finished wooden shelves and subtle metallic desk accents—to create rich visual interest within a unified monochromatic theme. The result is a highly modern home office studio that looks like a professional design installation.
Execute this style by preparing all wall surfaces and wooden shelf components with a high-adhesion interior primer, followed by two coats of premium cabinet-grade enamel paint in your chosen color. Install heavy-duty hidden steel shelf channels into the wall studs using heavy structural screws, double-checking all measurements with a digital level to ensure exact horizontal positioning. Mount custom-fabricated floating box shelves—constructed with 45-degree mitered corners and hollow internal cores—directly onto the steel channels until they lock flush against the back wall. Apply a bead of paintable caulk along all seams where the shelves meet the wall, then apply a final topcoat of matching paint over the caulk lines to merge the floating shelves into the wall background. Complete the monochromatic workspace by installing concealed underside LED channels outfitted with black or white aluminum housings matching your chosen color scheme, casting an even glow across the integrated workstation.
Common Beginner Mistakes and How to Avoid Them
One of the most frequent errors made during a cloffice floating shelf installation is relying solely on drywall anchors rather than securing mounting brackets directly into solid wall studs. Floating shelves, especially primary desk surfaces subject to leaning weight and heavy equipment, require rigid structural anchoring; unreinforced drywall anchors will inevitably sag, loosen, or fail completely over time. Another common oversight is failing to verify exact wall squareness and levelness before cutting materials. Closet walls in both older and modern homes are rarely perfectly plumb, meaning straight-cut boards can leave noticeable gaps along the sides or rear edges. Always measure wall contours using a scribe tool or template before making final cuts on expensive hardwood boards. Additionally, neglecting cable management planning during the structural phase often leads to messy power strips and tangled cords across the finished workspace. Plan cord pass-through grommets, routed wire channels, and recessed outlet boxes before mounting shelves to ensure clean electrical integration.
Practical Tips for Better Results
Achieving professional-grade results on a cloffice conversion requires careful attention to detail during the preparation, structural mounting, and finishing stages. Utilize dense, stable wood species like maple, oak, walnut, or high-density cabinet-grade plywood with hardwood edge banding, avoiding soft construction-grade lumber that warps or bows under ambient humidity changes. When installing hidden bracket systems, use a long spirit level or cross-line laser level to verify that all mounting pins sit along a perfectly flat horizontal plane across the closet width. Countersink all underside structural screws and fill fastener holes with matching wood putty before applying final stains or sealants to maintain smooth, invisible joinery. To protect working surfaces from daily wear, apply at least three coats of durable polyurethane or hardwax oil to the primary desk shelf, sanding lightly between coats with fine-grit sandpaper. Finally, install soft felt padding along the edges of rolling office chairs to protect surrounding wall surfaces and baseboards within tight closet quarters.
Styling, Presentation, or Organization Ideas
Proper styling and systematic organization are essential to keep a compact cloffice clutter-free and visually appealing. Group office supplies into uniform, opaque storage boxes or woven baskets placed on higher floating shelves, keeping loose visual items hidden from view. Arrange books using heavy bookends or lay them horizontally in small organized stacks to create varied visual height across upper shelf tiers. Integrate functional decorative items, such as a compact analog clock, a small framed art print, or low-maintenance indoor plants like pothos or succulents, to introduce warm organic textures into the functional work space. Utilize the vertical wall area between the desk surface and the first floating shelf by mounting a magnetic memo board, cork strip, or linear brass rail for hanging active notes, task lists, and calendars. Keep the primary floating desktop as clear as possible by elevating computer monitors on slim desktop risers or mounting monitor arms directly onto the rear wall framework.
Budget or Time Planning
Executing a DIY cloffice floating shelf transformation efficiently requires balancing material investments with a clear project schedule. A standard conversion project typically spans a single weekend, with wall preparation, painting, and structural bracket mounting taking place on the first day, followed by shelf fitting, surface finishing, and cable routing on the second. From a budget perspective, using high-grade cabinet plywood with iron-on hardwood edge banding offers a cost-effective alternative to expensive solid hardwood slabs, delivering a premium look at a fraction of the cost. Sourcing standard hidden steel mounting rods and off-the-shelf LED channel lighting kits further keeps costs manageable without compromising on structural strength or modern visual appeal. Prioritize spending on heavy-duty bracket hardware and durable surface finishes, as these components directly impact the lifespan and safety of the installation. Proper tool preparation and accurate initial measurements prevent costly material waste, keeping the entire renovation within reasonable time and financial parameters.
Creative Expansion and Advanced Inspiration
For home renovators looking to take their cloffice project to an advanced level, incorporating custom architectural elements can dramatically elevate the final result. Consider installing full-height sliding barn doors, folding wooden louvers, or sleek pocket doors to completely conceal the workstation when off the clock. Incorporating smart home automation—such as motion-activated underside LED shelf lights, touchless desk switches, or integrated wireless phone charging pads embedded directly beneath the wooden desktop surface—adds high-tech convenience to a compact space. Advanced woodworkers can integrate shallow, push-to-open flush drawers into the underside of the main floating desk shelf, adding hidden storage for pens, laptops, and paperwork without affecting the clean floating line. Extending the wood paneling from the desk up the back wall to create a continuous floor-to-ceiling timber accent wall establishes a high-end custom feel, turning a basic storage closet into an architectural centerpiece within the home.