

10 Kandi Ideas Easy
Kandi crafts are colorful handmade accessories created using plastic pony beads and elastic string. These accessories are widely associated with creative DIY projects because they are simple to assemble, customizable, and visually expressive. Many Pinterest ideas highlight kandi designs as beginner friendly crafts that allow people to create bracelets, rings, and decorative bead patterns using basic materials. The term “kandi” commonly refers to beaded jewelry often exchanged at festivals or used as colorful accessories. However, kandi projects are also popular in everyday craft activities because they encourage creativity, pattern recognition, and color coordination. The process typically involves threading beads onto elastic cord in different sequences to create unique patterns. Because the materials are lightweight and inexpensive, kandi crafts are accessible for beginners, children, and hobbyists interested in simple handmade decoration projects. These designs can range from minimal single-strand bracelets to small decorative shapes formed through bead weaving techniques. Pinterest inspiration boards frequently feature easy kandi projects because they are quick to assemble and allow for endless variations in color and style. By following clear step by step methods and organizing materials carefully, anyone can create aesthetic kandi accessories that reflect personal creativity.

Why Easy Kandi Crafts Continue to Trend on Pinterest
Easy kandi crafts remain popular on Pinterest because they combine creative expression with accessible DIY techniques. Many people look for craft ideas that can be completed quickly while still producing visually appealing results. Kandi projects meet this requirement because the materials are simple and the assembly process is straightforward. Pinterest searches often highlight beginner friendly crafts that do not require advanced tools or complex techniques. Pony beads and elastic string are widely available and easy to work with, which makes kandi crafts a practical creative project for all skill levels. Another reason for their popularity is customization. Kandi designs allow individuals to experiment with color patterns, letter beads, and geometric arrangements to produce unique accessories. This flexibility encourages experimentation and creativity. Additionally, kandi projects can be completed individually or as group activities, making them suitable for craft workshops, school projects, or casual hobby sessions. The process of threading beads also helps improve hand coordination and focus, particularly for younger crafters. Because of these advantages, easy kandi ideas continue to appear frequently in Pinterest inspiration boards and DIY tutorials focused on colorful handmade accessories.
Materials and Preparation for Easy Kandi Craft Projects
Preparing the correct materials before starting a kandi project helps ensure smooth assembly and consistent results. The most essential material used in kandi crafts is pony beads, which are small plastic beads with large holes designed for easy threading. These beads are available in a wide range of colors, allowing creators to design patterns and decorative shapes. Elastic cord is typically used to string the beads together because it stretches easily and holds the accessory comfortably when worn. Additional materials may include letter beads, small charms, scissors, and bead organizers. Before beginning the craft process, sorting beads by color can make pattern creation easier. Organizing beads in small containers prevents them from rolling away during the project. Measuring the correct length of elastic cord is another important preparation step. For bracelets, a cord length of approximately eight to ten inches usually allows enough space for threading beads and tying a secure knot. After cutting the cord, placing a temporary knot or bead stopper at one end prevents beads from slipping off while assembling the design. With organized materials and careful preparation, kandi projects become simple and enjoyable creative activities.
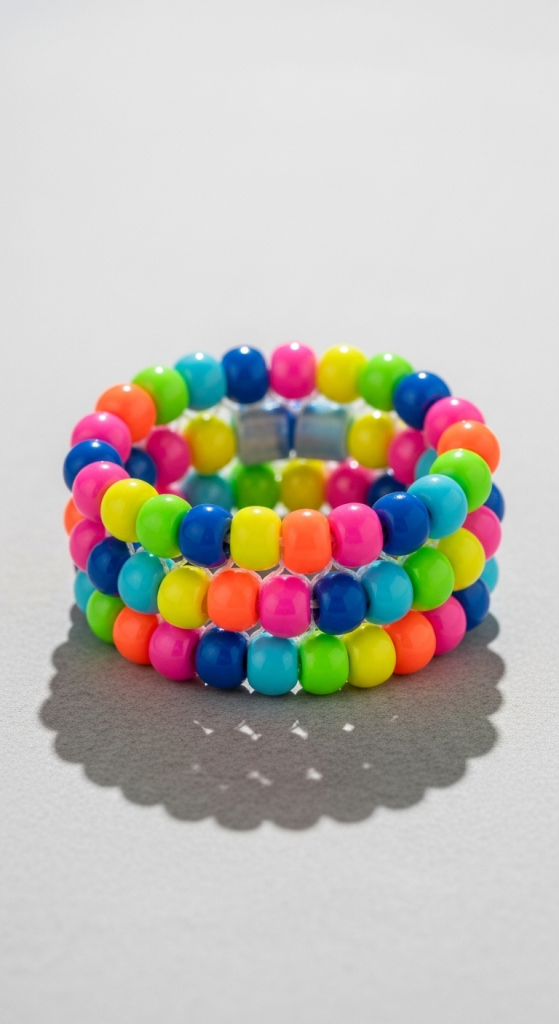
Classic Single Strand Kandi Bracelet
Step-by-Step Guide
The single strand kandi bracelet is one of the easiest and most recognizable kandi designs. This project introduces beginners to basic bead threading while allowing creativity through color patterns. To create this bracelet, begin by cutting a piece of elastic cord approximately nine inches long. Tie a small knot at one end or attach a bead stopper to prevent beads from slipping off the string. Next, choose several pony beads in colors that complement each other. Thread the beads onto the cord one by one. Many crafters create repeating patterns such as alternating colors or simple gradients. Continue adding beads until the bracelet length fits comfortably around the wrist. Leave a small amount of cord at the end to tie the final knot. Once the desired length is reached, tie a secure double knot to close the bracelet. Trim any excess cord if necessary. This design remains popular in Pinterest DIY tutorials because it is quick to assemble and allows endless variations through color combinations. The single strand bracelet also serves as a foundation for learning more advanced kandi techniques later.
Simple Letter Bead Message Bracelet
How to Create
Letter bead bracelets allow crafters to personalize their kandi accessories with short words or phrases. This project follows the same basic threading technique used in standard bracelets but includes alphabet beads as decorative elements. Begin by cutting elastic cord and securing one end with a temporary knot. Select pony beads that complement the color of the letter beads. Start threading beads onto the cord until you reach the position where the message will appear. Then add the letter beads in the correct order to spell a word such as “LOVE,” “HAPPY,” or a name. After placing the letters, continue threading colored beads until the bracelet reaches the desired length. Tie the cord securely with a double knot and trim the excess string. Letter bead bracelets are popular Pinterest inspiration projects because they combine personalization with simple crafting techniques. These bracelets are often exchanged as handmade gifts or used as colorful accessories that reflect individual style.
Easy Kandi Ring Design
Execution Process
Kandi rings are small accessories created using a short loop of beads arranged in a circular pattern. This project requires fewer beads than a bracelet and can be completed quickly. To create a kandi ring, cut a small piece of elastic cord approximately four inches long. Thread several pony beads onto the cord until the strand fits comfortably around a finger. Once the correct length is reached, tie the ends together with a tight double knot to form a circular loop. For added decoration, a larger bead or charm can be placed at the center of the ring before tying the knot. This bead becomes the focal point of the design. Because kandi rings require minimal materials and time, they are commonly featured in beginner friendly Pinterest tutorials. The small scale of the project makes it ideal for practicing bead threading and experimenting with color combinations.
Color Gradient Kandi Bracelet
How to Make
Gradient bracelets create a smooth transition between different bead colors. This design focuses on arranging colors gradually from one shade to another. Begin by selecting several bead colors that belong to the same color family, such as light blue, medium blue, and dark blue. Cut the elastic cord and secure one end. Start threading beads from the lightest color and gradually introduce darker shades as the bracelet grows. This step by step color transition creates a gradient effect that looks visually balanced. Continue threading beads until the bracelet reaches the correct length. Tie the ends of the cord together securely and trim any excess string. Gradient bracelets are widely shared on Pinterest because they demonstrate how simple color planning can transform a basic kandi design into a visually appealing accessory.
Two Color Pattern Kandi Bracelet
Setup Method
Two color pattern bracelets use alternating bead colors to create a repeating design. This project introduces simple pattern organization while remaining easy for beginners. To begin, select two contrasting bead colors. Cut the elastic cord and secure one end with a knot. Start threading beads in an alternating sequence such as red, blue, red, blue. This consistent pattern creates a balanced visual rhythm throughout the bracelet. Continue the pattern until the bracelet reaches the appropriate length for the wrist. Tie the cord with a secure knot and trim the excess. Two color pattern bracelets remain popular DIY projects because they demonstrate how simple repetition can produce attractive results without requiring complicated bead weaving techniques.
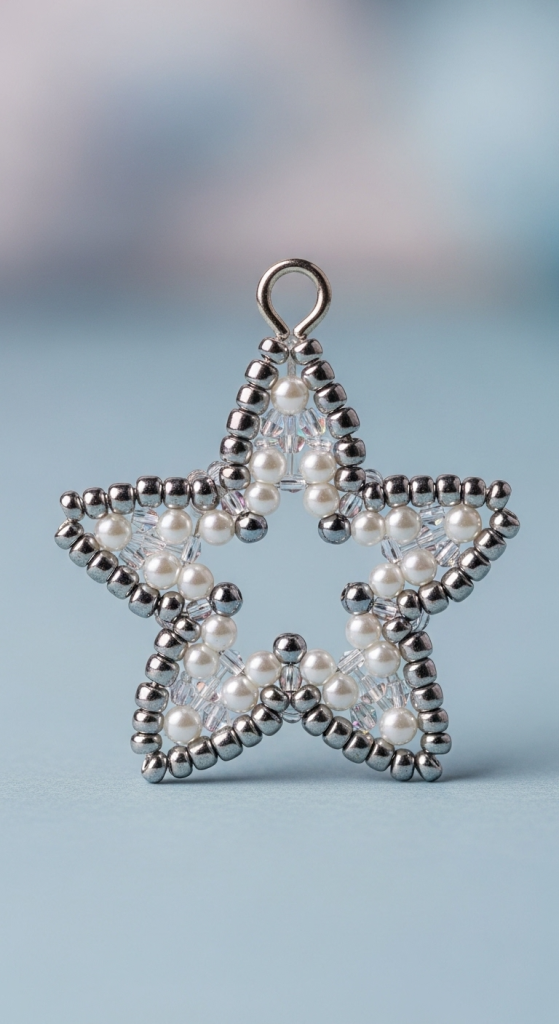
Small Beaded Star Charm

Step-by-Step Guide
A beaded star charm adds decorative detail to kandi accessories. This project involves arranging beads into a star shape using a short piece of elastic cord or thin string. Begin by threading five beads onto the cord and forming a circular loop. Tie the ends together securely. Next, add additional beads between each original bead to create pointed star shapes. Continue threading the cord through the beads until the star structure becomes stable. Once the shape is complete, attach the charm to a bracelet or keychain using a small loop of string. Star charms are often included in Pinterest kandi inspiration because they provide a decorative element that can enhance simple bead accessories.
Simple Kandi Keychain

How to Create
Kandi keychains transform bead designs into functional accessories. To create a keychain, begin by cutting a piece of strong elastic cord or thin nylon thread. Attach one end of the cord to a keyring before threading beads. Choose colorful pony beads and thread them onto the cord to create a short strand. Patterns such as stripes or alternating colors work well for keychains. Once the desired length is reached, tie the cord securely and attach it to the keyring. Keychains are practical kandi projects because they combine decoration with everyday utility. Pinterest DIY tutorials often highlight keychains as quick creative projects that require only a small number of beads.
Flower Shape Kandi Design

Execution Process
Flower shaped kandi designs introduce basic bead weaving techniques. To create a simple flower, thread six beads onto the cord and form a loop. These beads act as the flower petals. Next, thread a contrasting bead through the center of the loop to represent the flower’s center. Tighten the cord so the petals form a circular flower shape. Secure the cord with a knot and attach the flower to a bracelet or necklace. Flower designs add decorative variety to kandi accessories and remain popular in Pinterest inspiration collections focused on handmade bead crafts.
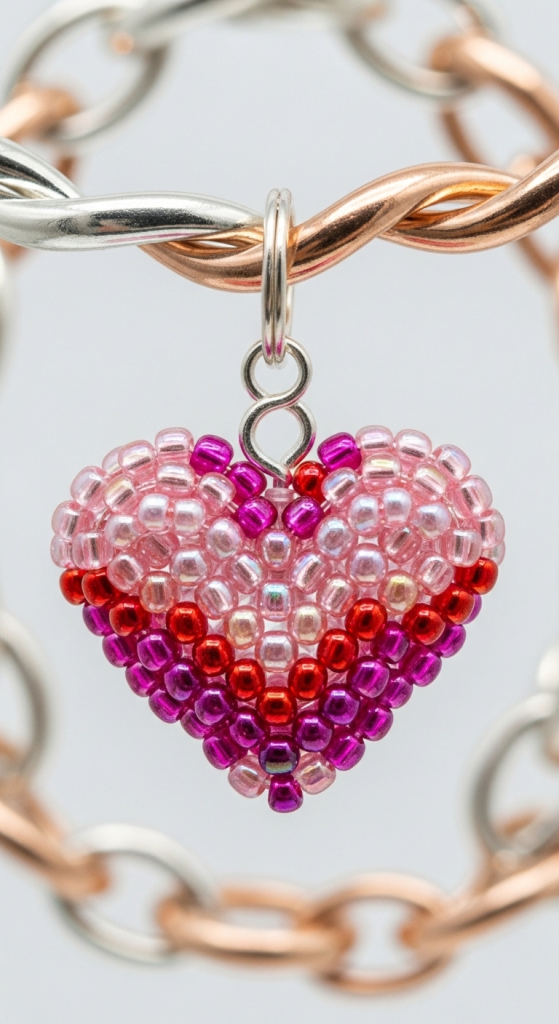
Mini Beaded Heart Charm

How to Make
Heart charms are small kandi decorations often used in bracelets or keychains. Begin by threading beads in a curved pattern that forms the outline of a heart. This typically involves creating two small loops that join at a point at the bottom. Once the heart shape is formed, tighten the string and secure it with a knot. The finished charm can be attached to elastic bracelets or used as a decorative accessory. Heart charms are frequently featured in Pinterest craft ideas because they represent simple symbolic shapes that can be created using only a few beads.

Setup Method
Spiral pattern bracelets create a twisting visual effect by repeating color sequences. To make this design, begin by selecting three bead colors. Thread the beads onto elastic cord in a repeating pattern such as red, blue, yellow. As the bracelet forms, the repeating sequence creates a subtle spiral appearance around the bracelet. Continue adding beads until the bracelet reaches the desired length. Tie the cord securely and trim excess string. Spiral bracelets demonstrate how simple color sequencing can produce dynamic visual effects without requiring advanced techniques.
Common Beginner Mistakes in Kandi Crafting
One common mistake when creating kandi accessories is cutting the elastic cord too short. Insufficient cord length makes threading beads difficult and leaves little space for tying secure knots. Another issue involves inconsistent bead patterns that disrupt the visual balance of the design. Planning color sequences before threading beads helps maintain consistency. Loose knots are another frequent problem. A double knot or surgeon’s knot provides stronger closure and prevents bracelets from breaking.
Practical Tips for Creating Durable Kandi Designs
Durability is important for wearable kandi accessories. Stretching the elastic cord slightly before threading beads helps reduce tension after the bracelet is completed. Reinforcing the final knot with clear glue can also improve longevity. Organizing beads by color in small containers prevents confusion during pattern creation. Using smooth, evenly sized beads ensures that the bracelet remains comfortable to wear.
Presentation and Organization Ideas for Kandi Accessories
Finished kandi designs can be displayed in creative ways. Bracelets and rings can be arranged on jewelry stands or stored in small containers to keep them organized. Keychains and charms can be attached to bags or displayed on hooks. Keeping completed designs organized allows crafters to experiment with new patterns while preserving earlier creations.
Expanding Creative Possibilities with Advanced Kandi Projects
As experience with kandi crafts grows, more complex designs can be explored. Multi strand bracelets, bead weaving patterns, and 3D bead shapes offer additional creative opportunities. These projects build on the same basic techniques used in beginner kandi crafts while introducing new levels of detail. By experimenting with color combinations and patterns, crafters can continue developing unique handmade accessories inspired by Pinterest DIY creativity.